How to use live transcription in Notes on iOS 18, iPadOS 18, and macOS Sequoia

Get Free Scanner and check your computer for errors
Fix It NowTo fix found issues, you have to purchase the full version of Combo Cleaner. Free trial available. Combo Cleaner is owned and operated by Rcs Lt, the parent company of PCRisk.com read more.
A complete guide to using live transcription on your iPhone, iPad, and Mac
Live transcription is perfect for meetings, lectures, or brainstorming sessions. It helps you capture everything without needing to write it down manually, ensuring you get all the details.

This feature turns spoken words into written text in real time, making it easy to review and reference later. It enhances productivity by allowing you to focus on the conversation without the distraction of taking manual notes.
With just a few taps, you can easily generate live transcriptions directly within the Notes app in iOS 18, iPadOS 18, and macOS Sequoia, making it a convenient tool for both personal and professional use.
Video on How to use live transcription in Notes on iOS 18, iPadOS 18, and macOS Sequoia
Table of Contents:
- Introduction
- Generate live transcriptions on iPhone and iPad
- Generate live transcriptions on Mac
- Video on How to use live transcription in Notes on iOS 18, iPadOS 18, and macOS Sequoia
Download Computer Malware Repair Tool
It is recommended to run a free scan with Combo Cleaner - a tool to detect viruses and malware on your device. You will need to purchase the full version to remove infections. Free trial available. Combo Cleaner is owned and operated by Rcs Lt, the parent company of PCRisk.com read more.
Generate live transcriptions on iPhone and iPad
The Notes app on iOS 18 or iPadOS 18 has a great feature for live transcription, perfect for meetings or lectures. Here are simple steps to get started:
1. Launch the Notes app on your iPhone or iPad.
2. Tap the pen icon at the top-right corner to create a new note, or tap on an existing note to open it.

3. Tap the paperclip icon in the toolbar to open the attachment menu.
4. Choose the "Record Audio" option from the attachment menu.
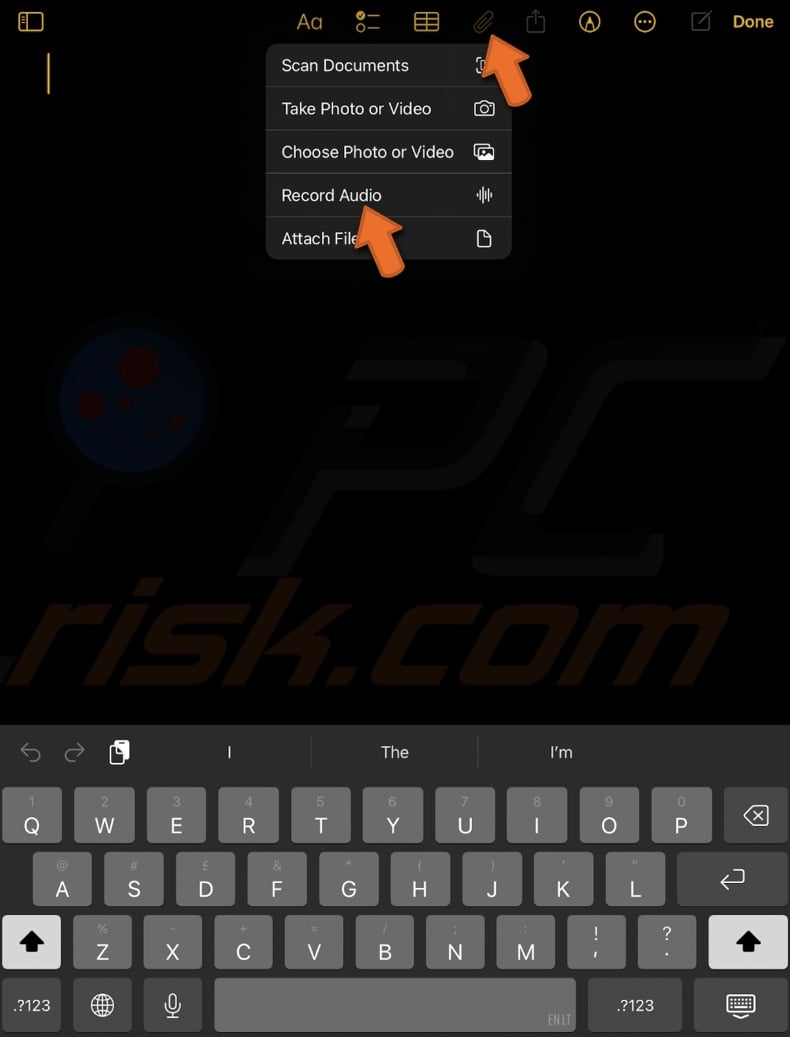
5. Start recording. You'll see an interface similar to the Voice Memo app. Tap the red circular button to start recording.
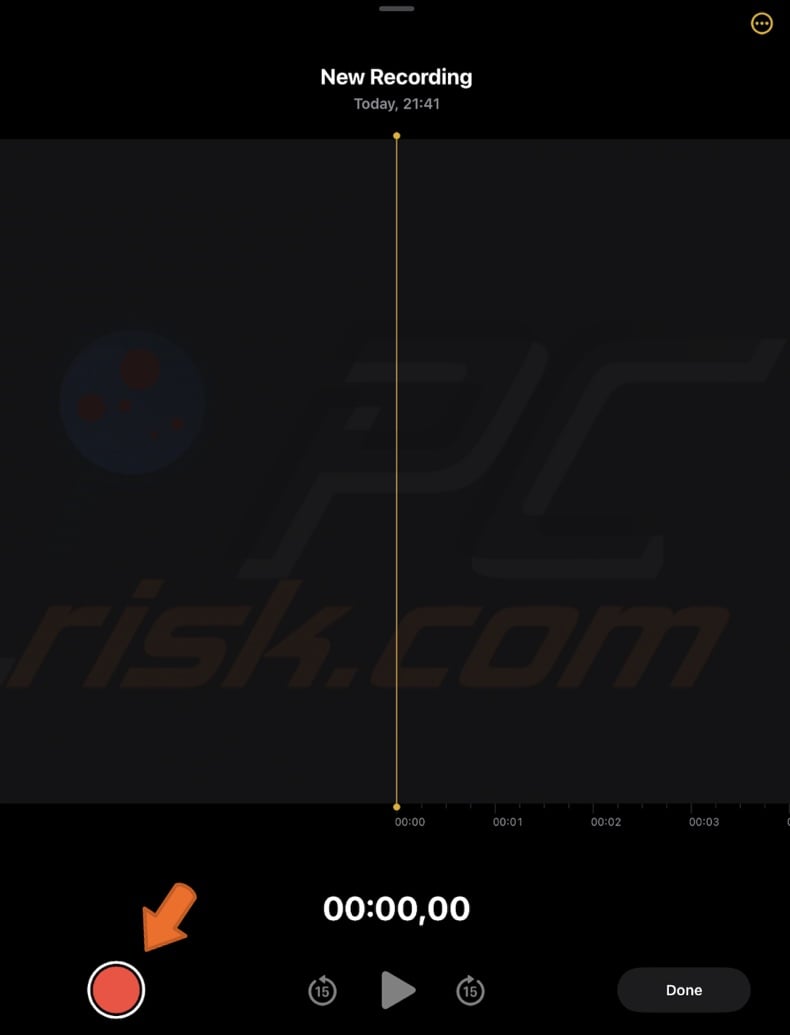
6. Speak directly into your device or record external audio like a meeting or lecture.
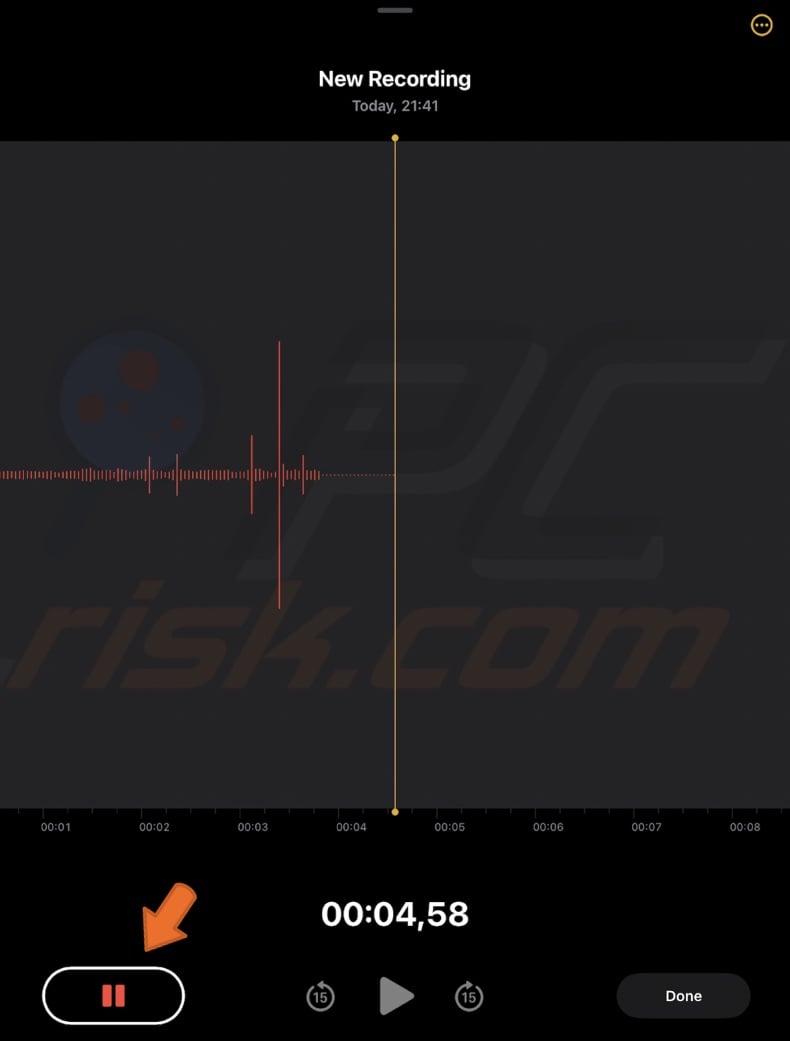
7. Tap the red pause button with two vertical lines to pause.
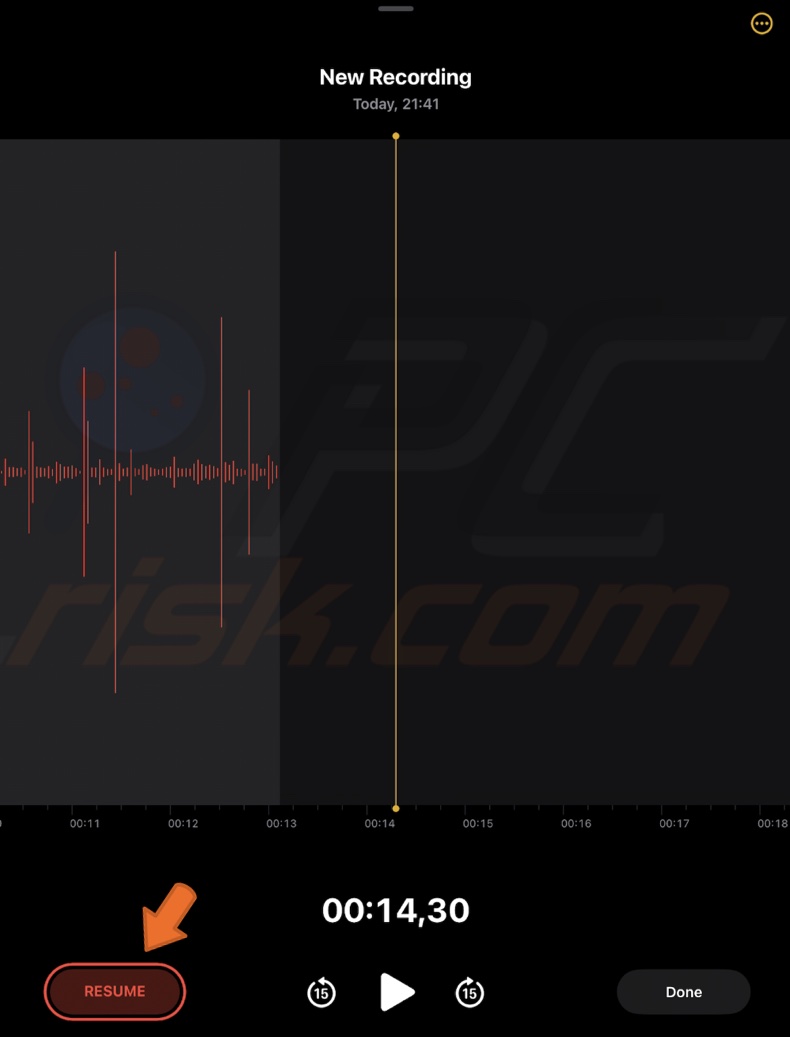
8. Resume recording by tapping the Resume again.
9. When you're done, tap "Done".
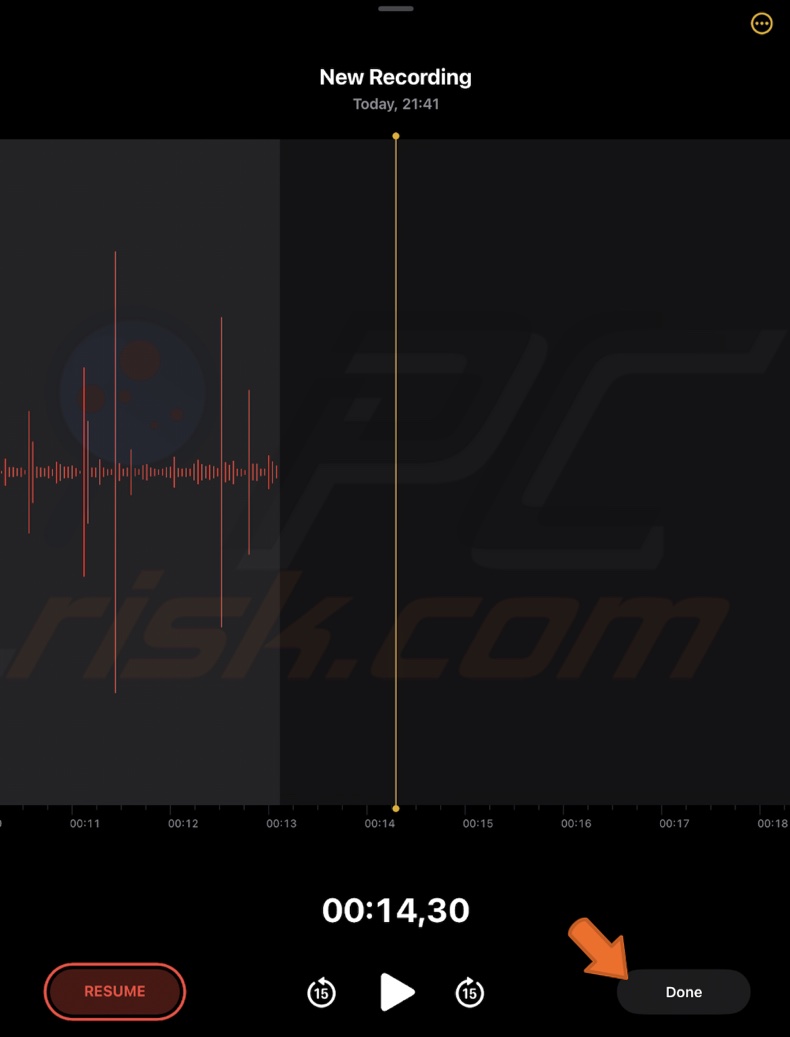
10. After a few seconds, a transcription preview will appear. Select it.
11. Tap the yellow quotation box button in the bottom-left corner to see the full transcription.
12. To manage your transcription, tap the three-dots icon to add the transcript to your note or copy it.
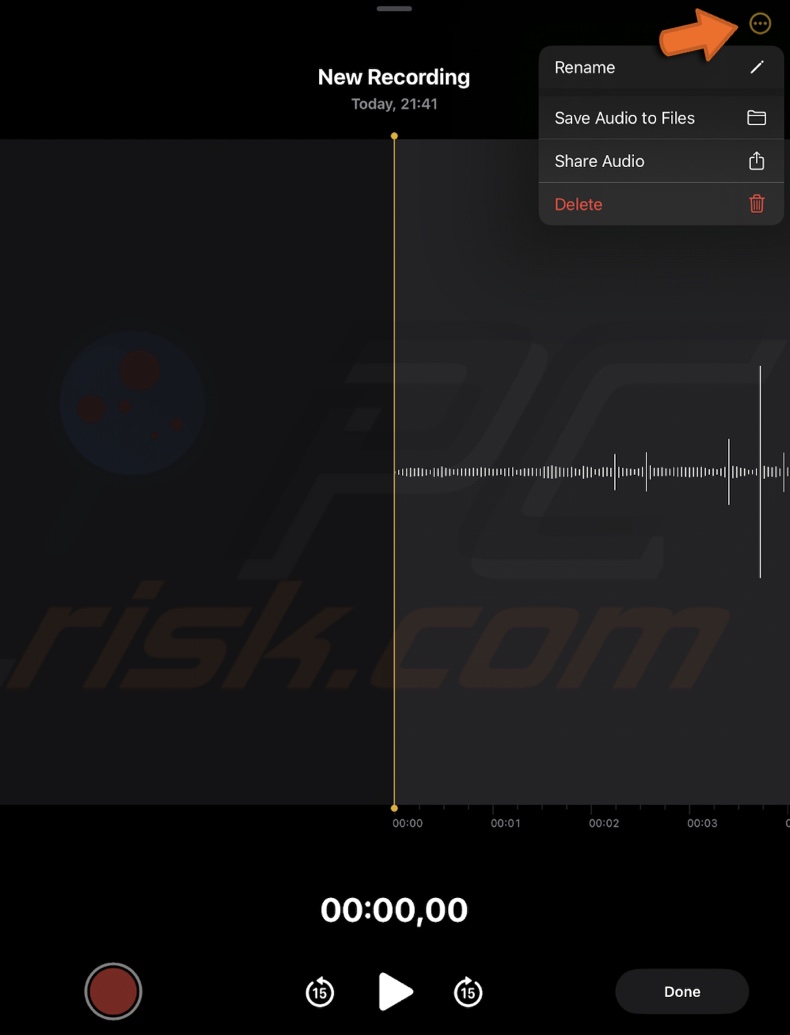
13. You can also share the audio file, save it to iCloud, or delete it if no longer needed.
The quotation icon may not appear on an iPhone 15 Pro. However, it works perfectly on an iPhone 14. Hopefully, it will be available across all iPhones in the next beta version.
Suppose you don't see the quotation icon while recording. In that case, the transcription will still appear under the audio box in the note.
Live audio transcriptions might not be available on older models like the iPhone 11, which only allows audio recording within the note.
Sometimes, the transcripts can be inaccurate, especially with homophones. Apple is expected to improve this with upcoming updates.
By following these steps, you can easily generate and manage live transcriptions in the Notes app on your iPhone or iPad.
Generate live transcriptions on Mac
The audio transcription feature in macOS Sequoia is especially useful during meetings. It allows you to save and transcribe everything so you can focus on the discussion without worrying about taking notes.
Using your Mac to create live audio transcriptions is easy and ideal for those who prefer a larger screen.
1. Launch the Notes app on your Mac.
2. Click the pen icon to create a new note or choose an existing one.
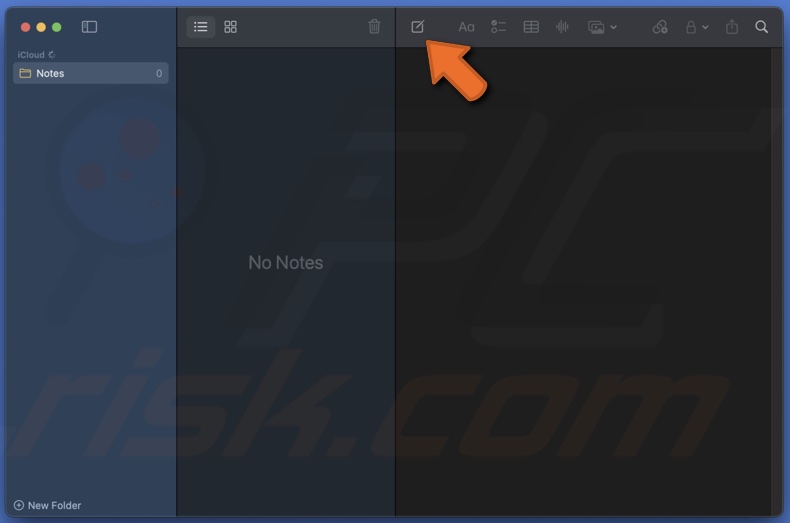
3. In the toolbar, click the "Record Audio" button. Then, click the red circular button to begin recording the audio.
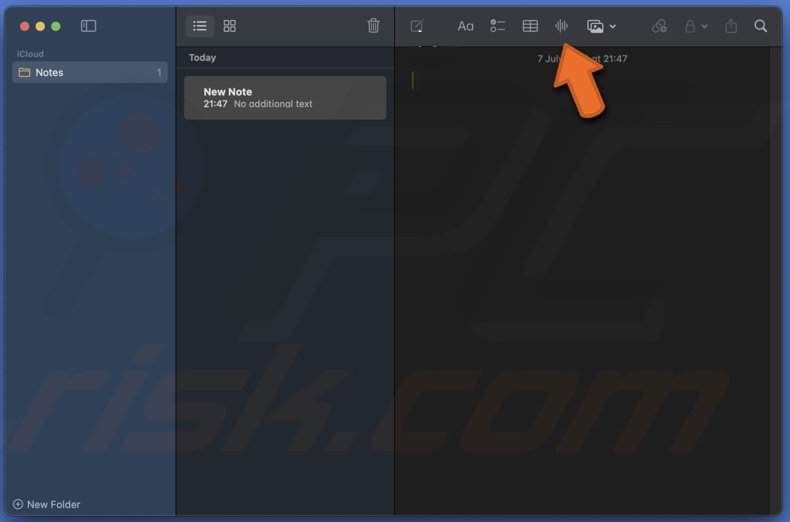
4. Tap the red pause button if you need to pause the recording. When you're done, click "Done" to save your recording and return to your note.
5. Wait for a few seconds, and the transcription for the recorded audio will appear in your note.
And that's it! You're all set to use live transcription on your iPhone, iPad, or Mac.
Remember that feature availability can vary occasionally across devices and iOS versions. Also, remember to check for updates that may enhance this functionality. Happy transcribing!
Share:

Karolina Peistariene
Author of how-to guides for Mac users
Responsible for collecting, analyzing, and presenting problem-solving solution articles related to macOS issues. Years of macOS experience combined with solid research and analyzing skills help Karolina provide readers with working and helpful solutions as well as introduce various features Mac has to offer.
▼ Show Discussion