Stop incorrect password from reinstalling your iPhone ir iPad

Get Free Scanner and check your computer for errors
Fix It NowTo fix found issues, you have to purchase the full version of Combo Cleaner. Free trial available. Combo Cleaner is owned and operated by Rcs Lt, the parent company of PCRisk.com read more.
Stop data erase after wrong password attempt and restore your disabled device
If you're worried about losing important data because of a forgotten passcode, you're in the right place. This guide will help you understand the steps to keep your information safe.

iPhones and iPads have a built-in security feature. If you enter the wrong password too many times, the device will delete all its data. While it's a great security measure, it can be a bit scary if you accidentally forget your passcode.
Many people have faced this issue. Whether you're a parent whose child keeps trying to unlock your device or someone who simply forgets their passcode sometimes, keep reading. I'll show you how to adjust your settings to avoid this problem and what to do if your iPhone or iPad gets disabled.
Video on Stop incorrect password from reinstalling your iPhone ir iPad
Table of Contents:
- Introduction
- Stop an iPhone or iPad from erasing data after ten wrong passwords
- Understanding passcode protection on iPhone and iPad
- How to restore a disabled device
- Video on Stop incorrect password from reinstalling your iPhone ir iPad
Download Computer Malware Repair Tool
It is recommended to run a free scan with Combo Cleaner - a tool to detect viruses and malware on your device. You will need to purchase the full version to remove infections. Free trial available. Combo Cleaner is owned and operated by Rcs Lt, the parent company of PCRisk.com read more.
Stop an iPhone or iPad from erasing data after ten wrong passwords
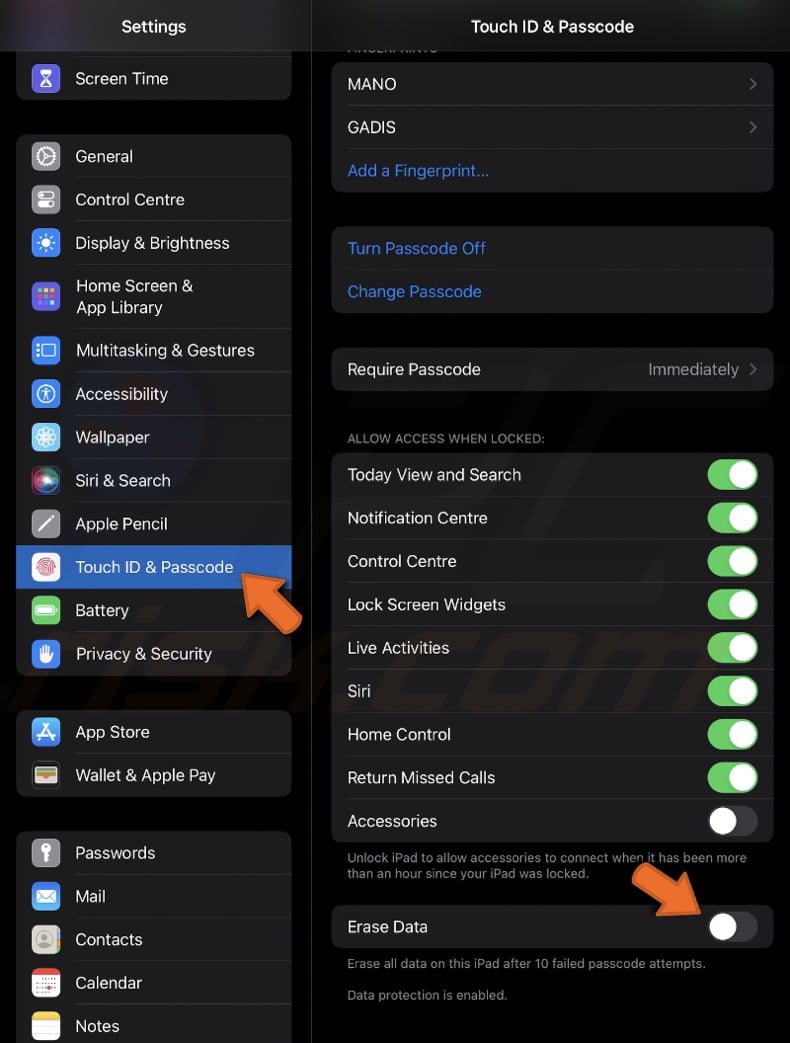
If you want to stop your iPhone or iPad from deleting all your information, media, and personal settings after 10 wrong passcode tries, follow these easy steps:
1. Open the "Settings" application on your iPhone or iPad.
2. Depending on your model, do one of the following:
- For iPhones/iPads with Face ID, go to "Face ID & Passcode".
- For iPhones/iPads with a Home button, go to "Touch ID & Passcode".
3. Scroll down to the bottom of the screen and toggle "Erase Data" to turn off.

By doing this, your device won't erase everything after 10 incorrect passcode attempts.
Understanding passcode protection on iPhone and iPad
When using a stand-alone device, entering the wrong passcode too many times will disable it. This security measure protects data from unauthorized access and ensures that a stolen device is useless to others.
If the incorrect passcode is entered multiple times:
- The Security Chip (Secure Enclave) will be automatically erased.
- The device will be disabled and unusable.
How to restore a disabled device
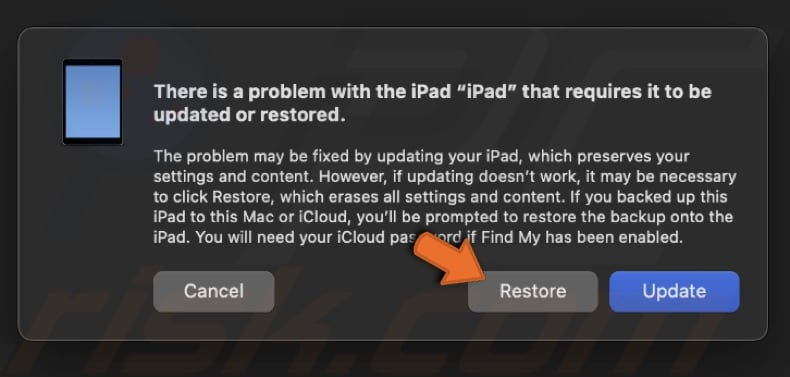
Suppose your iPad or iPhone is disabled due to too many incorrect passcode attempts. In that case, you must restore it using a computer. This process will erase all data from your device, so it's essential to have a backup.
1. Plug your iPad or iPhone into a computer with iTunes or a Mac using a USB or USB-C cable.
2. Put your device into Recovery mode by following these steps:
For iPads/iPhones with a Home Button:
- Press and hold both the Home and the Power buttons. Keep holding them until the Recovery Mode screen appears (an image of a cable pointing to a computer or iTunes logo).
For iPads/iPhones without a Home Button:
- Quickly press and release the Volume Up button and then the Volume Down button. Keep holding the Power button until you see the Recovery Mode screen.
3. On iTunes, when a prompt asking to "Update" or "Restore" appears, choose "Restore" to erase the device and reinstall your iPad.
On Finder, click on your iPad and select "Restore" to completely erase the device and install the latest version of iPadOS.

4. After the restoration process is complete, your iPad will restart.
5. Follow the on-screen instructions to set it up as a new device or restore it from a backup if you have one.
If nothing helps and you need more info, don't hesitate to contact Apple support.
Share:

Karolina Peistariene
Author of how-to guides for Mac users
Responsible for collecting, analyzing, and presenting problem-solving solution articles related to macOS issues. Years of macOS experience combined with solid research and analyzing skills help Karolina provide readers with working and helpful solutions as well as introduce various features Mac has to offer.
▼ Show Discussion