How to easily manage your browser notifications on Mac

Get Free Scanner and check your computer for errors
Fix It NowTo fix found issues, you have to purchase the full version of Combo Cleaner. Free trial available. Combo Cleaner is owned and operated by Rcs Lt, the parent company of PCRisk.com read more.
The ultimate guide to browser notifications on your Mac
This guide will show you how to manage browser notifications on your Mac to make your online experience more focused. You'll learn how to adjust Safari, Chrome, and Firefox.
Whether you find notifications helpful or a bit too distracting, knowing how to control them puts you in charge. I'll walk you through the steps to manage notifications from your favorite browser.
In the end, you'll know how quickly you can access the settings you need, making the process straightforward and hassle-free. Whether you want to block notifications from a pesky site or allow your favorites to keep you updated, this guide will provide you with all the necessary steps.
Video on How to easily manage your browser notifications on Mac
Table of Contents:
- Introduction
- Enable your browser notifications
- Allow specific website notifications
- Block specific website notifications
- Customize browser app notifications
- Turn off all browser notifications
- Video on How to easily manage your browser notifications on Mac
Download Computer Malware Repair Tool
It is recommended to run a free scan with Combo Cleaner - a tool to detect viruses and malware on your device. You will need to purchase the full version to remove infections. Free trial available. Combo Cleaner is owned and operated by Rcs Lt, the parent company of PCRisk.com read more.
Enable your browser notifications
When you first set up a browser like Chrome, Firefox, or others, you might see a message pop up at the top right corner of your screen. It will ask if you want to let the browser send you notifications. You can either allow or reject the notifications.
You can manage browser notifications in the system notification settings if you don't see the popup.
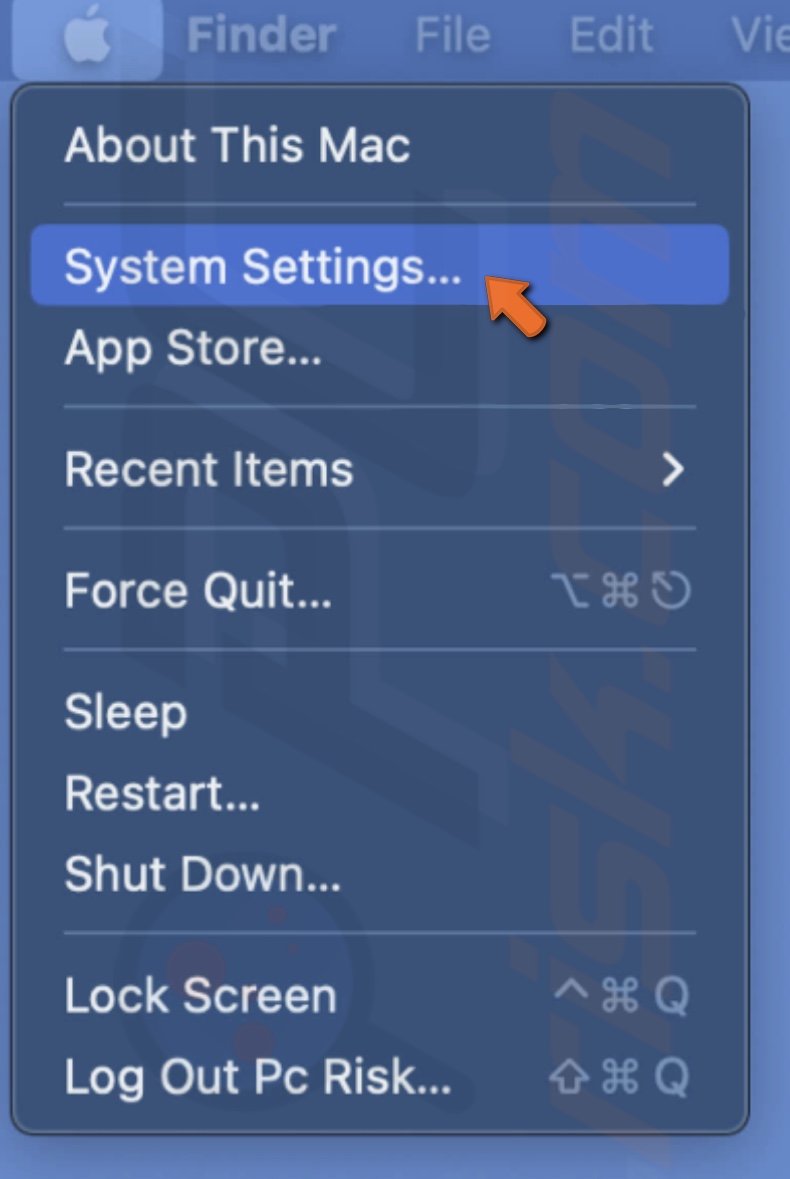
1. Select the Apple logo and click "System Settings" to open them.
2. Go to "Notifications".
3. Under "Application Notifications", find and select your browser.
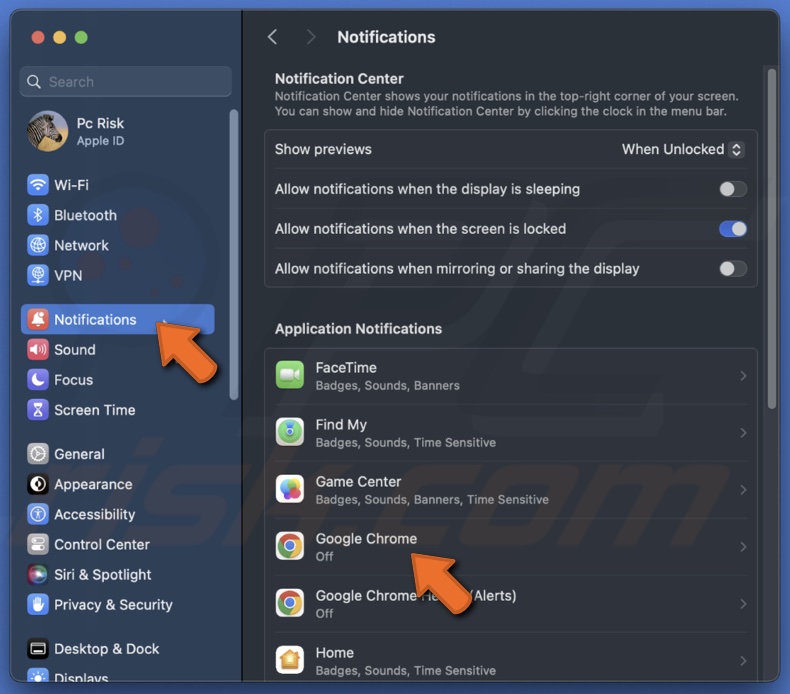
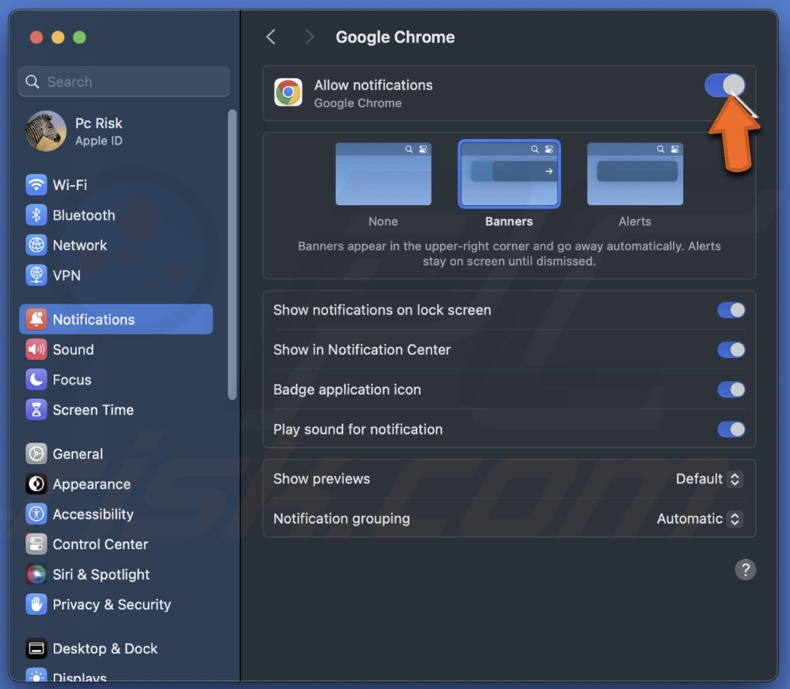
4. Enable browser notifications and the settings you prefer.
Allow specific website notifications
If you want to receive updates directly in your browser from certain websites, here are simple steps on how to allow notifications:
1. Start by opening the website from which you want to receive notifications.
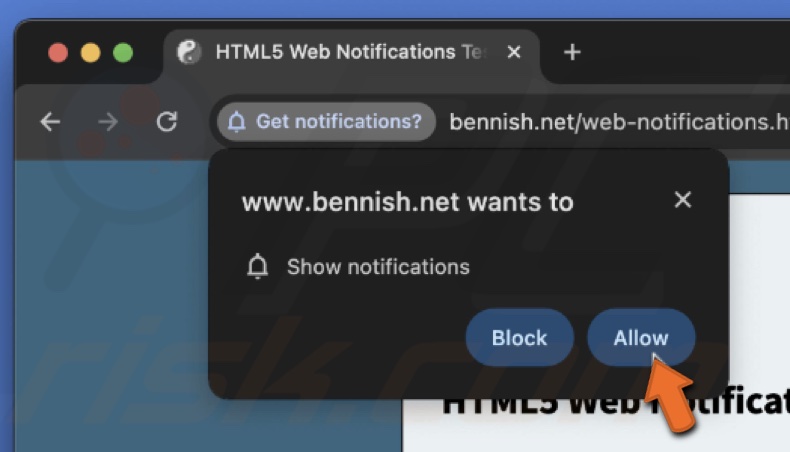
2. A popup will appear asking if you want to receive notifications. Depending on the website, this popup might look different, but the options are generally the same.
3. Click "Allow" on the popup to receive notifications. If there's a confirmation step, go ahead and confirm your choice.
Block specific website notifications
If you find notifications from certain websites distracting, you can easily block them. Here's how to stop receiving notifications from specific websites depending on your browser:
Safari
1. Open the Safari browser.
2. At the top menu bar of your Mac, click on "Safari" and then select "Settings".
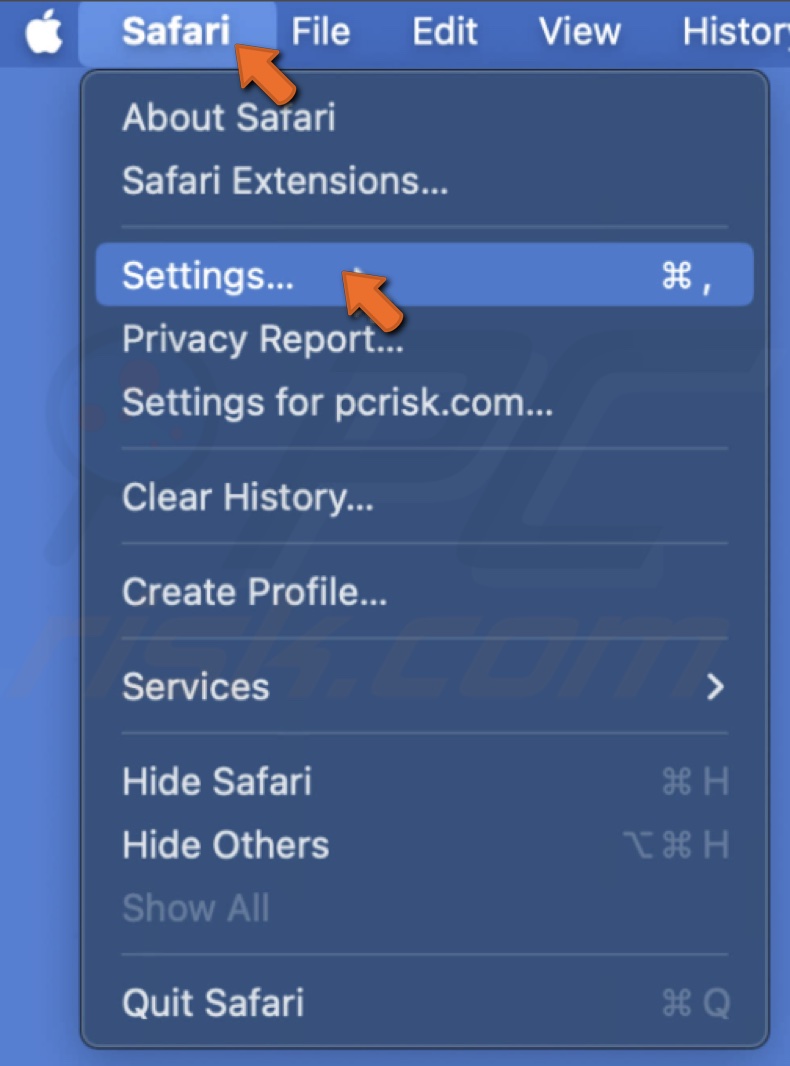
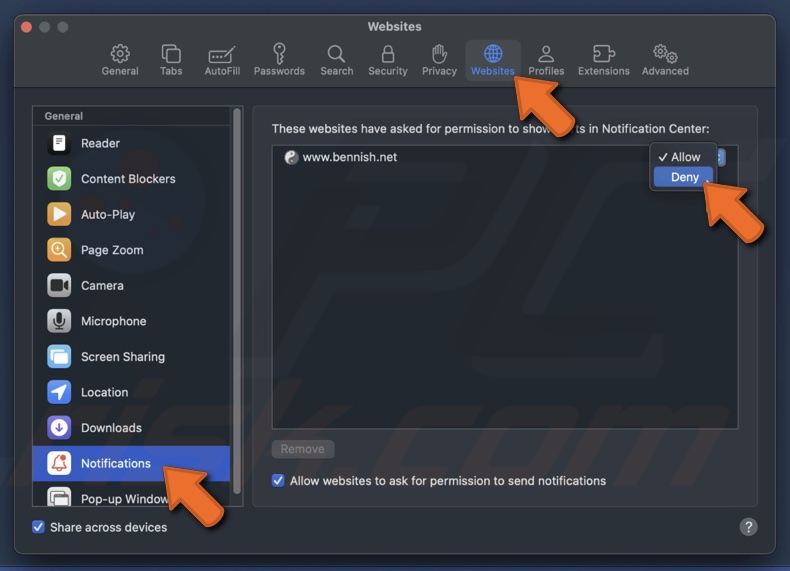
3. Choose the "Websites" tab.
4. Click "Notifications" on the left side. You'll see a list of websites that are allowed or blocked from sending notifications.
5. Find the website you want to block, click the drop-down menu next to it, and choose "Deny" to stop receiving notifications.
Chrome
1. Open Chrome and go to the website that's sending notifications.
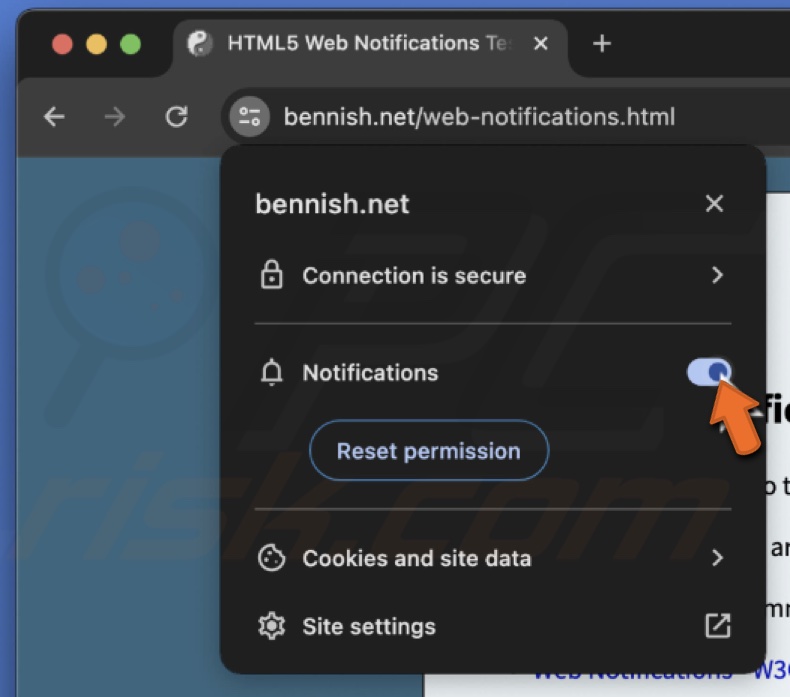
2. Click on the notification icon in the address bar at the top.
3. If you see "Notifications" in the menu, click on it and set it to "Block". If you don't see Notifications, the site might not have permission or the capability to send them.
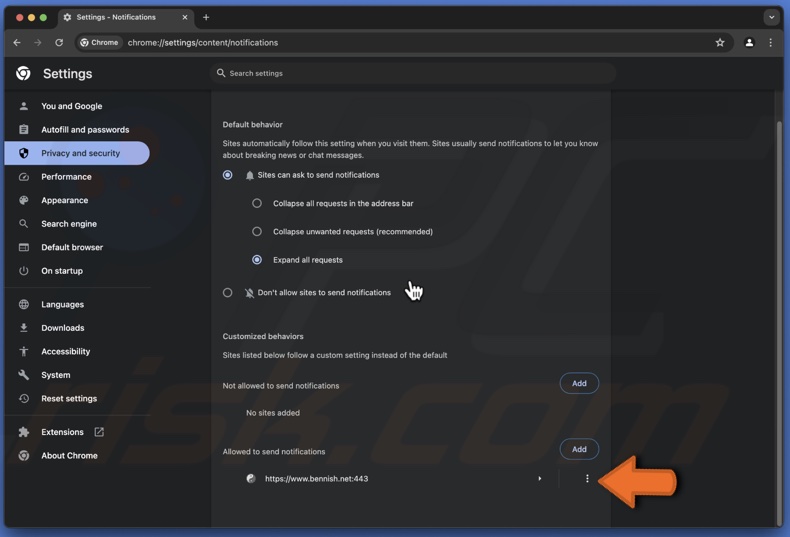
4. Alternatively, type chrome://settings/content/notifications in the address bar to go directly to the notification settings.
5. Here, you can see a list of sites under "Allowed to send notifications". Click the three dots next to a site and select "Block" to stop notifications.
Firefox
1. Open Firefox and load the website that's bothering you with notifications.
2. Click on the notification icon in the address bar and click on "Allowed" to remove the permission.

3. Refresh the page to apply the changes.
4. For more control, click on "Firefox" in the top menu bar of your Mac, choose "Settings", then "Privacy & Security".
5. Scroll to the "Permissions" section and click "Settings" next to "Notifications".
6. Here, you can see all the sites with notification permissions and change them to "Block" as needed.
Customize browser app notifications
If you're finding the notification settings on your web browser a bit limiting, macOS has got you covered with more detailed controls.
It allows you to treat websites that send notifications through Safari as apps. It means you can customize these notifications with the same flexibility you have with apps on your Mac.
1. Open "System Settings" from the Apple menu.

2. Go to "Notifications".
3. In the "Notifications" menu, you'll see a list of your installed browser apps, such as Safari, Chrome, and Firefox. If you've allowed websites in Safari to send you notifications, they'll appear here, too. Click on the browser or website whose notifications you want to customize.
4. You can adjust the notifications just as you would for any app on your Mac. Here are a few things you can do:
• Choose how you want the notifications to appear.
• Keep notifications from showing up when your Mac is locked.
• Stop notifications from stacking to keep the Notification Center more organized.
• If you don't like the red badges that show up on the app icon, you can disable them.
• Disable notification sounds.
• Choose whether to show or hide the preview of the notification content.
• Set how multiple notifications from the same app or website are grouped.
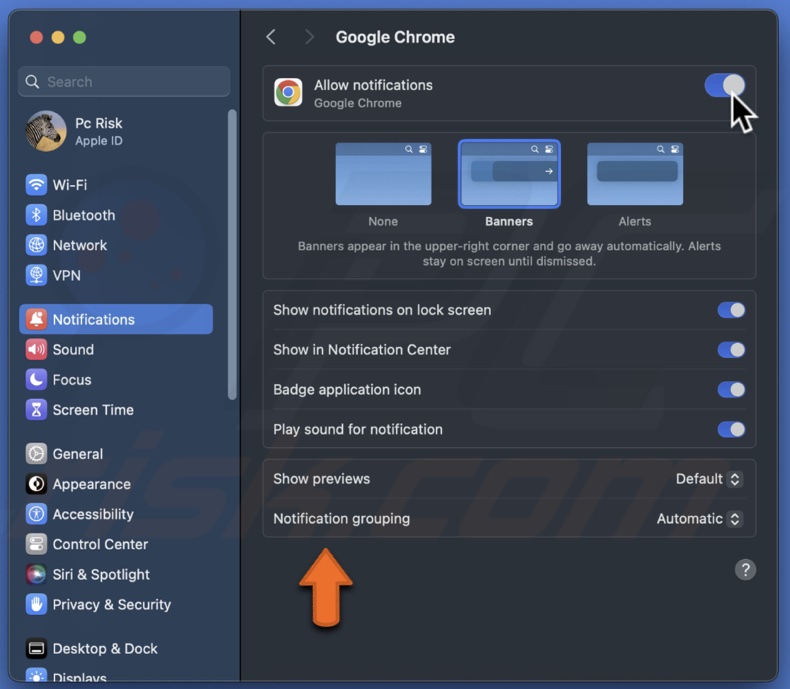
By following these steps, you can tailor how you receive notifications from your browser apps and websites on your Mac, making it easier to manage your online interactions without getting overwhelmed.
Turn off all browser notifications
If you'd like to stop all notifications from websites and enjoy a distraction-free browsing experience, here's how to turn off your browser notifications.
1. Click on the Apple icon at the top left corner of your screen and select "System Settings".

2. In the System Settings menu, click "Notifications".
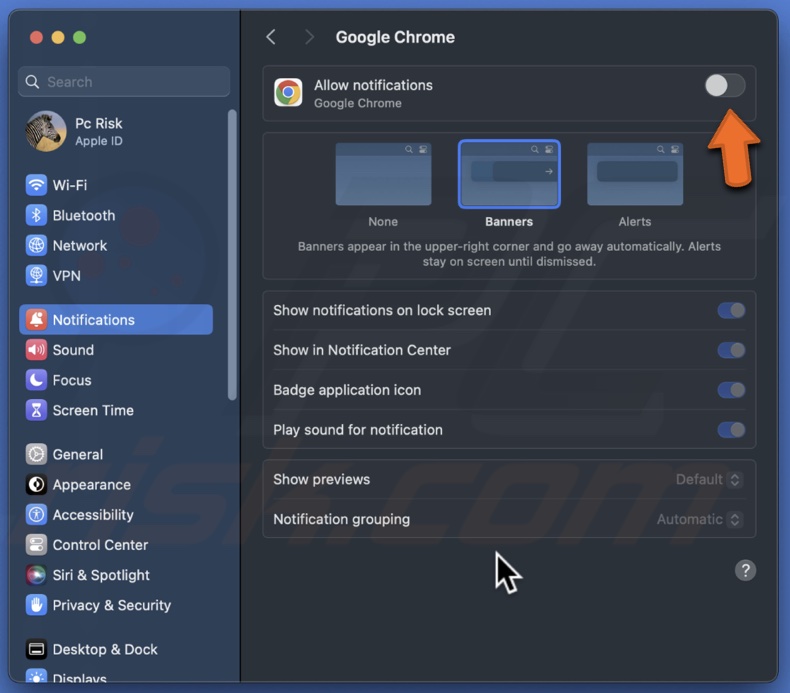
3. Scroll through the list of apps until you find your web browser. Click on it to open its notification settings.
4. Toggle off the "Allow Notifications" option.
Whether you're looking to stay updated with alerts from specific websites, minimize distractions by blocking unwanted notifications, or even turn off all browser notifications, these guidelines will help you easily manage them.
Share:

Karolina Peistariene
Author of how-to guides for Mac users
Responsible for collecting, analyzing, and presenting problem-solving solution articles related to macOS issues. Years of macOS experience combined with solid research and analyzing skills help Karolina provide readers with working and helpful solutions as well as introduce various features Mac has to offer.
▼ Show Discussion