3 ways to mute Live Photos on your iPhone, iPad, and Mac

Get Free Scanner and check your computer for errors
Fix It NowTo fix found issues, you have to purchase the full version of Combo Cleaner. Free trial available. Combo Cleaner is owned and operated by Rcs Lt, the parent company of PCRisk.com read more.
Step-by-step on how to remove sound from Live Photos
Are you looking to remove the sound from your Live Photos but not sure how to do it? Don't worry—it's quite simple, and you can do it right from the Photos app on your iPhone, iPad, or Mac.

You can choose the most appealing solution by simply turning off the sound, adding effects, or converting the photo into a still image. This guide will walk you through the steps to mute your Live Photos so you can enjoy them without any background noise.
Whether you're editing on a phone or computer, you'll find the process quick and easy. Let's dive in!
Video on 3 ways to mute Live Photos on your iPhone, iPad, and Mac
Table of Contents:
- Introduction
- Turn off the sound on Live Photos
- Add Loop or Bounce effects on your Live Photo
- Convert Live Photo to a still Image
- How to revert to Live Photo again
- Turn off the Live Photo feature
- Video on 3 ways to mute Live Photos on your iPhone, iPad, and Mac
Download Computer Malware Repair Tool
It is recommended to run a free scan with Combo Cleaner - a tool to detect viruses and malware on your device. You will need to purchase the full version to remove infections. Free trial available. Combo Cleaner is owned and operated by Rcs Lt, the parent company of PCRisk.com read more.
Turn off the sound on Live Photos
The Photos app has a great feature that allows you to mute the Live Photos on the editing screen. All you need to do is open the image you want to remove the sound and select the mute button. Here's how to do that on your devices:
On iPhone or iPad
1. Open the Photos app. You'll find your Live Photos in the "Media Types" section.
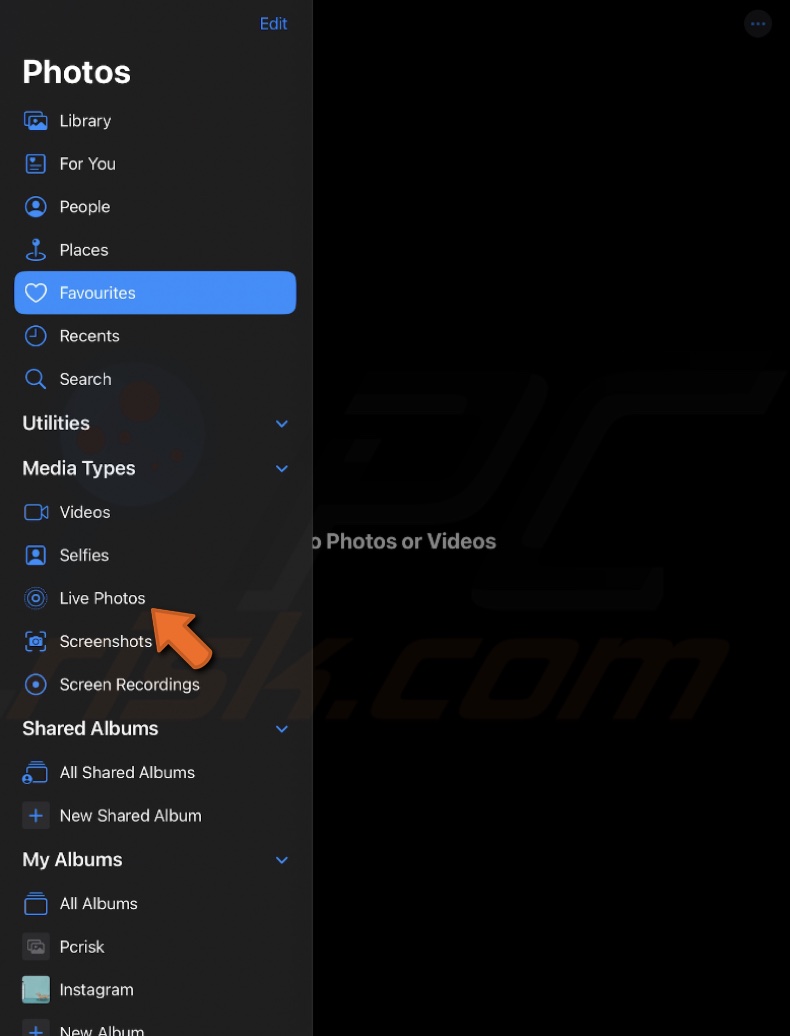
2. Tap on the Live Photo you want to edit.
3. Tap "Edit" in the top right corner of the screen.

4. Tap on the "Live" icon, then tap the speaker icon to turn off the sound. The icon will appear muted when the sound is off.

5. Tap "Done" to save the Live Photo without sound.
On Mac
1. On your Mac, open the Photos app. To view all your Live Photos at once, click the small arrow next to "Media Types" in the left sidebar and choose "Live Photos".
2. Double-click on the Live Photo you wish to edit.
3. Select "Edit" in the window's top right corner. Make sure you are in the "Adjust" or "Filters" tab.
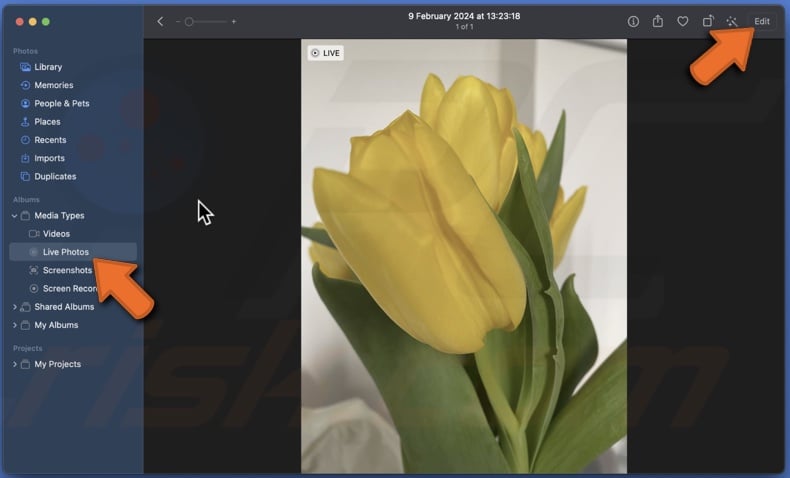
4. Click on the yellow speaker icon to mute the sound of the Live Photo.
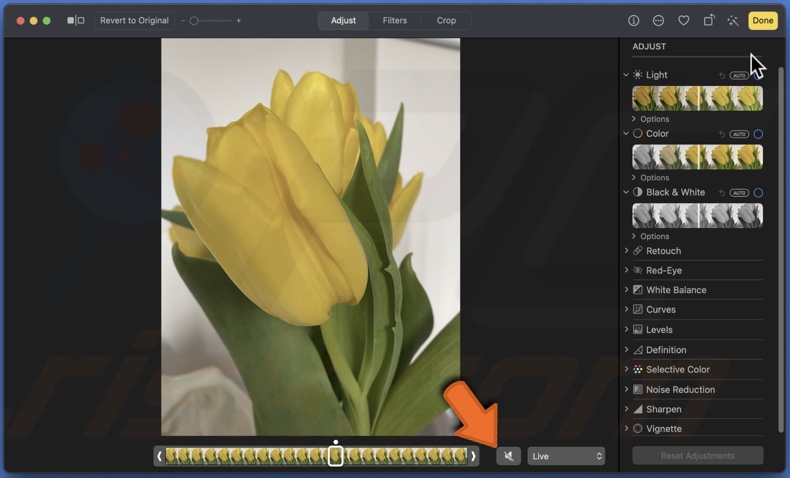
5. Click "Done" to save the Live Photo with the audio turned off.
Add Loop or Bounce effects on your Live Photo
You can easily mute your Live Photos' sound using built-in effects like Loop or Bounce.
The Loop effect takes your Live Photo, turns it into a continuous looping video, and removes the sound. This effect is perfect if you want to highlight a repetitive action, like waves crashing or a pet wagging its tail, without any background noise.
The Bounce effect plays your Live Photo forward and then reverses it, creating a boomerang-like effect. Like the Loop effect, applying Bounce will also remove the original audio of the photo.
On iPhone and iPad
1. Open the Live Photo you want to edit and select "Live" to see more options.
2. Tap on either the Loop or Bounce effect. Adding one of these effects will automatically turn off the sound in your photo.

3. When finished, save the photo. Now, your Live Photo will play without any sound.
On Mac
1. On your Mac, open the Photos app. Open your Live Photos.
2. Double-click on the Live Photo you wish to edit.
3. Select "Edit" in the window's top right corner. Make sure you are in the "Adjust" or "Filters" tab.

4. Click on the "Live" drop-down menu and select "Loop" or "Bounce".
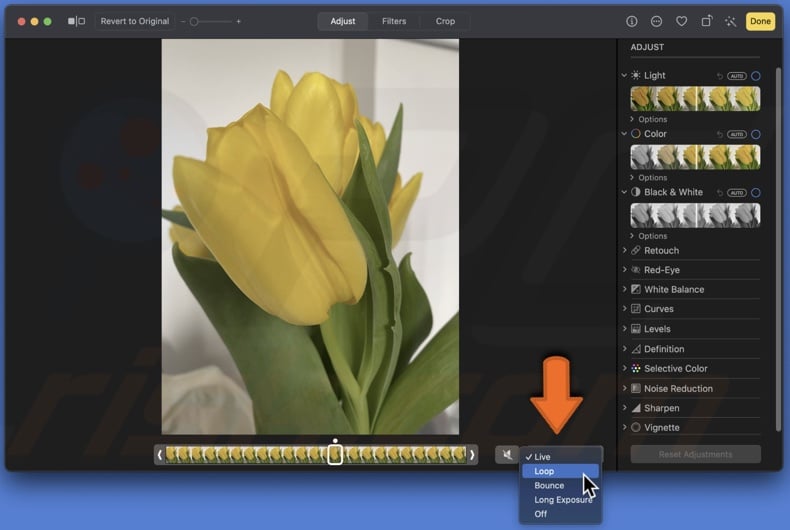
5. Click "Done" to save the photo.
Convert Live Photo to a still image
Another way to remove sound from your Live Photo is to convert it into a regular photo. It will remove the 3-second video, leaving you with just the main image. This main photo is called the "keyframe," representing the most significant part of the Live Photo.
On iPhone and iPad
1. Open the Photos app.
2. Select the Live Photo you want to convert.
3. Tap on the "Edit" button.

4. Select the Live Photo icon (it looks like three concentric circles) and tap "LIVE" at the top. When it's turned off, the icon should appear white.

5. After turning off the Live Photo, tap "Done" to save your photo as a still image.
On a Mac
1. Launch the Photos app on your Mac.
2. Find and double-click on the Live Photo you want to convert from your library.
3. Select "Edit" in the window's top right corner. Make sure you are in the "Adjust" or "Filters" tab.

4. Click on the Live drop-down menu and select "Off".
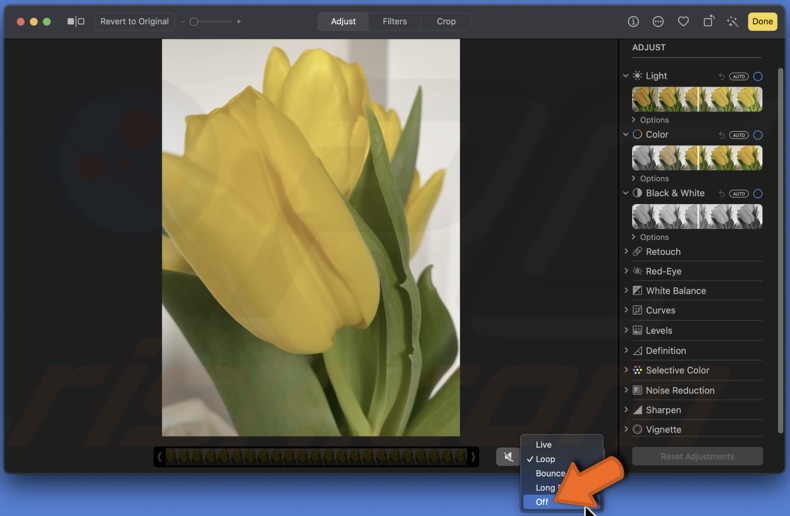
5. Click "Done" to save.
How to revert to Live Photo again
If you decide later to return to the original Live Photo format, you can easily do that in the same Phoso app. It's especially useful if you realize you need the original audio or if you prefer the original motion capture before the effects were applied.
On iPhone and iPad
1. Open the photo you edited.
2. Tap on "Edit" to enter the editing mode.

3. Select the Live Photo icon (it looks like three concentric circles) and tap "LIVE" at the top. When it's turned on, the icon should appear yellow.

4. When finished, tap "Done".
On Mac
1. Launch the Photos app.
2. Double-click on the Live Photo you want to convert from your library.
3. Select "Edit" in the window's top right corner. Make sure you are in the "Adjust" or "Filters" tab.

4. Click on the "Off" drop-down menu and select "Live".
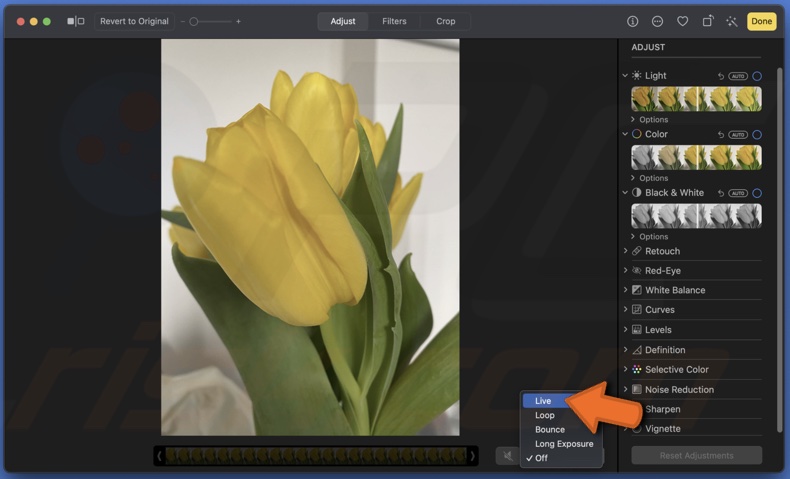
5. Click "Done" to save.
Turn off the Live Photo feature
If you don't want to keep capturing Live Photos and then muting them, you can turn off the Live Photo feature entirely. As Macs don't have a camera that supports capturing Live Photos, you can only deactivate it on your iPhone or iPad.
On iPhone and iPad
1. Launch the Camera app from your home screen.
2. Look for the Live Photo icon, which resembles a set of concentric circles.
3. Tap the Live Photo icon. It should turn white, indicating that Live Photos is disabled.

Whether you choose to mute the sound, apply dynamic effects like Loop or Bounce, or convert your Live Photo to a still image, you now have all the knowledge you need to remove unwanted sound from the image.
Share:

Karolina Peistariene
Author of how-to guides for Mac users
Responsible for collecting, analyzing, and presenting problem-solving solution articles related to macOS issues. Years of macOS experience combined with solid research and analyzing skills help Karolina provide readers with working and helpful solutions as well as introduce various features Mac has to offer.
▼ Show Discussion