Can't take screenshots on Mac? Here are 7 quick fixes

Get Free Scanner and check your computer for errors
Fix It NowTo fix found issues, you have to purchase the full version of Combo Cleaner. Free trial available. Combo Cleaner is owned and operated by Rcs Lt, the parent company of PCRisk.com read more.
7 ways to get your Mac's screenshot feature working again
Have trouble capturing screenshots on your Mac? It's a common issue that can stem from various causes, ranging from temporary software glitches to incorrect settings.
Screenshots are incredibly useful for saving important information, sharing screen content, and troubleshooting issues. When this feature stops working, it can disrupt your workflow and cause frustration. Fortunately, there are several steps you can take to resolve this problem.
In this guide, I'll walk you through seven simple methods to get your screenshot functionality back up and running. By the end, you'll have all the tools you need to fix the screenshot issue on your Mac and resume capturing your screen without any hitches.
Video on Can't take screenshots on Mac? Here are 7 quick fixes
Table of Contents:
- Introduction
- Method 1. Check your keyboard shortcuts
- Method 2. Restart your Mac
- Method 3. Check the storage space
- Method 4. Reset NVRAM or PRAM
- Method 5. Enable screenshots using Terminal commands
- Method 6. Update macOS
- Method 7. Use Preview to take screenshots
- Video on Can't take screenshots on Mac? Here are 7 quick fixes
Download Computer Malware Repair Tool
It is recommended to run a free scan with Combo Cleaner - a tool to detect viruses and malware on your device. You will need to purchase the full version to remove infections. Free trial available. Combo Cleaner is owned and operated by Rcs Lt, the parent company of PCRisk.com read more.
Check your keyboard shortcuts
Sometimes, the issue is simply that the shortcuts are either disabled or changed. Mac allows you to customize keyboard shortcuts, including those for taking screenshots.
If you've accidentally altered the default screenshot shortcuts or if they're disabled, your attempts to capture your screen won't work.
To check the keyboard shortcuts, follow the steps below:
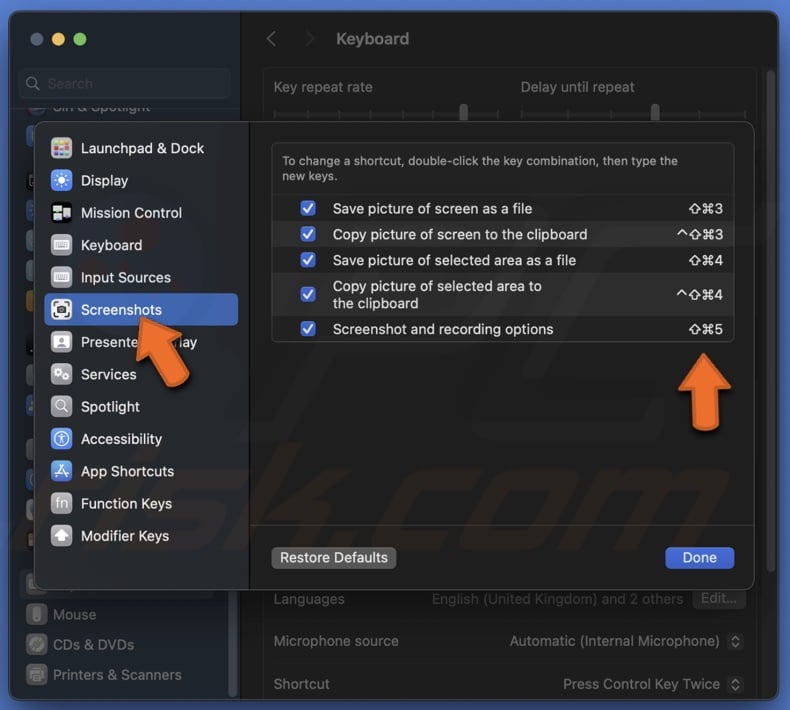
1. Press Command + Shift + 3 to check if the whole screen is captured.
2. Press Command + Shift + 4 to check if you can select a zone on the screen to capture.
3. If these don't work, click the Apple logo and go to "System Settings".
4. Select "Keyboard" and choose "Keyboard shortcuts".
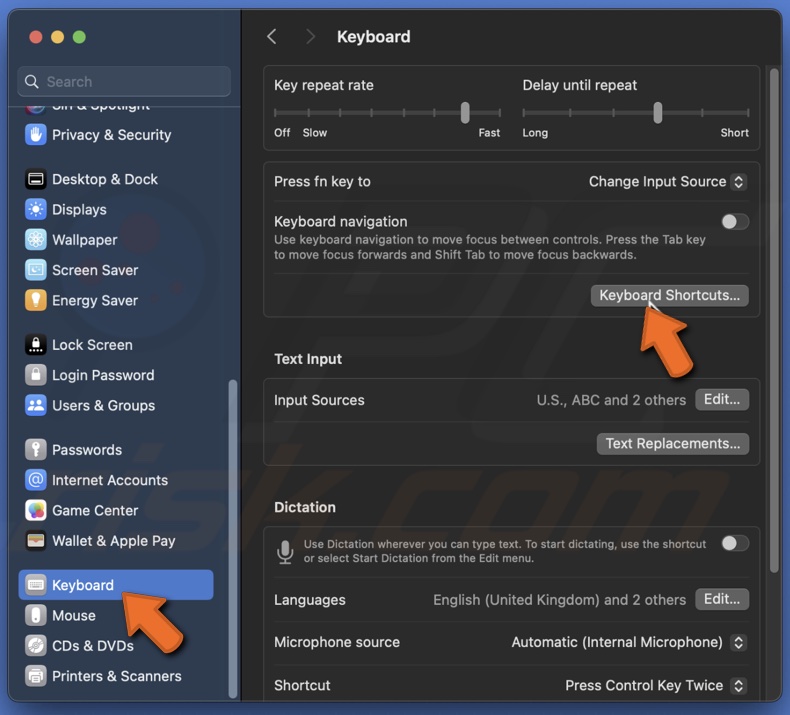
5. In the "Screenshots" tab, verify that the screenshot shortcuts are the same and enabled.
Restart your Mac
Restarting your Mac can often fix the screenshot problem because it clears out temporary glitches. When you restart your Mac, it closes all the programs and starts fresh. This can eliminate any minor software problems stopping the screenshot function from working.
To restart your Mac, follow the steps below:
1. Click the Apple logo in the top-left corner of the menu bar.
2. Select "Restart".
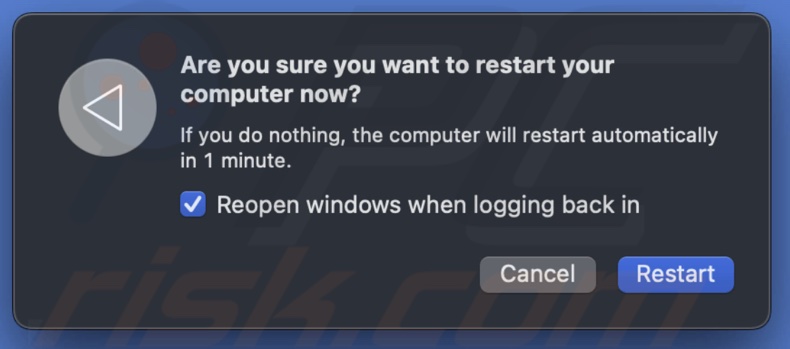
3. After your Mac restarts, try retaking a screenshot.
Check the storage space
When your Mac runs out of storage space, it can't save new files, including screenshots. Think of your computer's storage as a bookshelf. If the shelf is full, there's no room to add another book without removing an old one.
Similarly, if your Mac's storage is full, it can't store new screenshots. That's why checking and freeing up some space can help remove the issue and allow you to take screenshots again.
To check the storage space, follow the steps below:
1. Open the Apple menu and choose "System Settings".
2. Go to "General" and select "Storage".
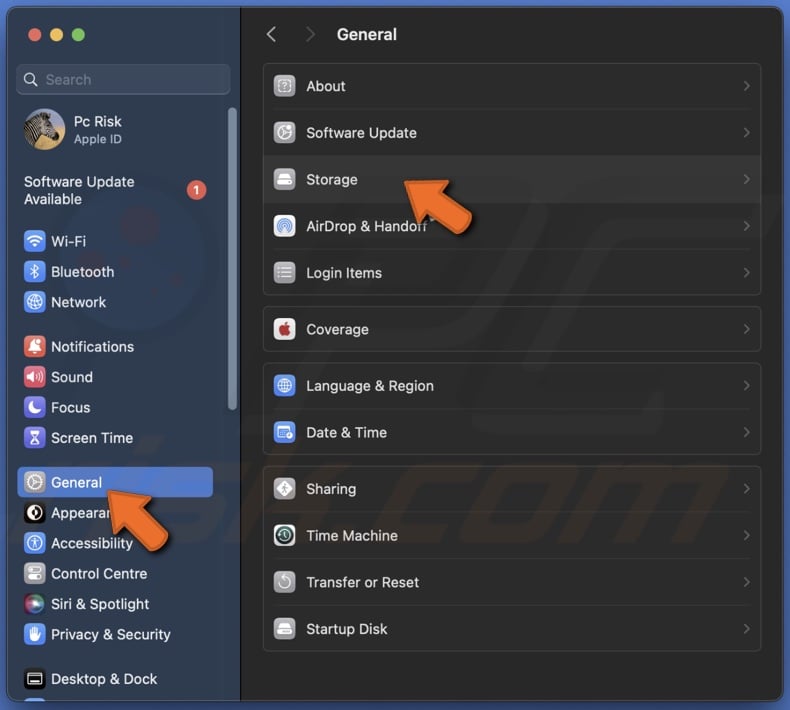
3. If space is low, consider deleting unnecessary files or backing them to an external drive.
Reset NVRAM or PRAM
Non-volatile random access memory or parameter random access memory store settings like screen resolution and volume levels. If something goes wrong with these settings, it can stop certain features, like screenshots, from working properly.
By resetting NVRAM or PRAM, you clear these settings and start fresh, which can often solve the problem and get your screenshots working again.
To reset NVRAM or PRAM, follow the steps below:
1. Shut down your Mac.
2. Turn it on and immediately press Option + Command + P + R together for about 20 seconds.
3. Release the keys and allow your Mac to continue starting up.
Enable screenshots using Terminal commands
Terminal commands can directly communicate with your Mac's underlying system to reset the screenshot functionality. This approach can bypass temporary glitches or settings issues that are not easily accessible through the standard interface. It's like having a direct conversation with your Mac, telling it to start allowing screenshots again.
This method is especially useful if you've tried simpler fixes, like checking keyboard shortcuts or restarting your Mac, and found that they didn't solve the problem.
To use Terminal commands, follow the steps below:
1. Open Terminal.
2. Enter the command: defaults write com.apple.screencapture disable false
3. Type "killall SystemUIServer" and press Enter.

Update macOS
Updating macOS is like giving your Mac a fresh start. Each update comes with fixes for bugs and problems that might be stopping your screenshots from working correctly.
To update your Mac, follow the steps below:
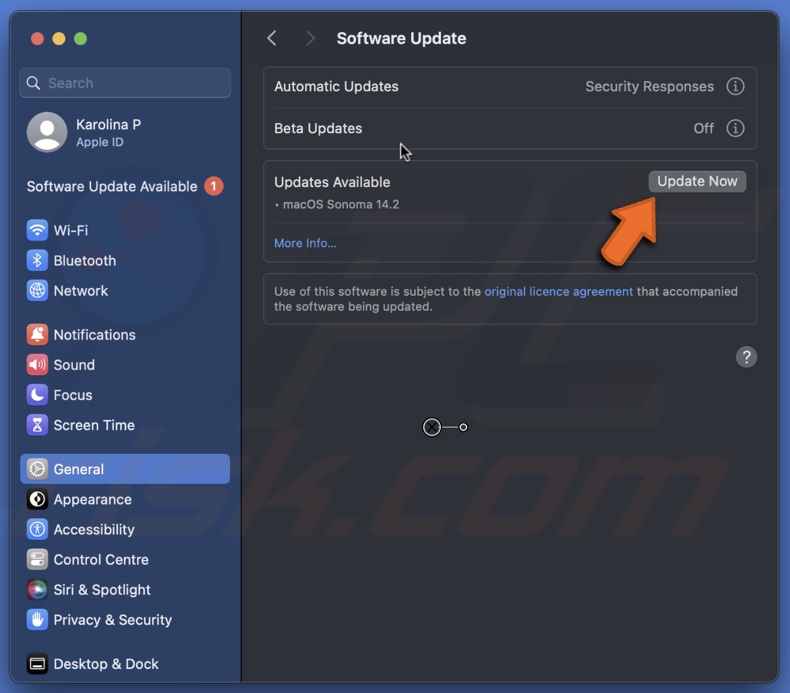
1. Navigate to the Apple menu and click "System Settings".
2. Go to the "Software Update" section.
3. If an update is available, choose "Update Now".
Use Preview to take screenshots
You can use Preview as a workaround to take screenshots when the usual shortcuts on your Mac aren't working, or the fixes in this guide didn't help. Preview is an app that comes with your Mac, so you don't need to download anything new.
To use Preview to take screenshots, follow the steps below:
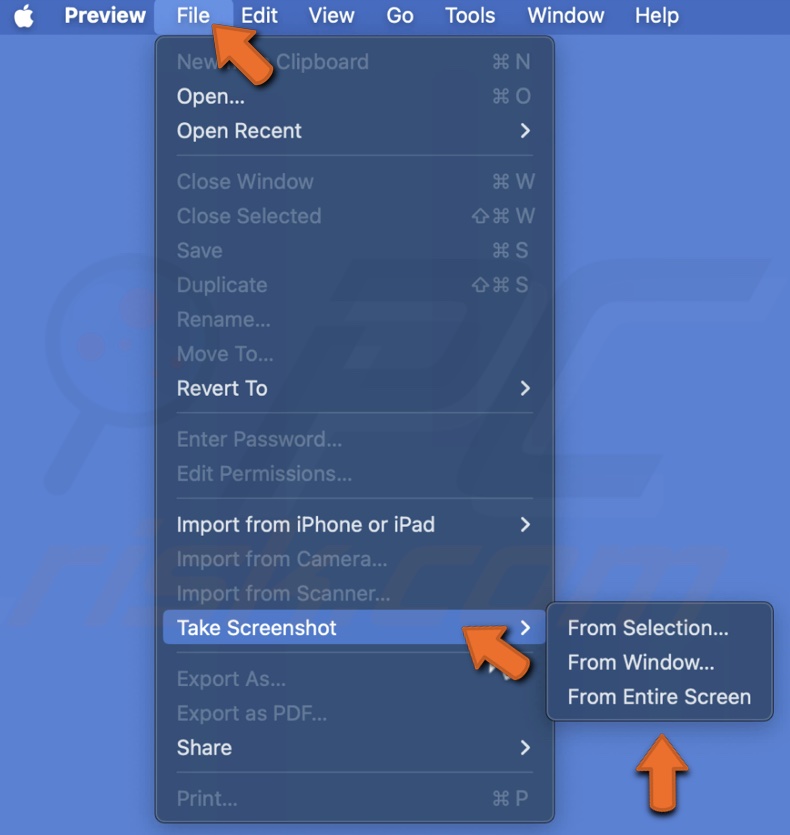
1. Open Preview.
2. Click on "File" in the menu bar.
3. Select "Take Screenshot" and choose from the available options.
By following these eight simple methods, you can troubleshoot and solve most problems related to screenshots. If nothing helps, contact Apple customer support or visit a service center for further assistance.
Share:

Karolina Peistariene
Author of how-to guides for Mac users
Responsible for collecting, analyzing, and presenting problem-solving solution articles related to macOS issues. Years of macOS experience combined with solid research and analyzing skills help Karolina provide readers with working and helpful solutions as well as introduce various features Mac has to offer.
▼ Show Discussion