The ultimate guide to sharing Voice Memos on iPhone and Mac

Get Free Scanner and check your computer for errors
Fix It NowTo fix found issues, you have to purchase the full version of Combo Cleaner. Free trial available. Combo Cleaner is owned and operated by Rcs Lt, the parent company of PCRisk.com read more.
7 ways to share your Voice Memos between iPhone and Mac
Are you tired of struggling to transfer voice memos between your iPhone and Mac? Do you want to simplify the process and ensure easy access to your important recordings wherever you are? Look no further!
This guide provides step-by-step instructions on syncing, sharing, and transferring your voice memos using various methods, including iCloud, AirDrop, messaging apps, email, the Files app, and iTunes.
Learn how to make the most of your Apple devices and streamline your workflow with these simple and effective techniques.
Video on The ultimate guide to sharing Voice Memos on iPhone and Mac
Table of Contents:
- Introduction
- Sync with your iCloud
- Use AirDrop
- Send as email
- Use messaging apps
- Send via the Files app
- Take advantage of other Cloud storage
- Use iTunes
- Video on The ultimate guide to sharing Voice Memos on iPhone and Mac
Download Computer Malware Repair Tool
It is recommended to run a free scan with Combo Cleaner - a tool to detect viruses and malware on your device. You will need to purchase the full version to remove infections. Free trial available. Combo Cleaner is owned and operated by Rcs Lt, the parent company of PCRisk.com read more.
Sync with your iCloud
By utilizing synchronization, you simplify sharing voice recordings and guarantee easy access to your important memos between Mac and iPhone.
To sync Voice Memos with iCloud on your iPhone, follow the steps below:
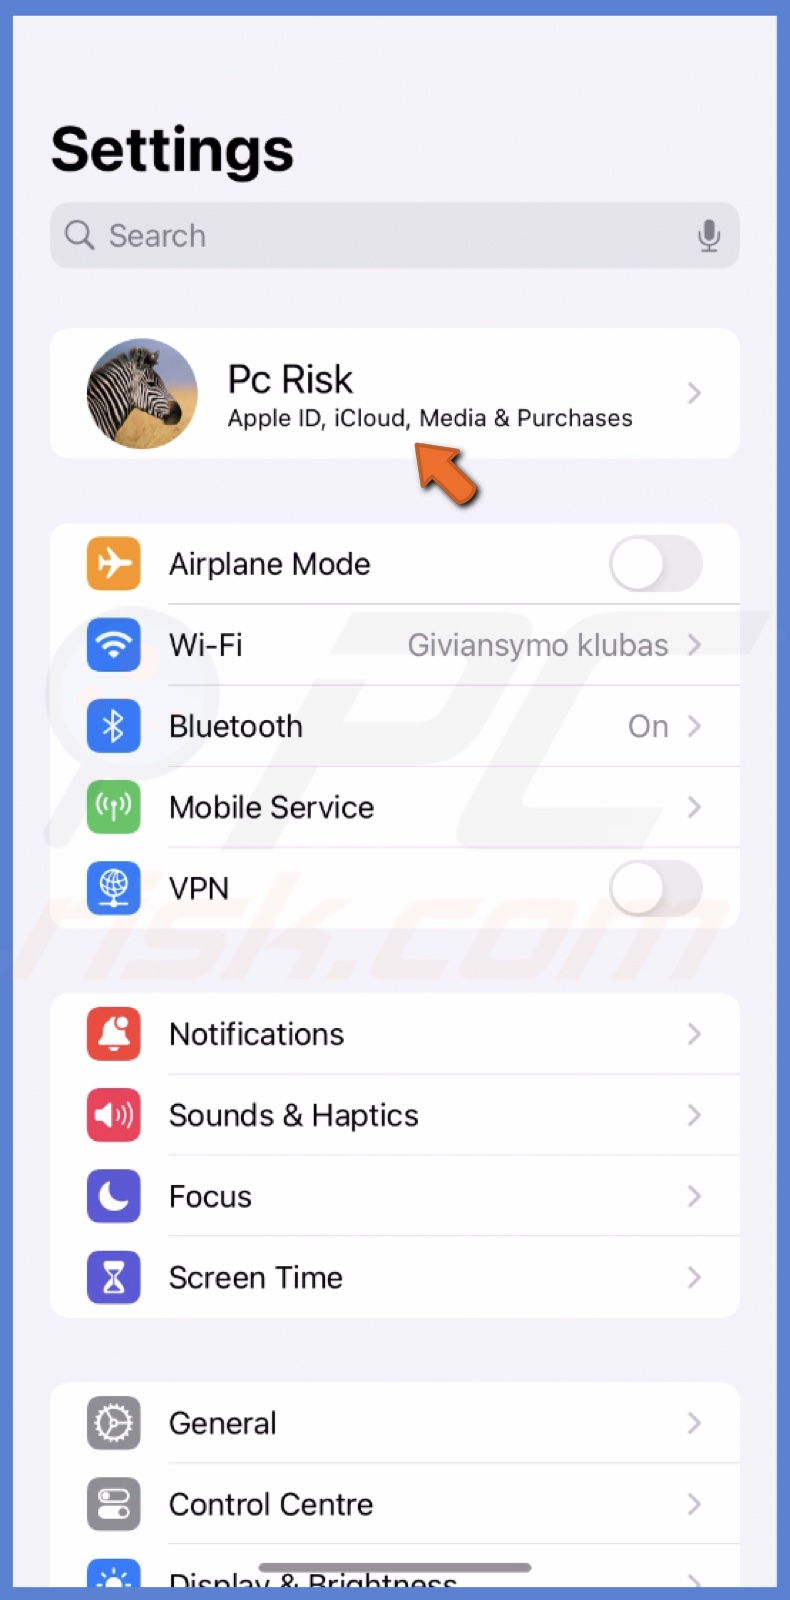
1. In the Settings app, tap on your Apple ID.
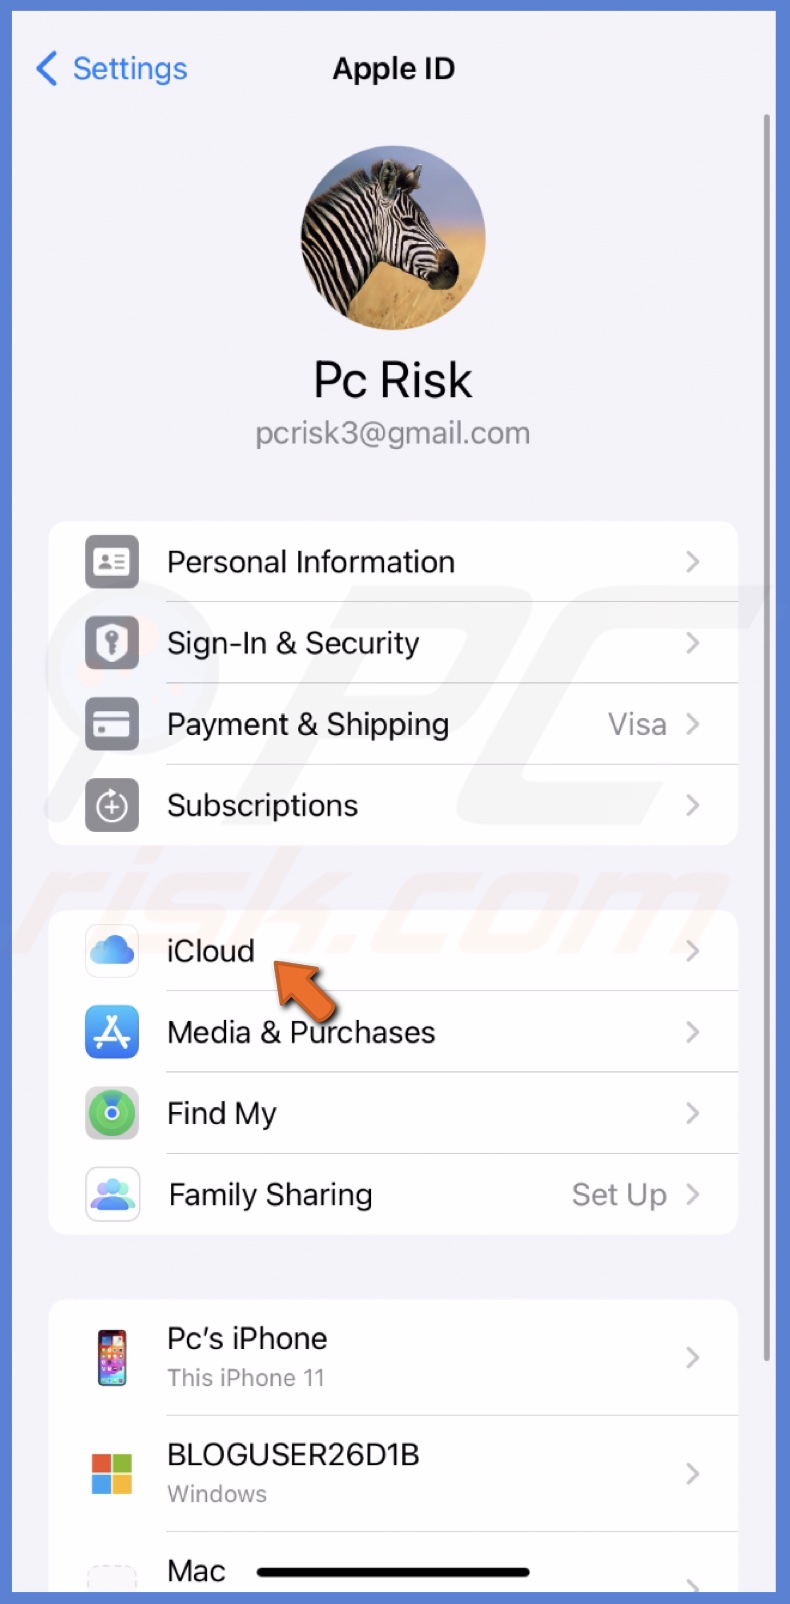
2. Go to "iCloud" and select "Show All".
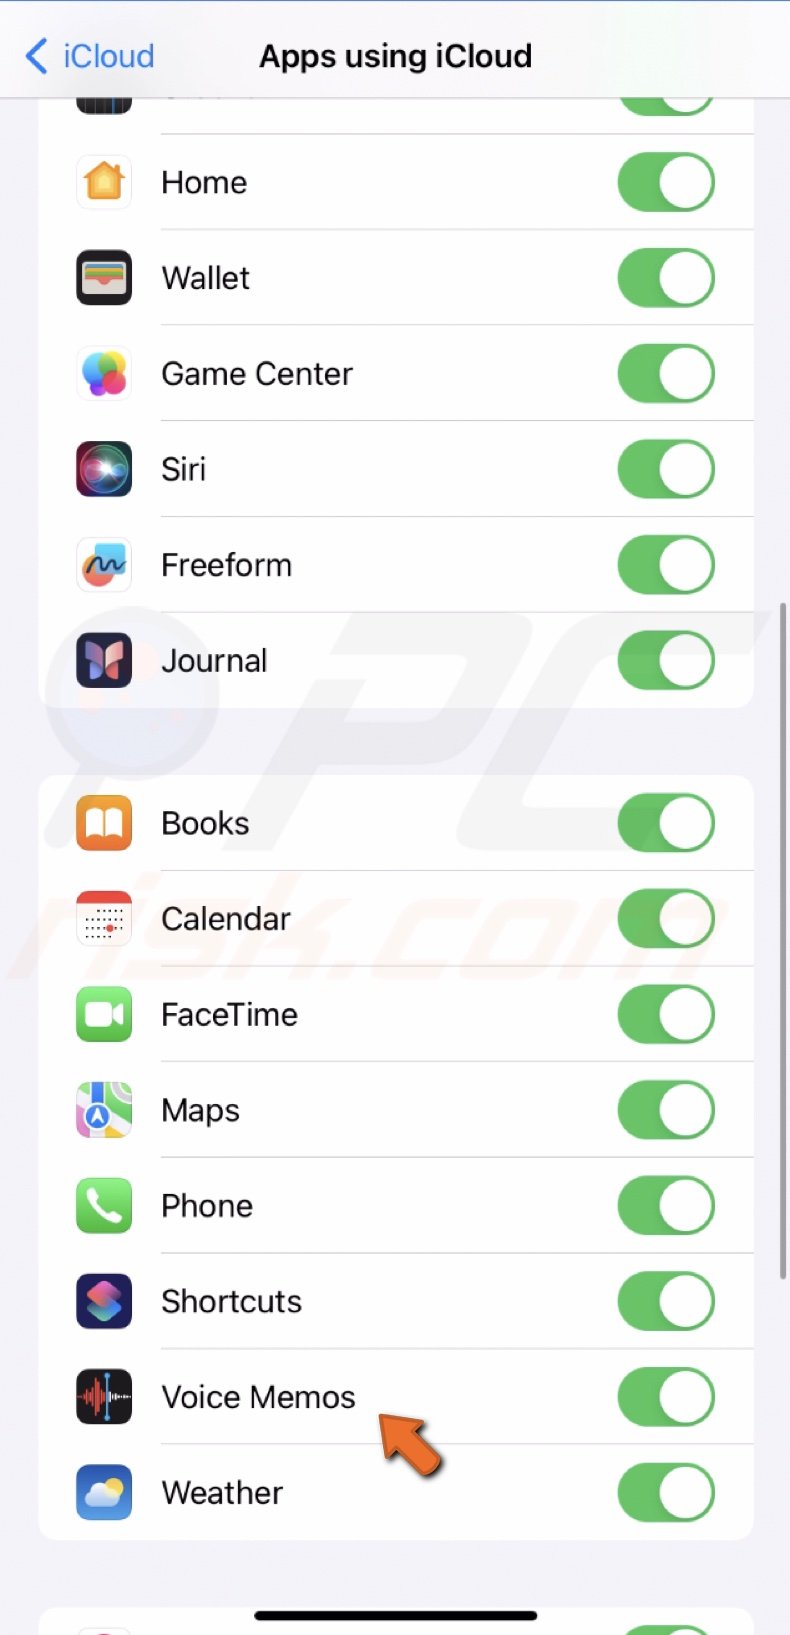
3. Find the "Voice Memos" option and enable it.
To sync Voice Memos with iCloud on your Mac, follow the steps below:
1. Click the Apple logo and go to "System Settings".
2. Click your Apple ID and select "iCloud".
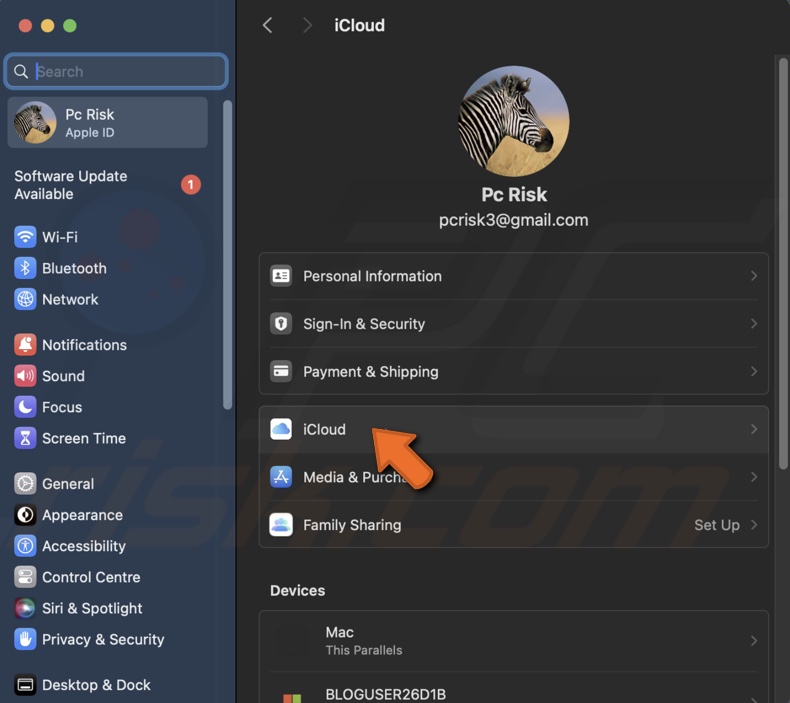
3. Choose "Show More Apps".
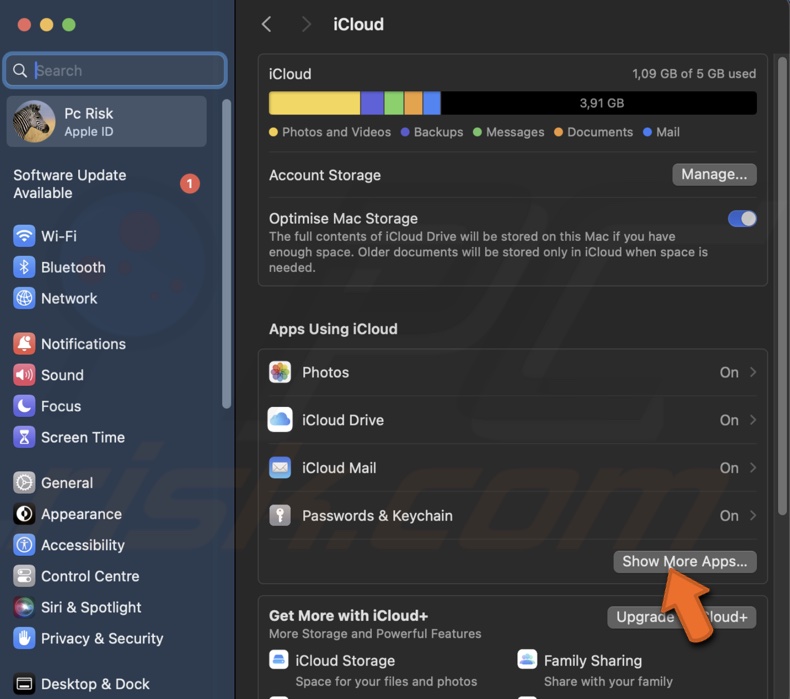
4. Turn on the "Voice Memos" sync.
Use AirDrop
AirDrop is a quick and easy way to transfer files between Apple devices, including Voice Memos. It's a wireless transfer method that works without cables or internet connectivity.
All you need is a Mac with OS X Yosemite or later and an iPhone running iOS 7 or later.
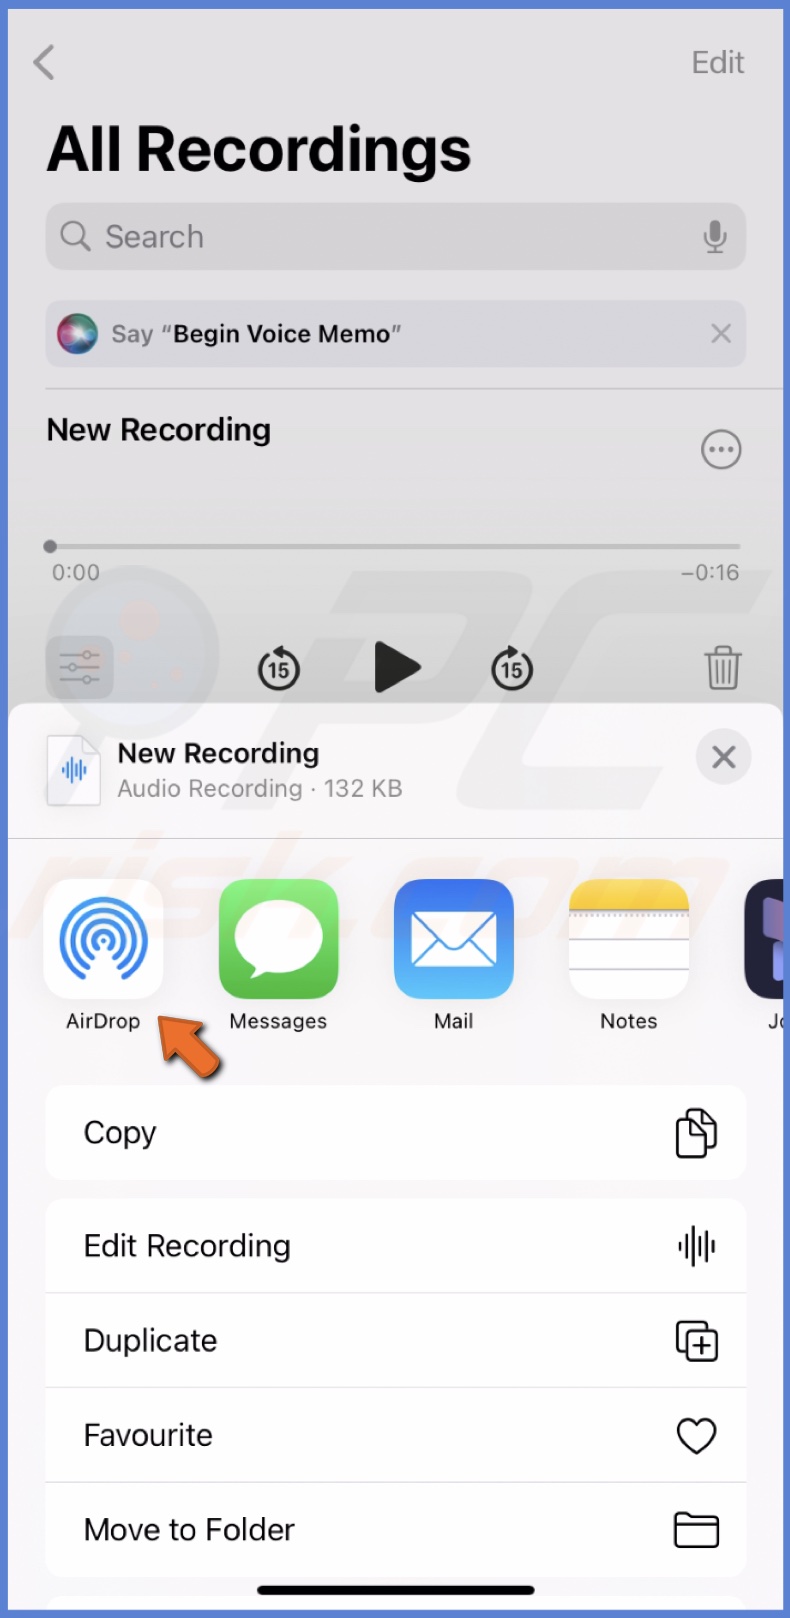
To send a Voice Memo using AirDrop on iPhone, follow the steps below:
1. Go to the Voice Memos app and open "All Recordings".
2. Select the recording and tap the three-dot button.
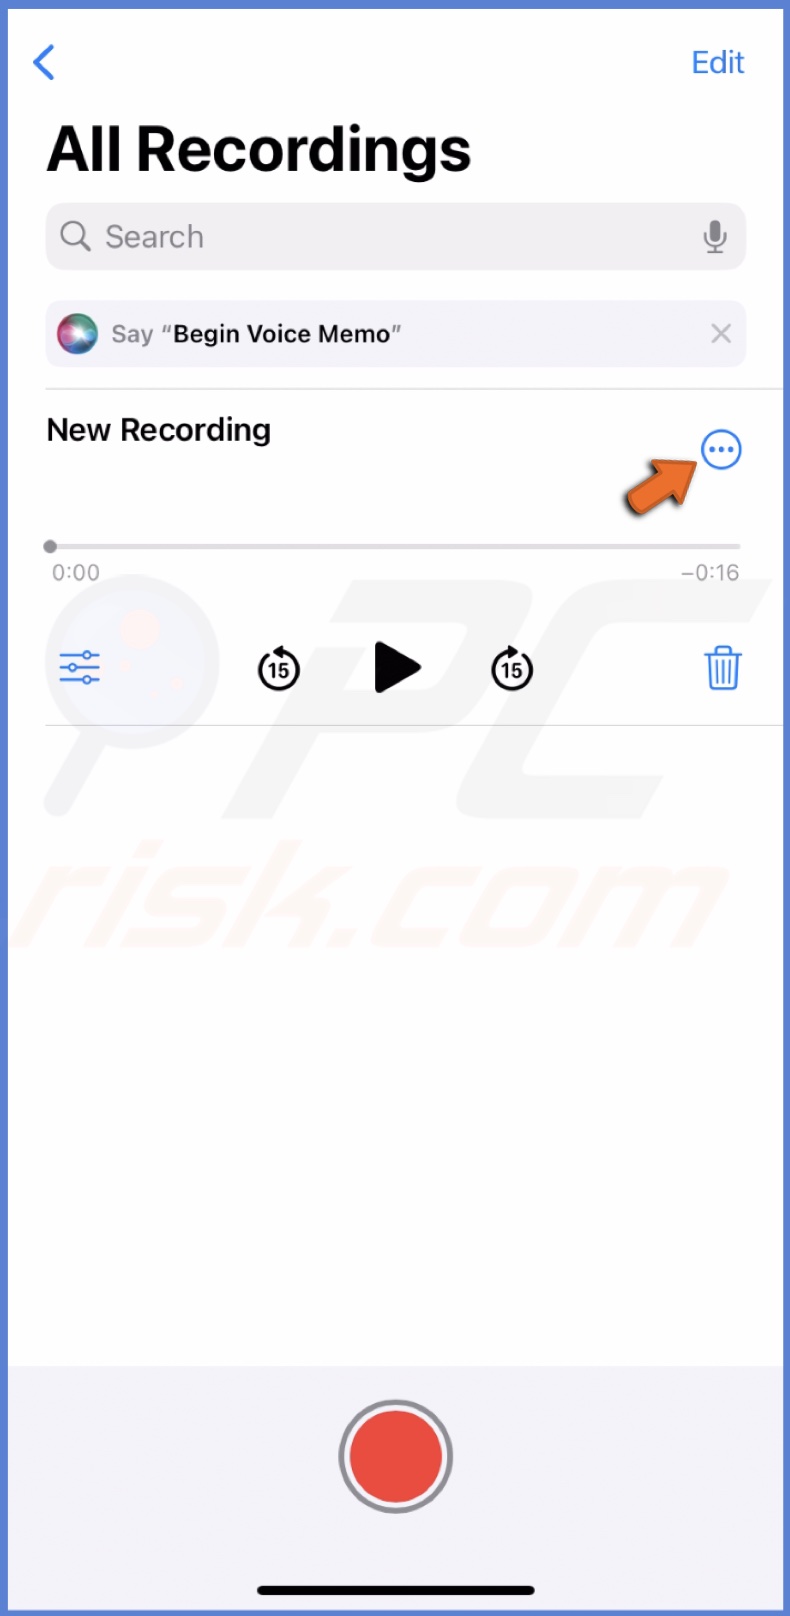
3. Tap "Share", select "AirDrop", and choose your Mac to send.
If you want to send more than one recording at the same time, follow the steps below:
1. Go to the Voice Memos app and open "All Recordings".
2. Tap "Edit", select the recordings, and tap the Share icon.
3. Select "AirDrop" and choose your Mac to send.
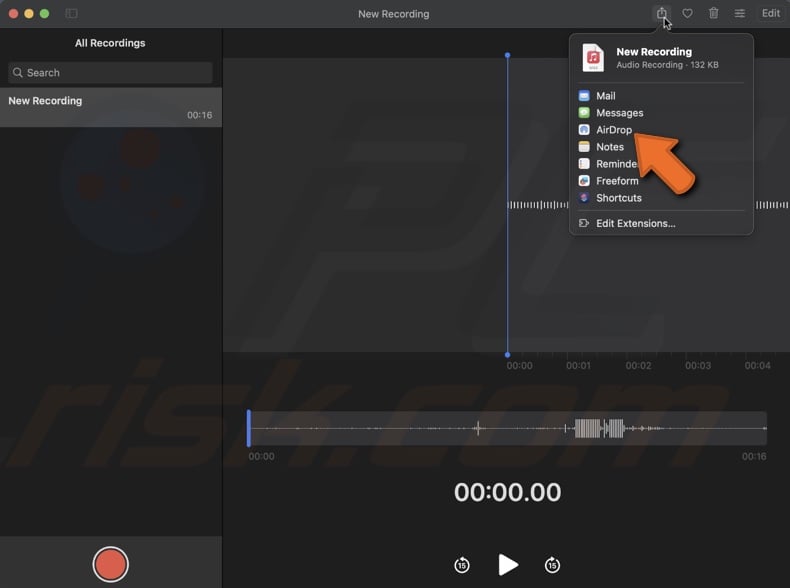
To send a Voice Memo using AirDrop on Mac, follow the steps below:
1. Open the Voice Memos app.
2. Select your recording and tap the Share icon.
3. Select "AirDrop" and tap on the iPhone name to send.
Send as email
Sharing a voice memo from your iPhone via email creates a file attachment that you can download and save to your Mac.
This method is also convenient because you can send the email to yourself or anyone else you want to share the voice memo with, and you can access the email from any device with internet connectivity.
To send a voice recording using the Mail app in iOS, follow the steps below:
1. Go to "All Recordings" in the Voice Memos app.
2. Select your recording, tap the three-dot icon, and choose "Share".
3. Tap "Mail" or another email app you use.
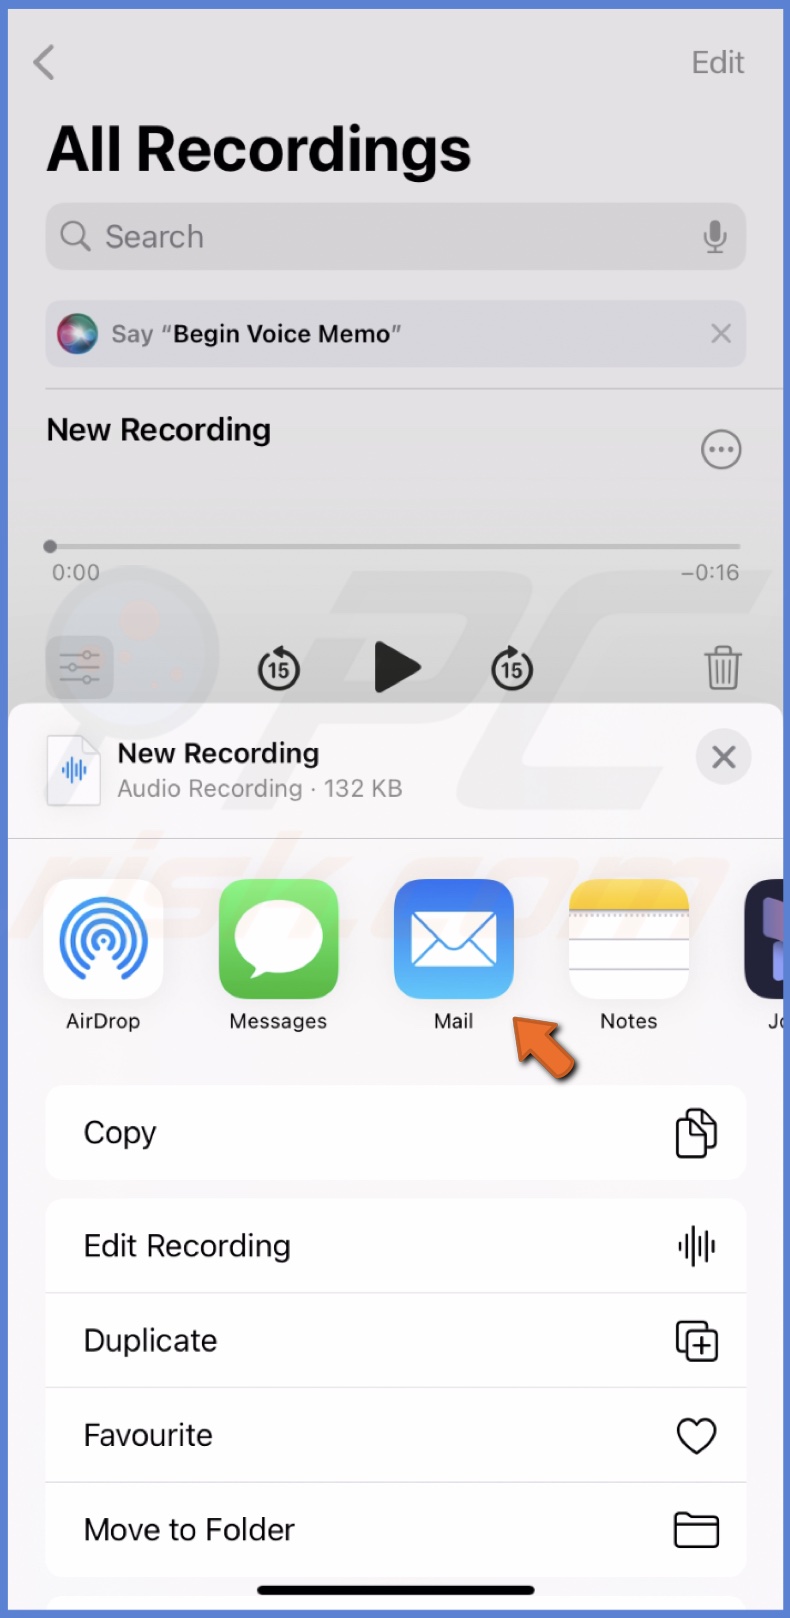
4. When an email with the recording attached appears, enter the recipient and send. You can send it to yourself or someone else.
5. Open the email on your Mac and download the voice recording.
To send a voice memo using the Mail app in macOS, follow the steps below:
1. Open the Voice Memos app.
2. Select your recording and tap the Share icon.
3. Select your mail app and follow the same steps as in the instructions for iPhone.
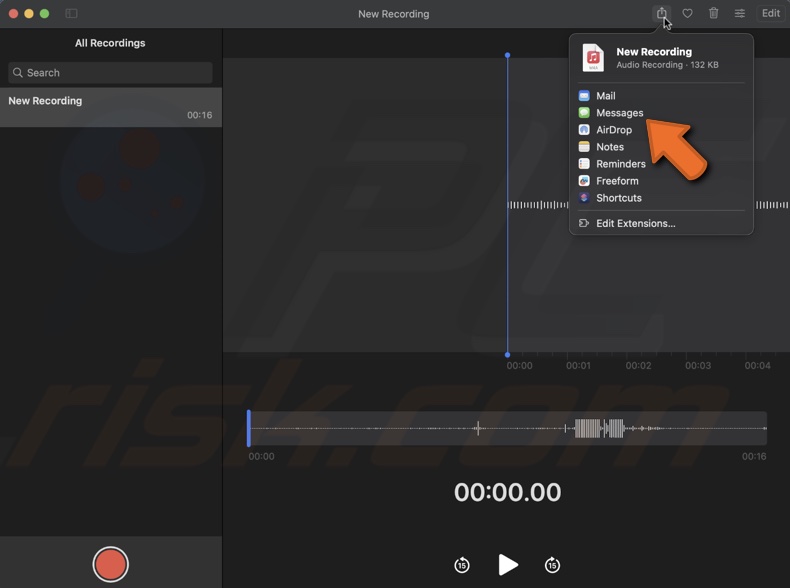
Use messaging apps
Messaging apps like iMessage or WhatsApp can quickly and conveniently transfer voice memos between your iPhone and Mac. This method can save you time and effort, especially if you frequently share voice memos between your devices.
However, make sure to use a reliable and secure messaging app, and be mindful of any file size limitations that may apply.
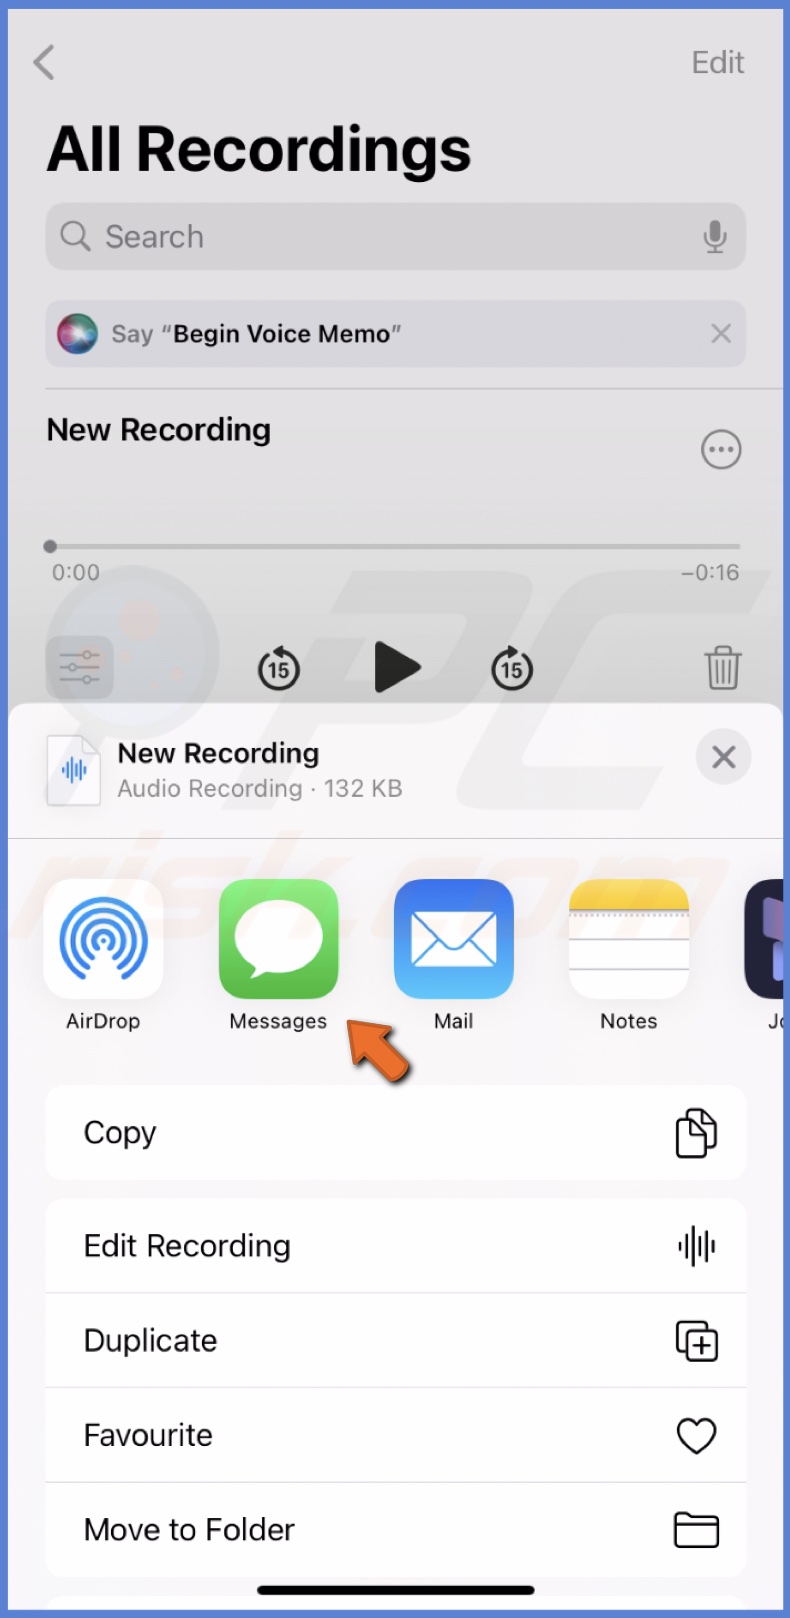
To send a Voice Memo using the messaging app on your iPhone, follow the steps below:
1. Go to the Voice Memos app and open "All Recordings".
2. Select the recording and tap the three-dot button.
3. Tap "Share", select the messaging app, and choose yourself or another recipient.
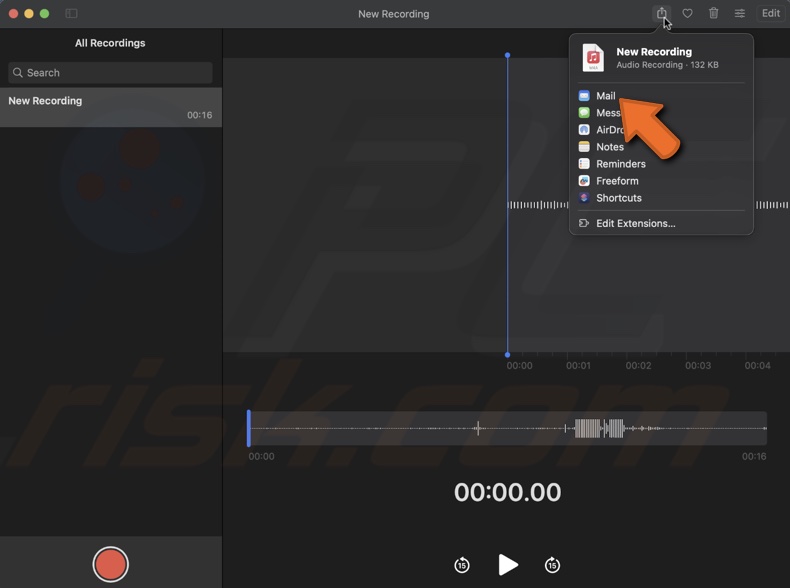
If you want to send a voice memo from your Mac using the messaging app, follow the steps below:
1. Open the Voice Memos app.
2. Select your recording and tap the Share icon.
3. Select the messaging app and select the recipient to send it to.
Send via the Files app
With the Files app, you can easily upload your Voice Memos to iCloud Drive and access them on your Mac. Additionally, the Files app lets you organize your Voice Memos into folders, making it easy to find the proper recording when needed.
To send a Voice Memo using the Files app on your iPhone, follow the steps below:
1. Go to the Voice Memos app and open "All Recordings".
2. Select the recording and tap the three-dot button.
3. Tap "Share" and select the "Save to Files".
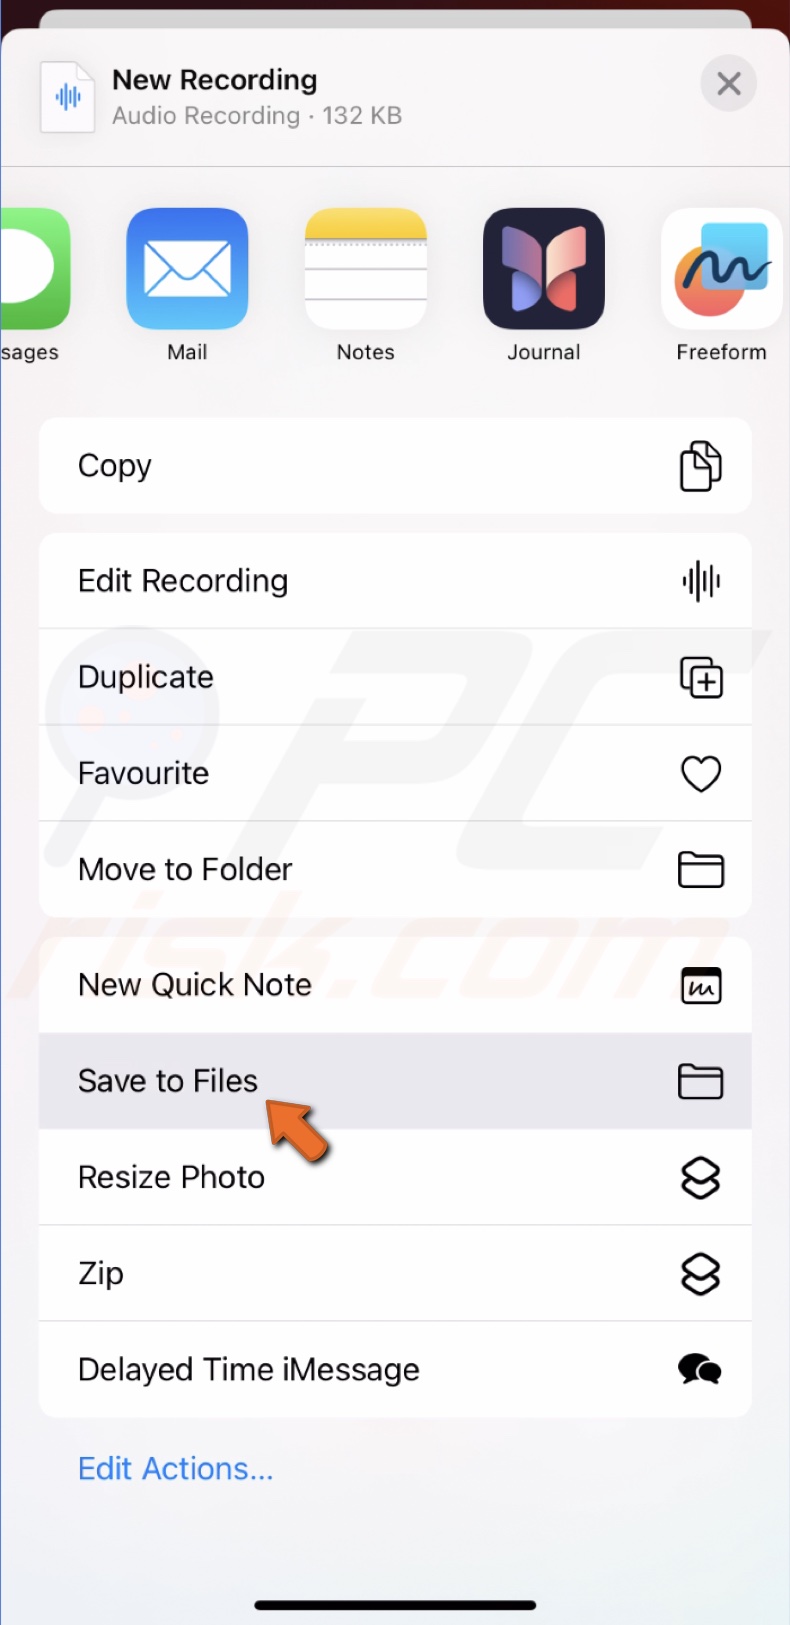
4. Choose "iCloud Drive" and tap "Save".
5. On your Mac, open the Finder window, and go to iCloud Drive.
6. Find and save the voice memo on Mac.
Take advantage of other Cloud storage
Using a cloud storage service like iCloud, Dropbox, or Google Drive, users can upload their voice memos to the cloud and then download them onto their Mac, or vice versa.
Cloud storage can provide an extra layer of security and back up your recordings, as the files are stored remotely and can be retrieved even if one of the devices is lost or damaged.
To send a Voice Memo using the Files app on your iPhone, follow the steps below:
1. Go to the Voice Memos app and open "All Recordings".
2. Select the recording and tap the three-dot button.
3. Tap "Share" and select the cloud app.
4. Open the same app on your Mac and save it where you want.

Use iTunes
You can use iTunes to transfer voice memos from an iPhone to a Mac or vice versa. The app allows you to manage playlists of your voice memos, making it easy to organize and access them.
Another advantage of using iTunes is that it provides a backup of your voice recordings.
To transfer voice memos from your iPhone using iTunes, follow the steps below:
1. Connect your iPhone to your Mac using a USB cable.
2. Open iTunes on your Mac and select the phone icon.
![]()
3. In the "File Sharing" section, find the Voice Memos app and choose the recording you want to transfer.

We hope this guide has provided you with the information you need. If you have any further questions or concerns, don't hesitate to contact Apple support or comment below!
Share:

Karolina Peistariene
Author of how-to guides for Mac users
Responsible for collecting, analyzing, and presenting problem-solving solution articles related to macOS issues. Years of macOS experience combined with solid research and analyzing skills help Karolina provide readers with working and helpful solutions as well as introduce various features Mac has to offer.
▼ Show Discussion