7 ways to improve Apple ID security

Get Free Scanner and check your computer for errors
Fix It NowTo fix found issues, you have to purchase the full version of Combo Cleaner. Free trial available. Combo Cleaner is owned and operated by Rcs Lt, the parent company of PCRisk.com read more.
Why you need to increase your Apple ID security and 7 ways how
Apple ID contains your data, such as contacts, payment details, and security information. With it, you can access iCloud, iMessage, FaceTime, and the App Store. That's why it's essential to keep your account secure.

Enabling two-factor authentication, generating a recovery key, and keeping passwords and OTP private will significantly improve your account's security. These are just a few things you can do to keep your personal information safe.
In this guide, you'll discover seven ways to secure your Apple ID on iPhone, iPad, and Mac.
Video on 7 ways to improve Apple ID security
Table of Contents:
- Introduction
- Enable two-factor authentication
- Don't share your Apple ID password and OTP
- Don't share your Apple ID account
- Update account information
- Set up a recovery contact
- Generate a recovery key
- Remove unused devices
- Video on 7 ways to improve Apple ID security
Download Computer Malware Repair Tool
It is recommended to run a free scan with Combo Cleaner - a tool to detect viruses and malware on your device. You will need to purchase the full version to remove infections. Free trial available. Combo Cleaner is owned and operated by Rcs Lt, the parent company of PCRisk.com read more.
Enable two-factor authentication
Using two-factor authentication is crucial as it can help protect your Apple ID from unauthorized access. In addition to your password, requiring a second authentication step adds extra security to your account.
The 2FA (two-factor authentication) ensures the safety of your data even if someone knows your Apple ID password. Without the additional six-digit verification code, no one will be able to access it. If you don't have 2FA turned on, enable the feature.
To turn on 2FA on your iPhone or iPad, follow the steps below:
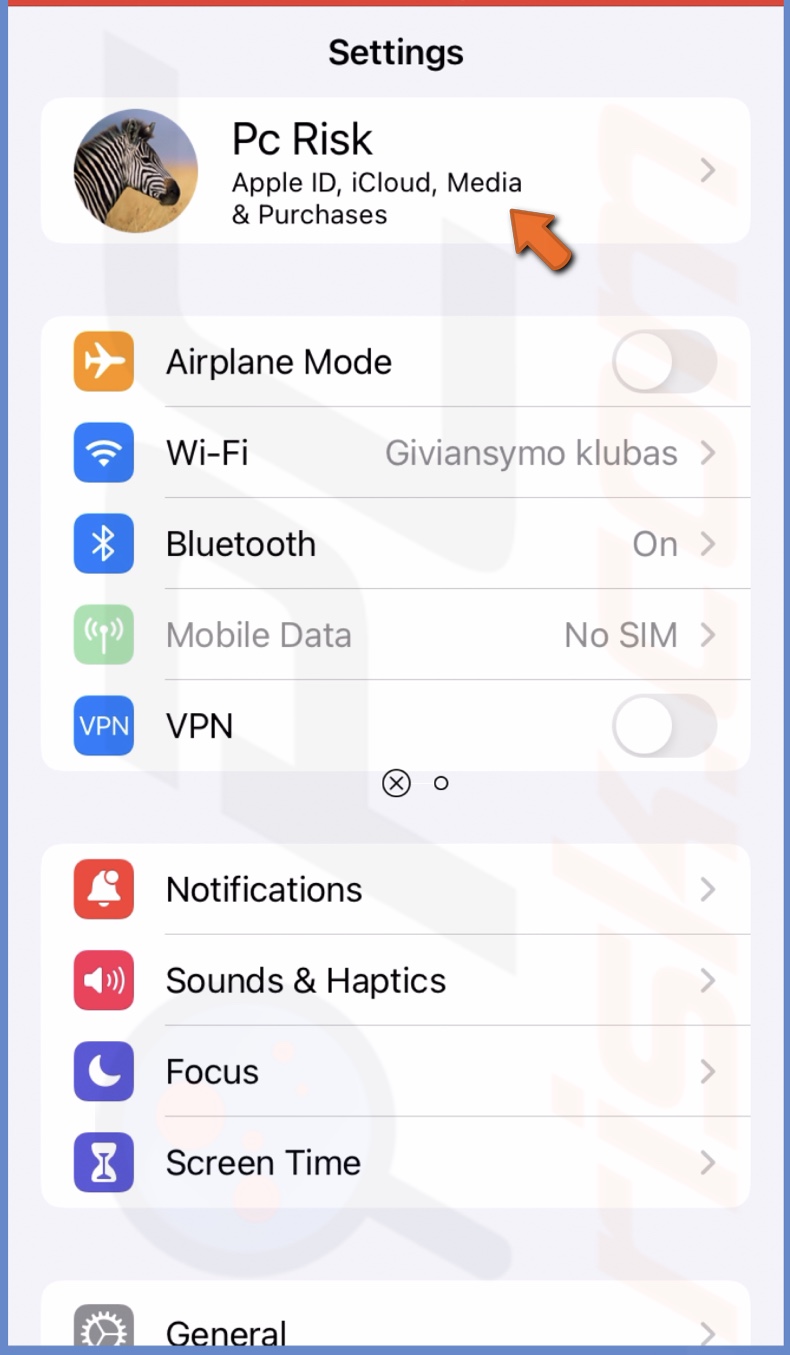
1. Go to your device settings and tap the Apple ID name.
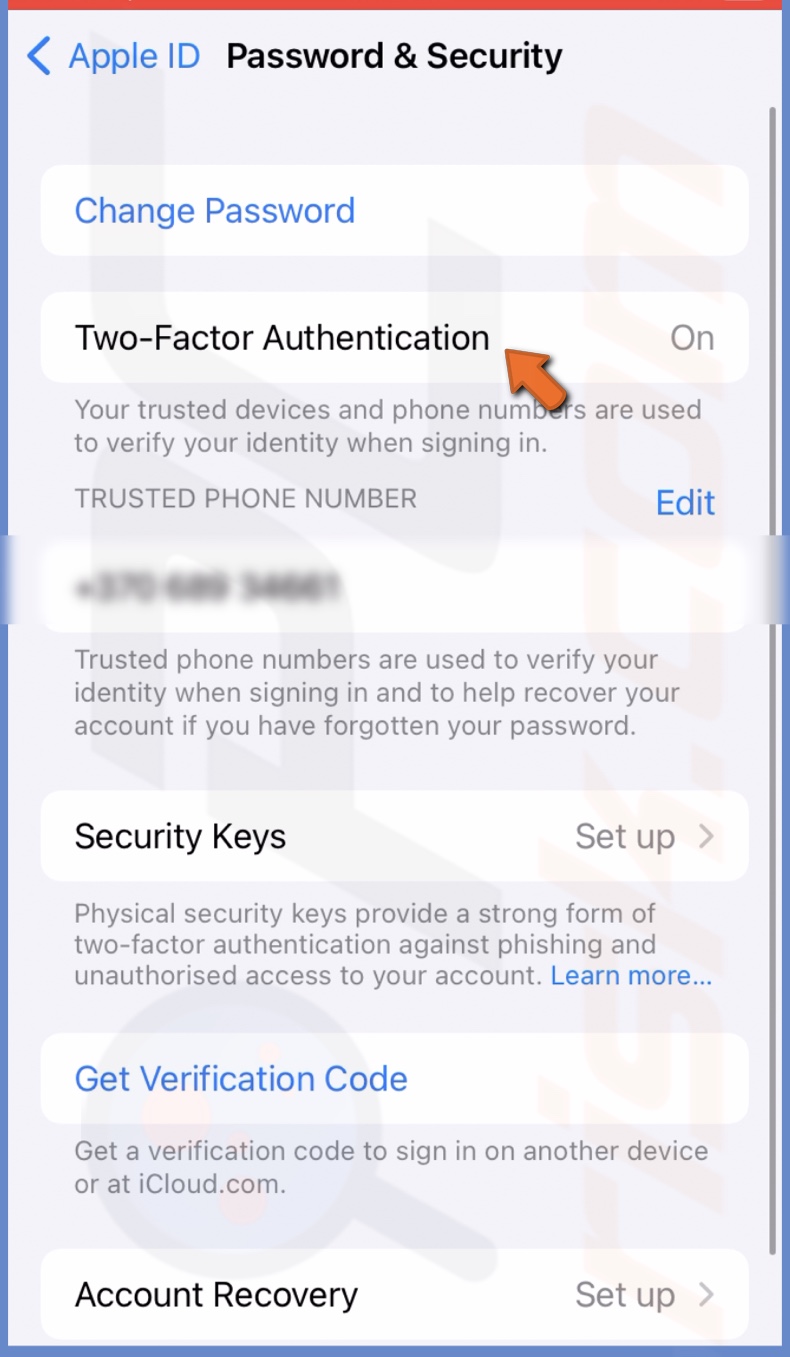
2. Go to "Password & Security".

3. Tap on "Turn On Two-Factor Authentication" and "Continue".
Keep in mind that you can only turn off 2FA within 14 days after you turn it on. After 14 days, you won't be able to turn it off.
The Apple ID password is the first step in accessing your account. That's why Apple requires that it be at least eight characters, including upper and lower cases, and at least one number.
If you're asked for your Apple ID information, don't give it out. Apple support agent would never ask for the security details for your account. Don't give out verification codes, passwords, or other sensitive information if asked to verify your account.
Keeping your Apple ID password and OTP (One Time Password) private increases the security of your account.
You might get asked by family members or friends to share your Apple ID. By letting others use your account, you're giving access to personal information. Even though you trust this person, there's a chance your data might get leaked, and someone could get into your account without your permission, especially if you're not using 2FA.
Create a Family Sharing account if you want to share your Apple ID with someone. That way, you can share iCloud photos, App Store purchases, or other benefits with others without giving direct access to your information.
Update account information
It's essential to have correct contact information, as any changes made to your account will be reported to you. You will get a notification, email, or an sms about any sign-in from a different device, password change, or an unknown sign-in attempt, so make sure to check your account info and update the necessary data.
If someone tries to access your account, change your password and review trusted phone numbers for better security.
To update account information on iPhone or iPad, follow the steps below:
1. Open the Settings app on your device.
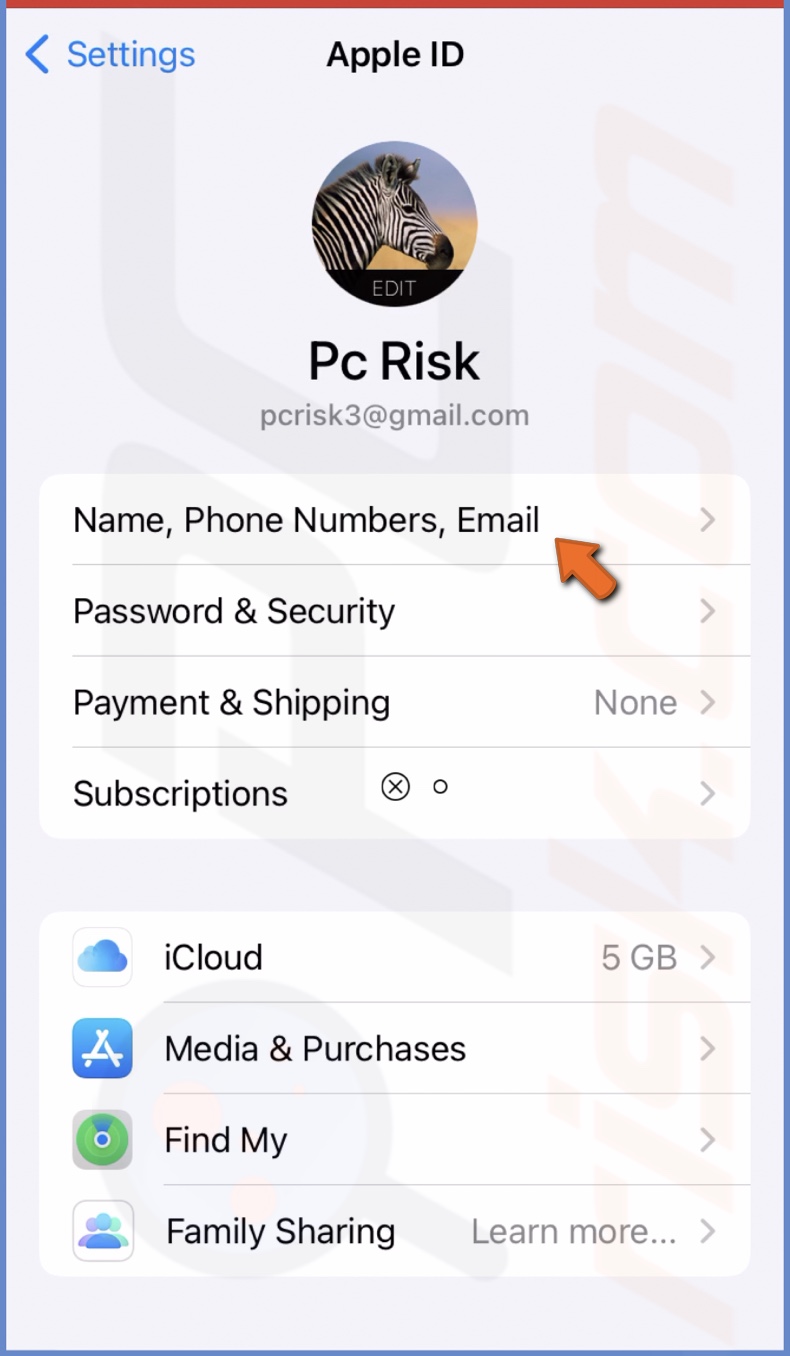
2. Tap on your Apple ID name.
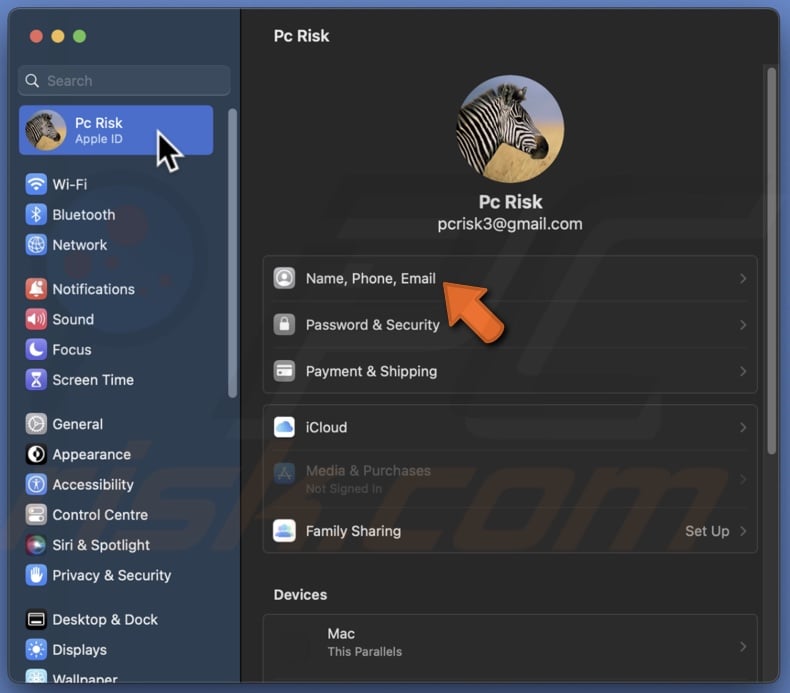
3. Select "Name, Phone, Numbers, Email" and update the necessary info.
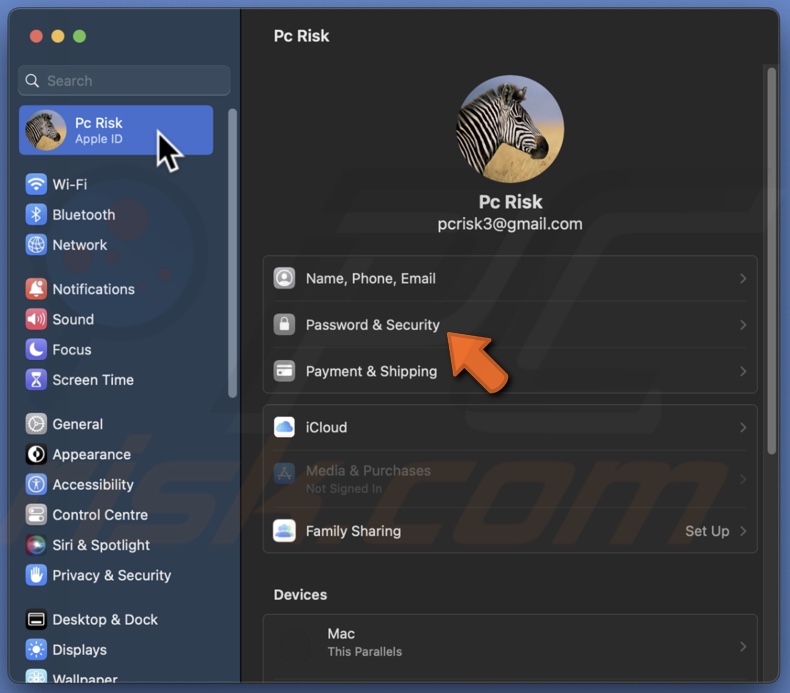
4. Then, go back and select "Password & Security". Review your trusted phone numbers. If needed, change your password.
To update account information on Mac, follow the steps below:
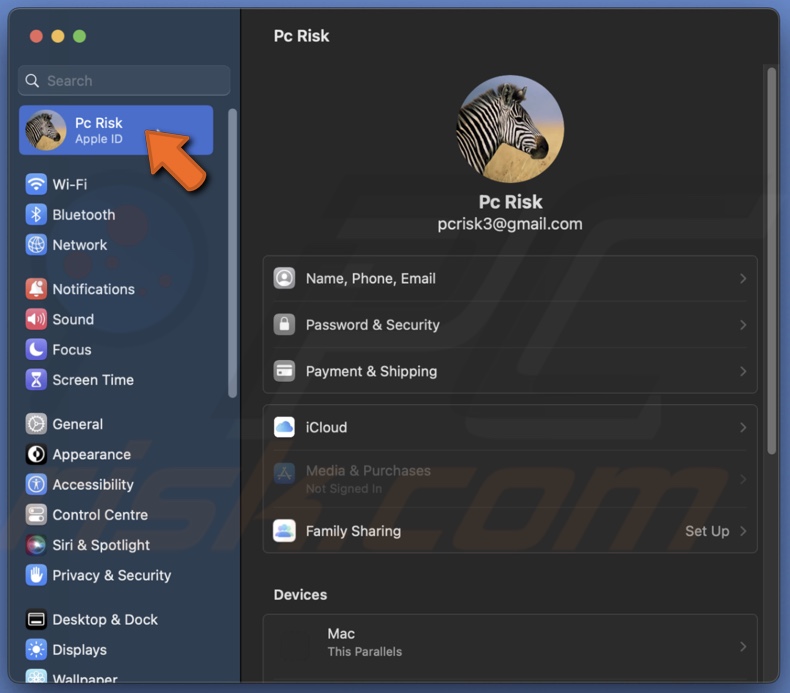
1. Click on the Apple logo and select "System Settings".
2. Go to your Apple ID.
3. Review and update your name, phone, and email information. Update your security info as well.
Set up a recovery contact
A recovery contact will allow you to change your Apple ID password and get back into your account if you ever get locked out.
To set up a recovery account on iPhone or iPad, follow the steps below:
1. Open the Settings app and tap on your Apple ID name.
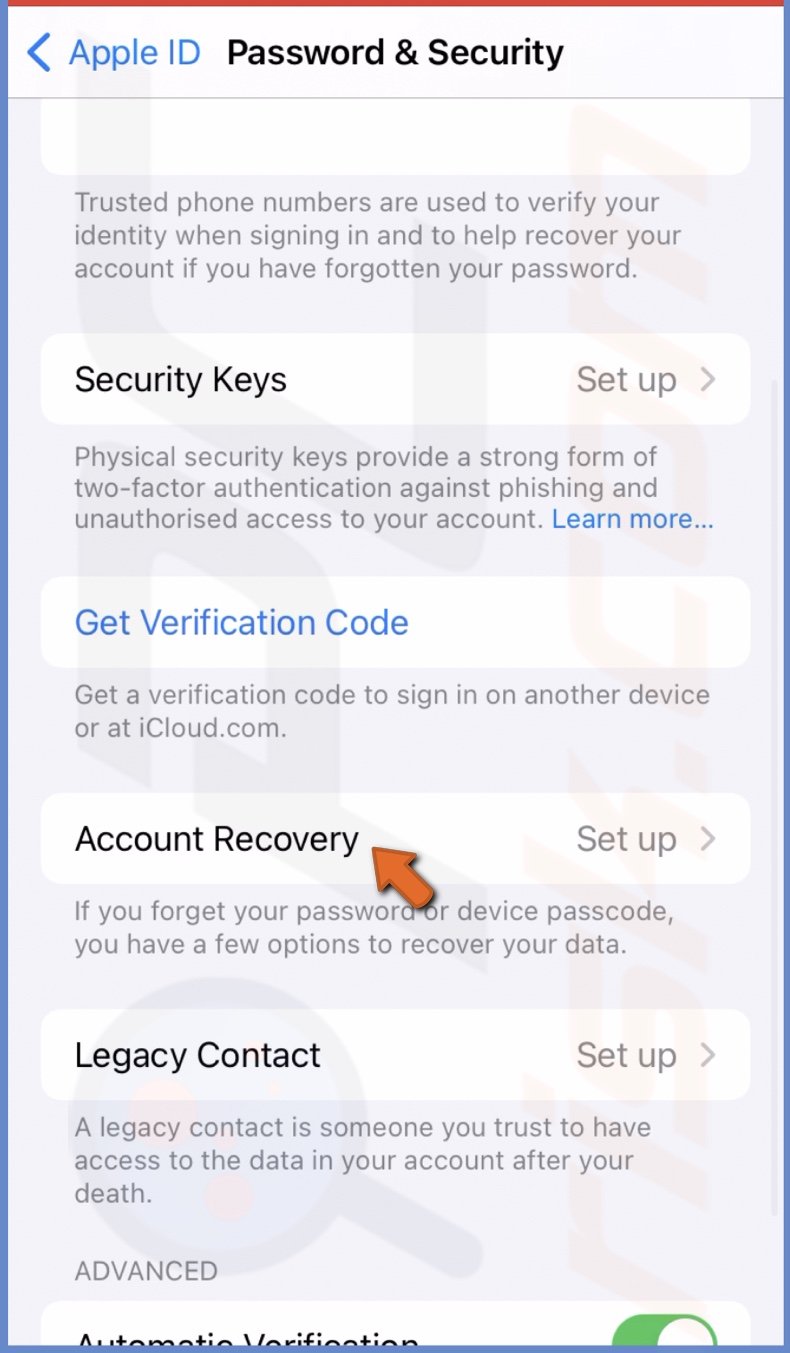
2. Tap "Password & Security" and select "Account Recovery".
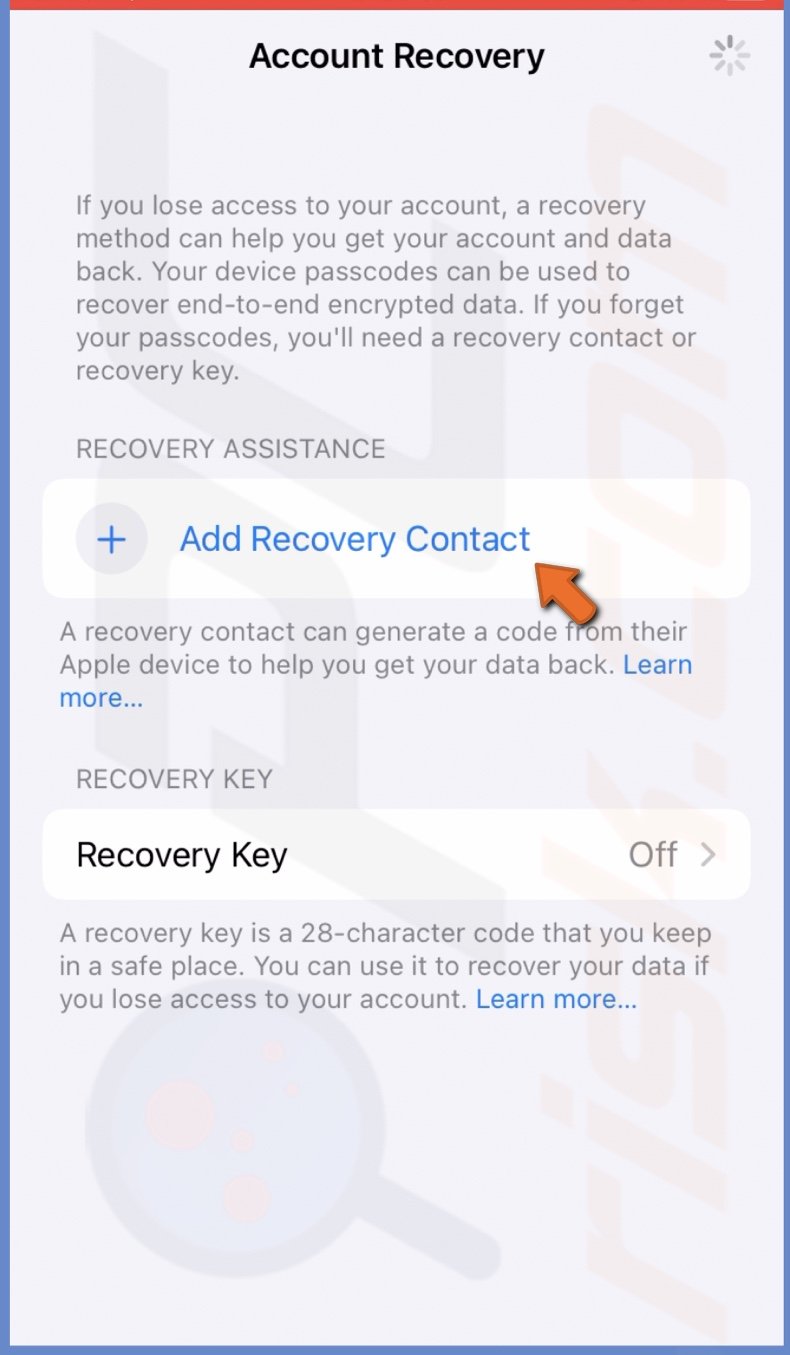
3. Choose "Add Recovery Contact" and tap on "Add Recovery Contact" again.
4. Confirm it's you with Touch ID or Face ID.
5. Select a contact that will be your recovery contact and tap on "Add".
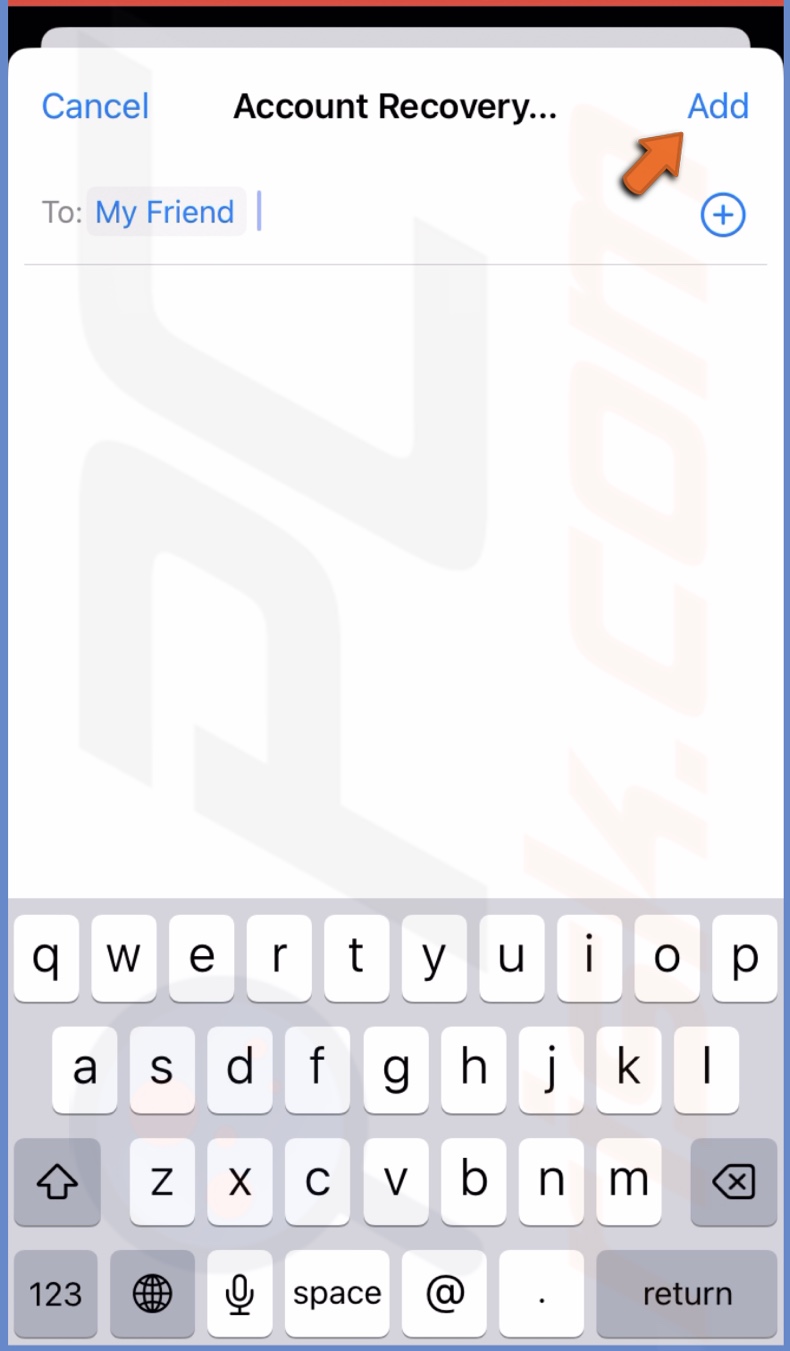
6. Send a message to the contact to inform them of your decision.
7. When done, tap on "Done".
To set up a recovery account on Mac, follow the steps below:
1. Click on the Apple logo and select "System Settings".
2. Go to your Apple ID.
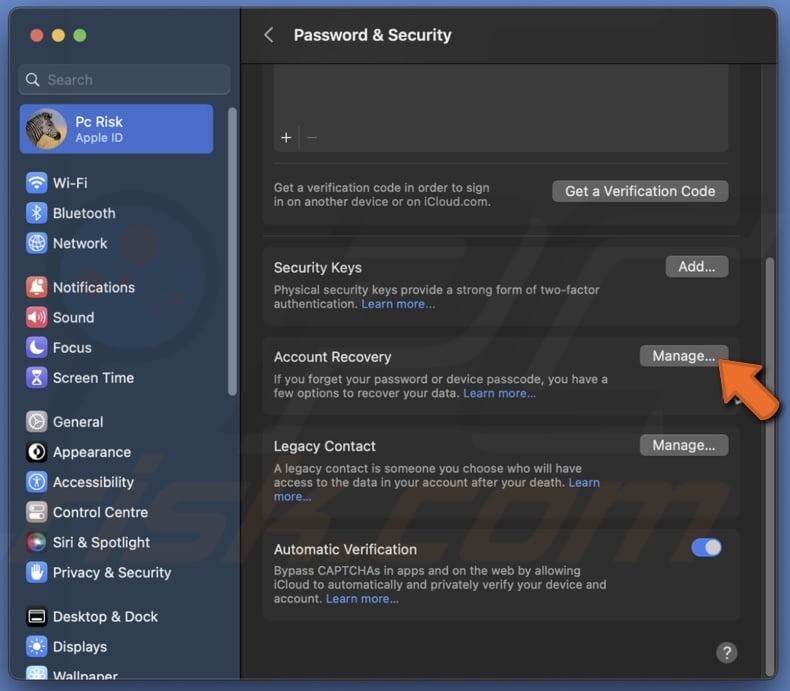
3. Select "Password & Security".
4. Next to "Account Recovery", click on "Manage".
5. Click the plus (+) icon and select "Add Recovery Contact".
![]()
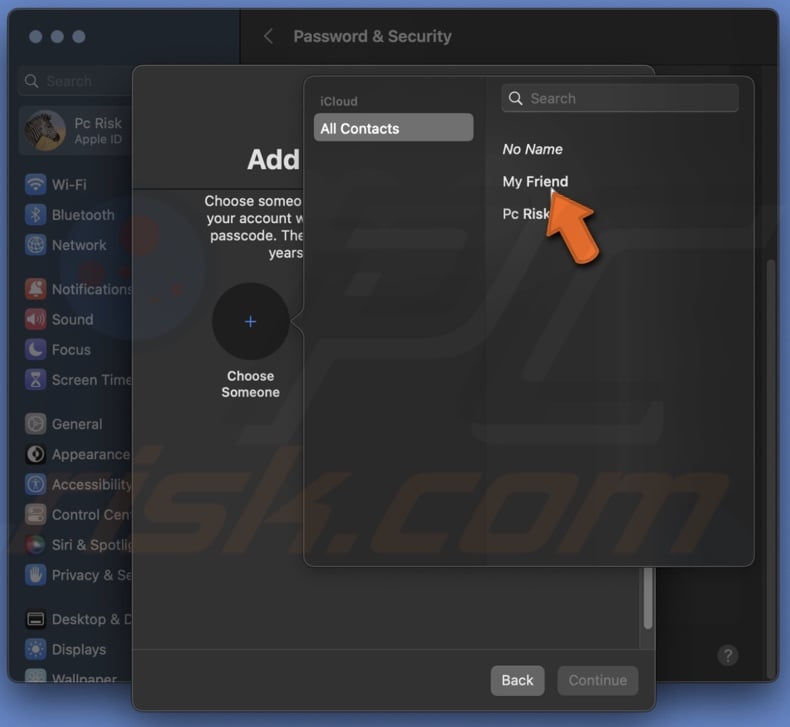
6. Enter your Mac password and click "+ Choose someone".
7. Select a contact and send them a text to inform the person of your decision.
8. When done, click on "Done".
Generate a recovery key
If you don't want to use recovery contact to access your Apple ID when in need, there's another option. Generate a recovery key that you'll be able to enter to confirm your identity and access your account.
The recovery key improves your account security by giving you more control over regaining access to Apple ID. Disable Apple's standard account recovery process when you generate the recovery key.
To generate a recovery key on an iPhone or iPad, follow the steps below:
1. Open the Settings app and tap on your Apple ID name.
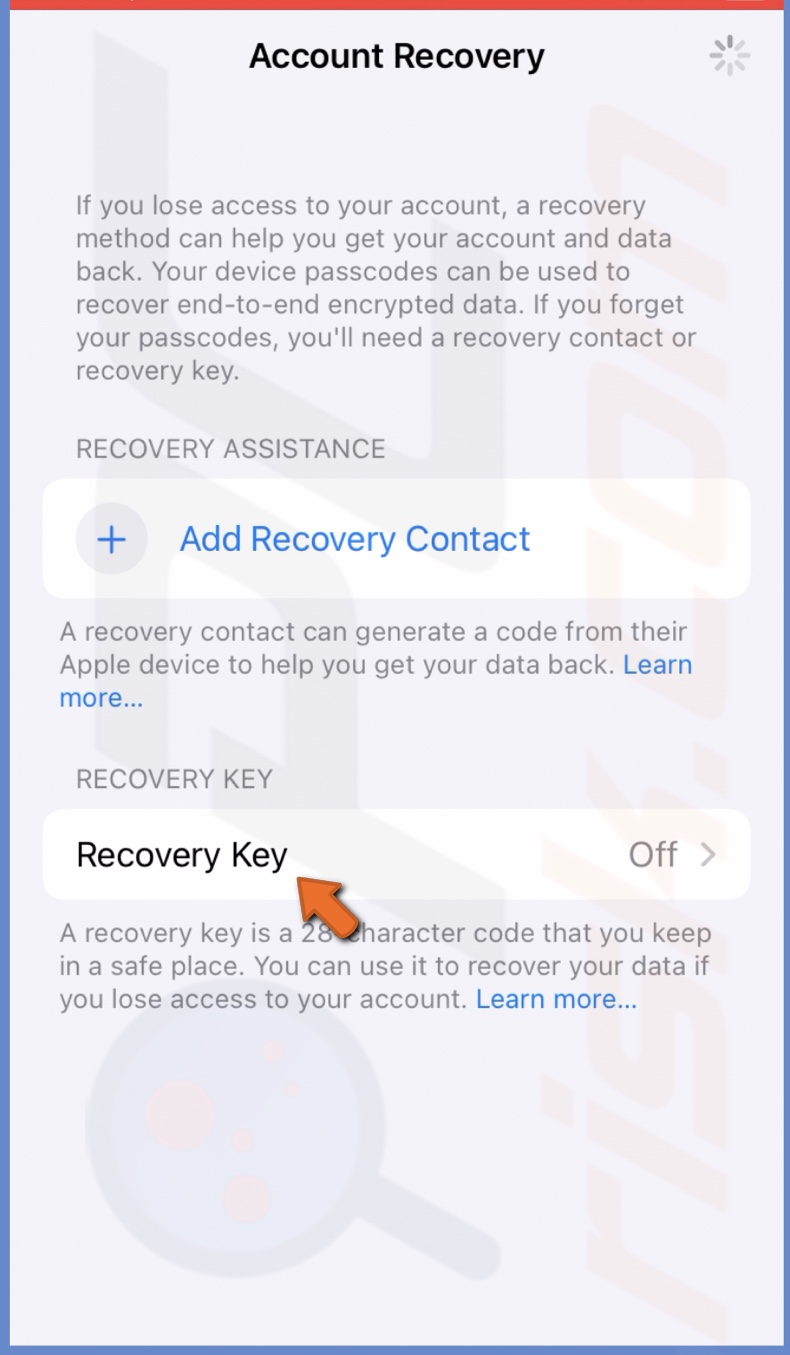
2. Tap "Password & Security" and select "Account Recovery".
3. Tap on "Recovery Key".
4. Enable "Recovery Key" and select "Use Recovery Key".

5. Enter the passcode, write down the recovery key, and keep it safe.

6. Tap on "Continue" and verify the key to enable it.
To generate a recovery key on Mac, follow the steps below:
1. Click on the Apple logo and select "System Settings".
2. Go to your Apple ID.
3. Select "Password & Security".
4. Next to "Account Recovery", click on "Manage".
5. Click on "Manage" again next to "Recovery Key".
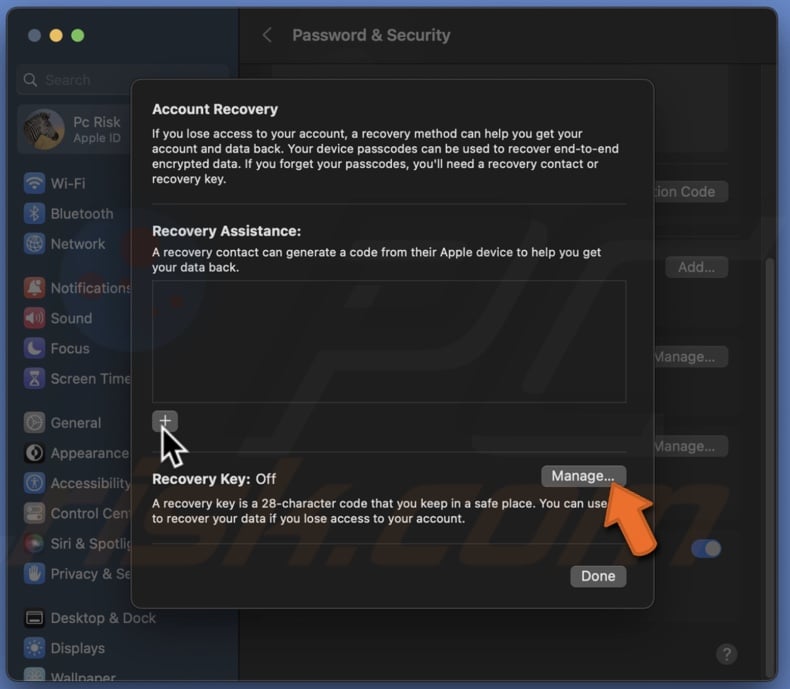
6. Select "Turn On" and click "Use Recovery Key".
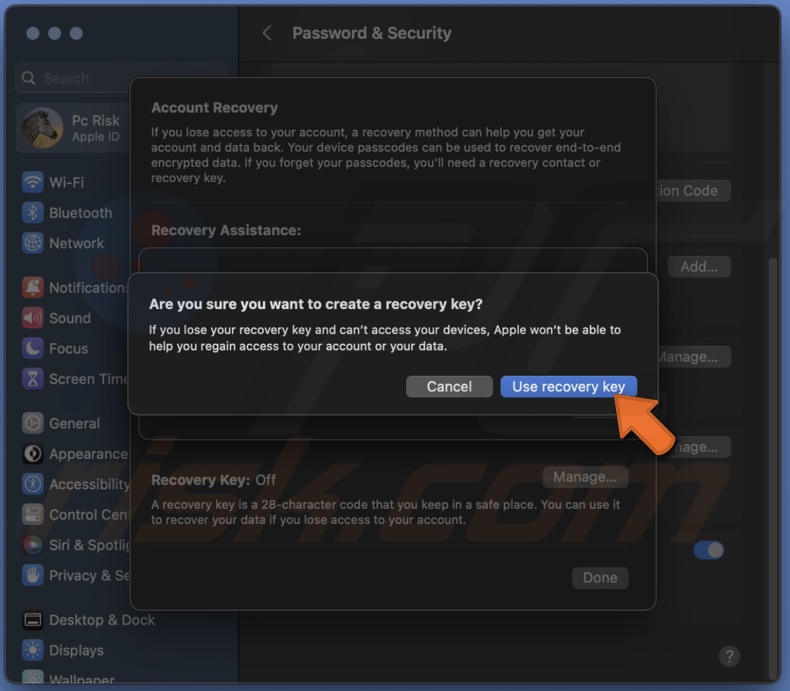
7. Enter the device passcode and click on "Allow".
8. Write down the recovery key and keep it safe. Then, click on "Continue".
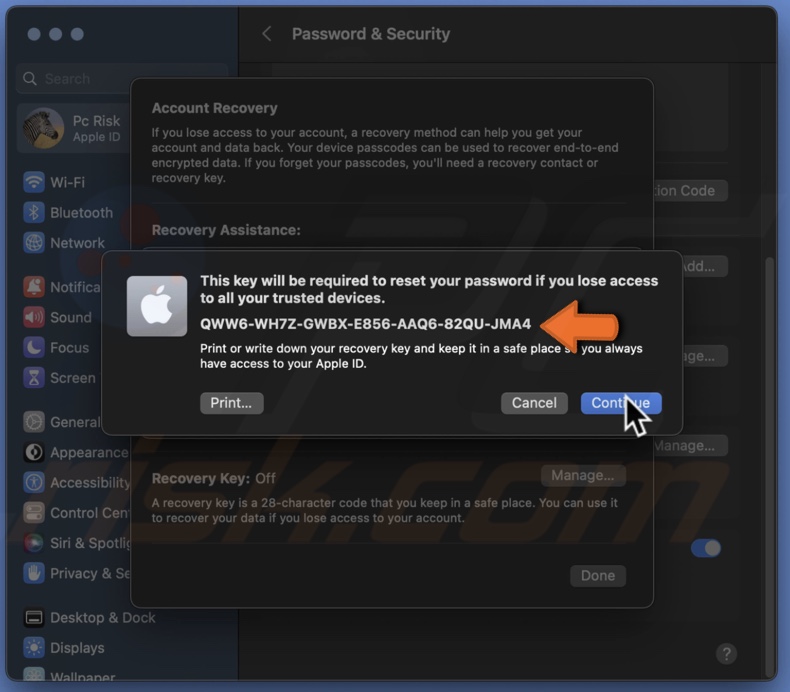
9. Enter the given key to enable it.
Remove unused devices
Remove old and unrecognized devices so they won't get access to your Apple ID services and any verification codes.
To remove devices from your Apple ID, follow the steps below:
1. Go to Settings app and tap on your Apple ID name.
2. Scroll to the bottom to see all devices linked to your account.
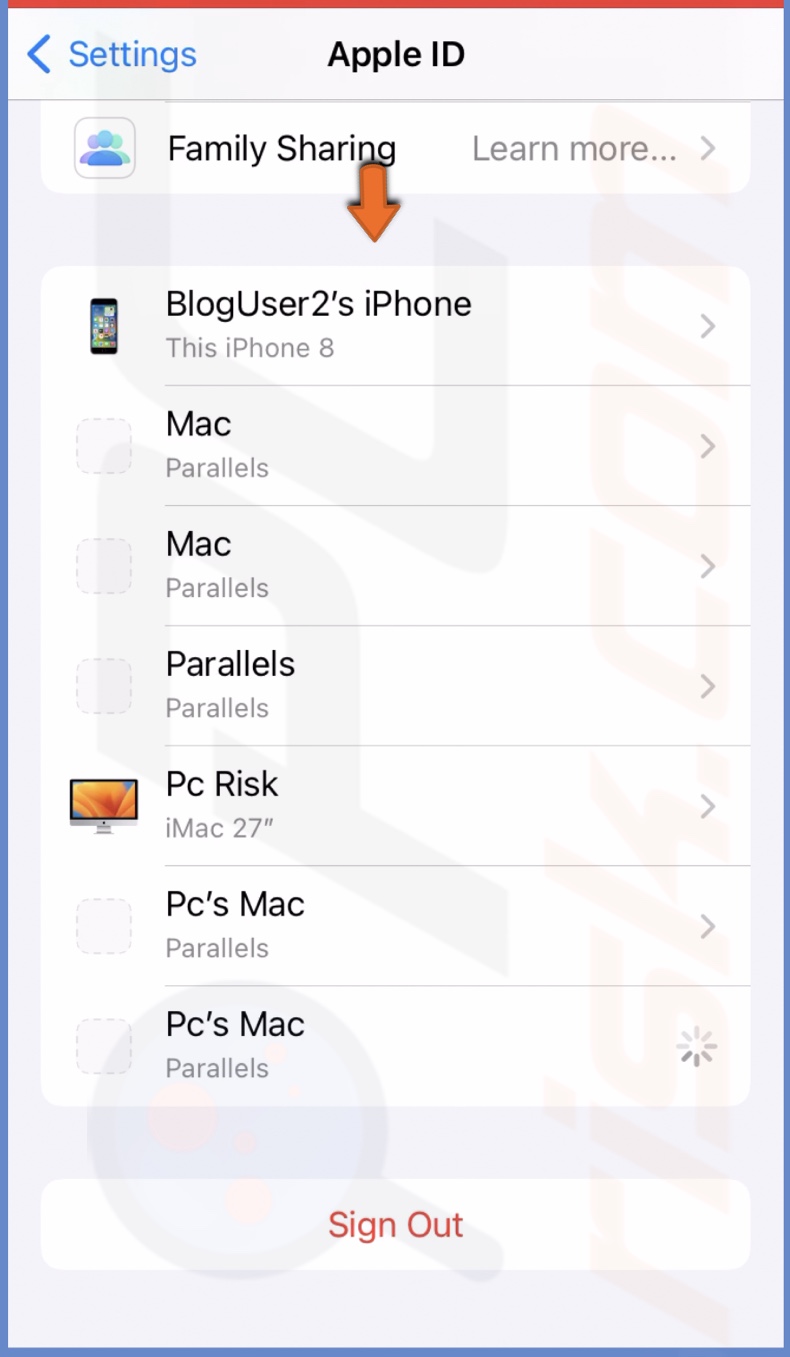
3. Tap on a device you don't use or don't recognize and select "Remove from Account".
4. Confirm the action by tapping "Remove".
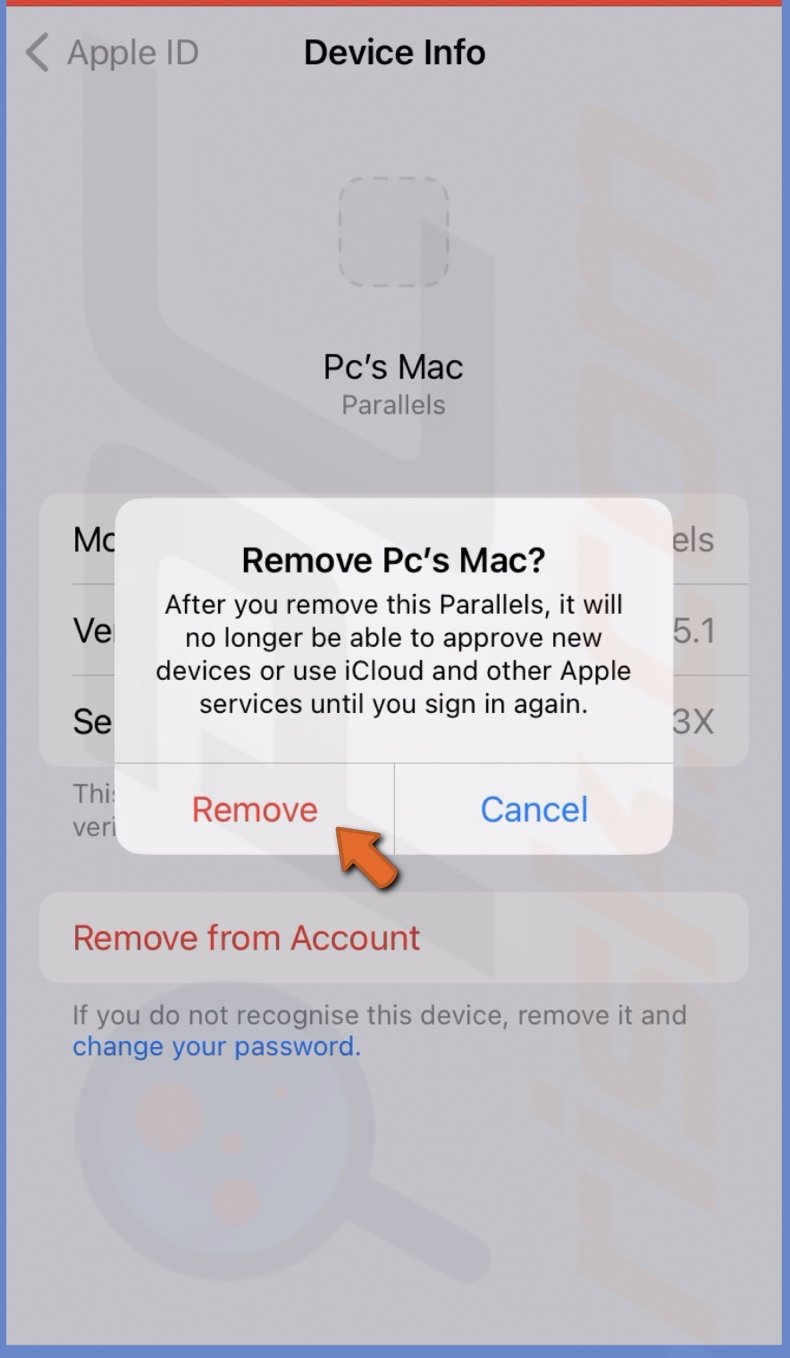
On Mac it's the same process.
If you have any questions, feel free to leave a comment below!
Share:

Karolina Peistariene
Author of how-to guides for Mac users
Responsible for collecting, analyzing, and presenting problem-solving solution articles related to macOS issues. Years of macOS experience combined with solid research and analyzing skills help Karolina provide readers with working and helpful solutions as well as introduce various features Mac has to offer.
▼ Show Discussion