Add or remove email address to iMessage and FaceTime on iOS and macOS

Get Free Scanner and check your computer for errors
Fix It NowTo fix found issues, you have to purchase the full version of Combo Cleaner. Free trial available. Combo Cleaner is owned and operated by Rcs Lt, the parent company of PCRisk.com read more.
How to add or remove an email address for Messages and FaceTime?
When you create an Apple ID, you provide your email address. It's then used for other Apple apps like the App Store, Message, and FaceTime. Other app users can see your email address as your contact information. But you might not want other people to see that particular email address.
In that case, you can add a different one and select it as your ID for messages and FaceTime. Adding a new email address is very simple and quick. You can add it to your Apple ID settings on your device.
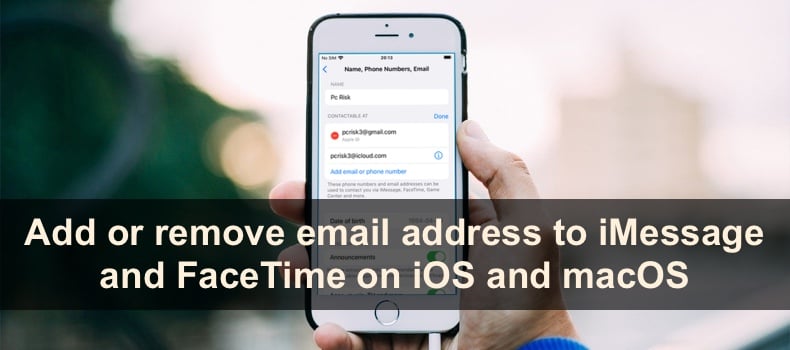
You can also delete an email address if you don't want to use it anymore. Thankfully you don't need to go to each app or its settings to remove the app. When you remove the email address from the Apple ID settings, it will be removed from all other apps as well. You can't delete the email that's tied up to the Apple ID.
Video on Add or remove email address to iMessage and FaceTime on iOS and macOS
Table of Contents:
- Introduction
- Add a new email to FaceTime and iMessage on iPhone and iPad
- Remove a new email to FaceTime and iMessage on iPhone and iPad
- Add a new email to FaceTime and iMessage on Mac
- Remove a new email to FaceTime and iMessage on Mac
- Video on Add or remove email address to iMessage and FaceTime on iOS and macOS
Download Computer Malware Repair Tool
It is recommended to run a free scan with Combo Cleaner - a tool to detect viruses and malware on your device. You will need to purchase the full version to remove infections. Free trial available. Combo Cleaner is owned and operated by Rcs Lt, the parent company of PCRisk.com read more.
Add a new email to FaceTime and iMessage on iPhone and iPad
To add a new email to FaceTime and iMessage on iPhone and iPad, follow the steps below:
1. Open the Settings app.
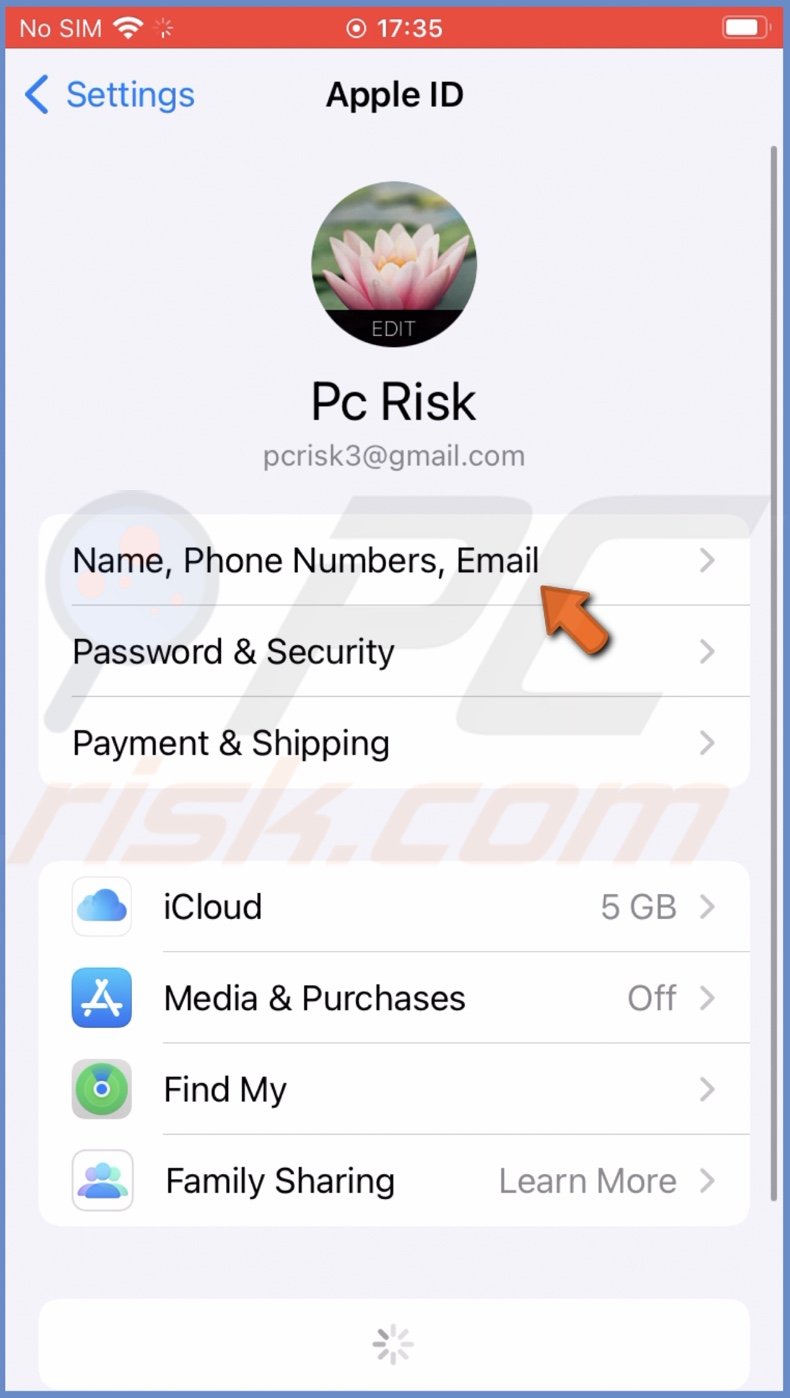
2. Tap on your Apple ID name at the top.
3. Then, tap on "Name, Phone Numbers, Email".
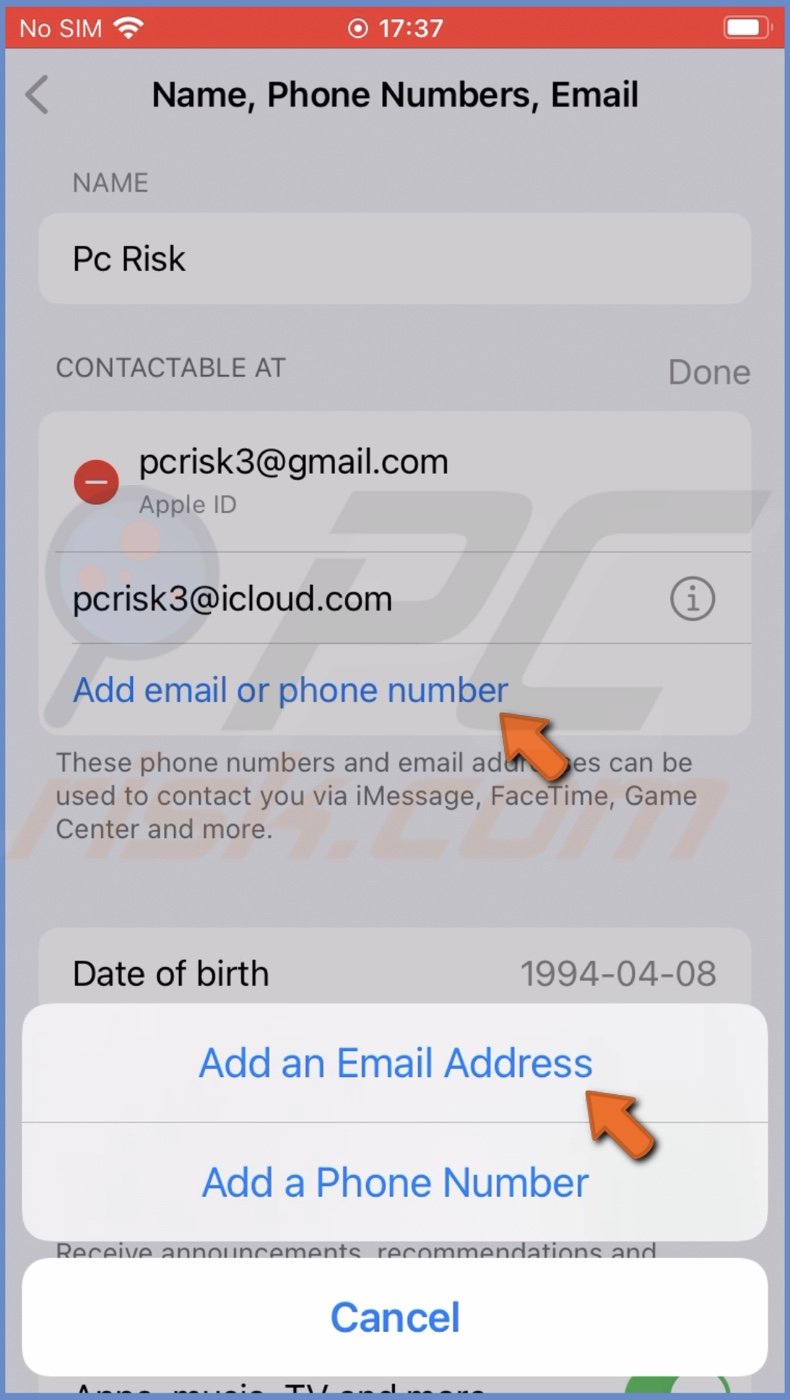
4. Next to "Contactable at", tap on "Edit".
5. Under your emails, an option "Add email or phone number" will appear. Tap on it.
6. Then, tap on "Add an Email Address".
7. Enter the new email address you want to add and tap on "Next".
8. Go to the email address you added and copy the code you got.
9. Go back to settings and paste the code where you're asked to.
10. After a few seconds, a pop should appear asking to add the new email address for iMessage and FaceTime. Tap on "Yes".
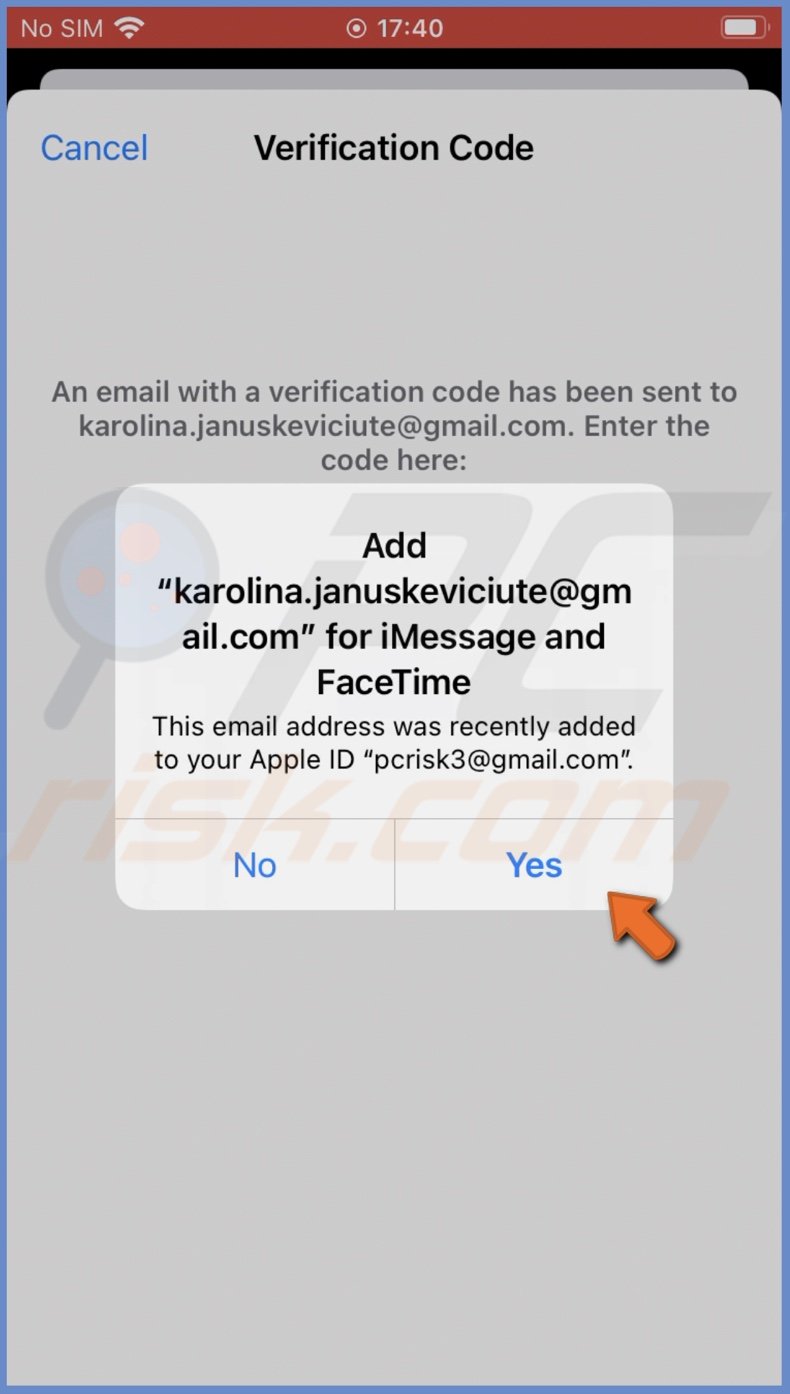
If the pop-up doesn't appear, follow the steps below:
1. Open the Settings app.
2. Scroll down and tap on "Messages".
3. Then, tap on "Send & Receive".
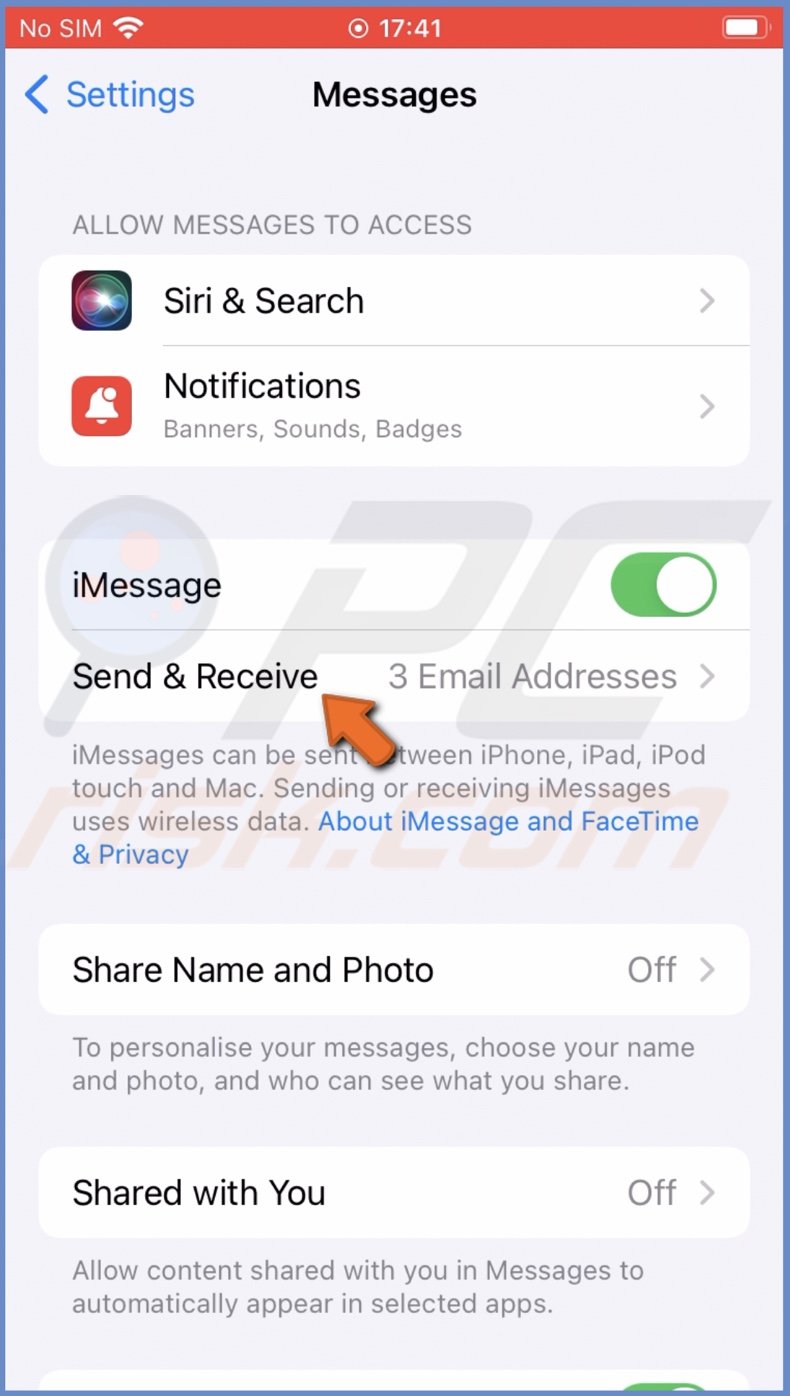
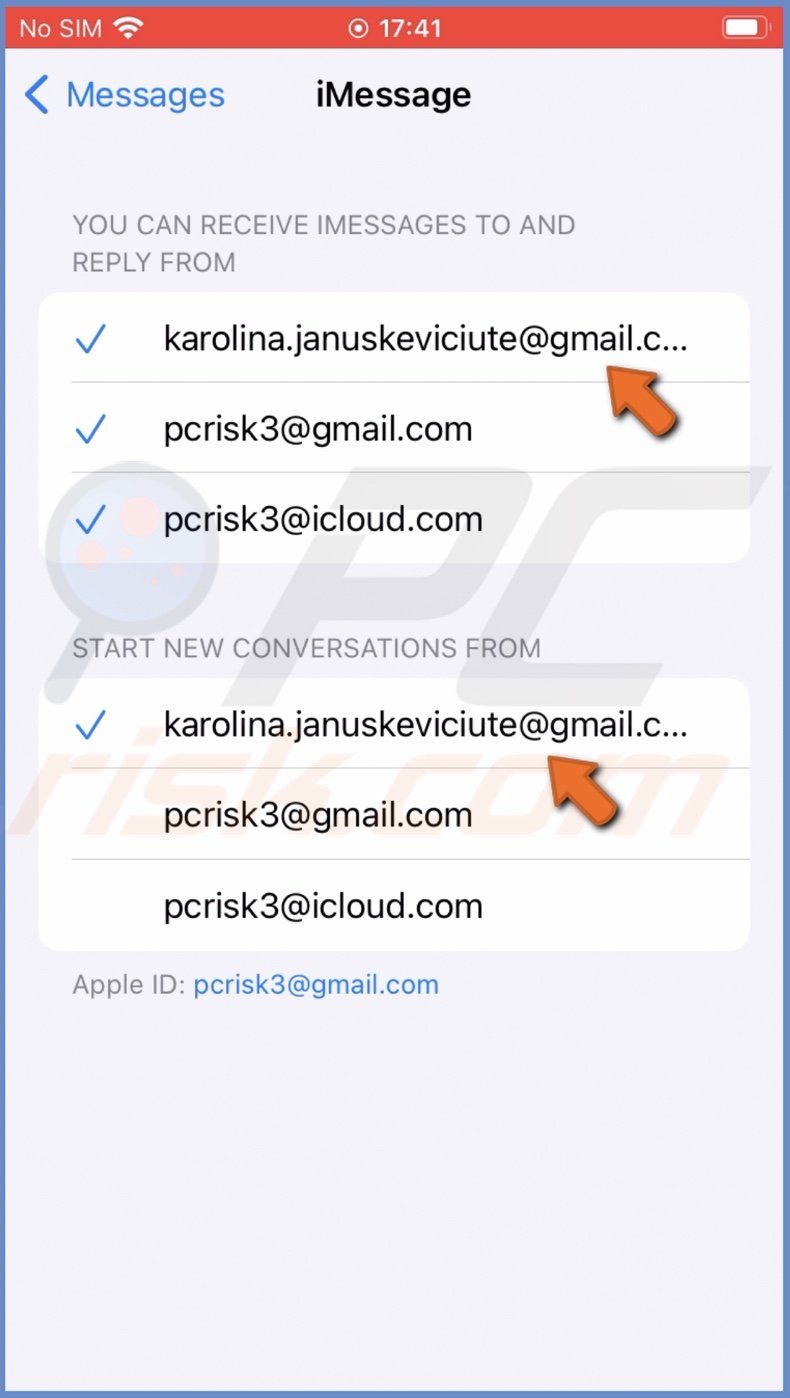
4. If you want to receive messages to and from the newly added email, select the email address under the first option. A checkmark should appear next to it.
5. If you want to start conversations using the added email, select the email address under the second option as well. A checkmark should appear next to it.
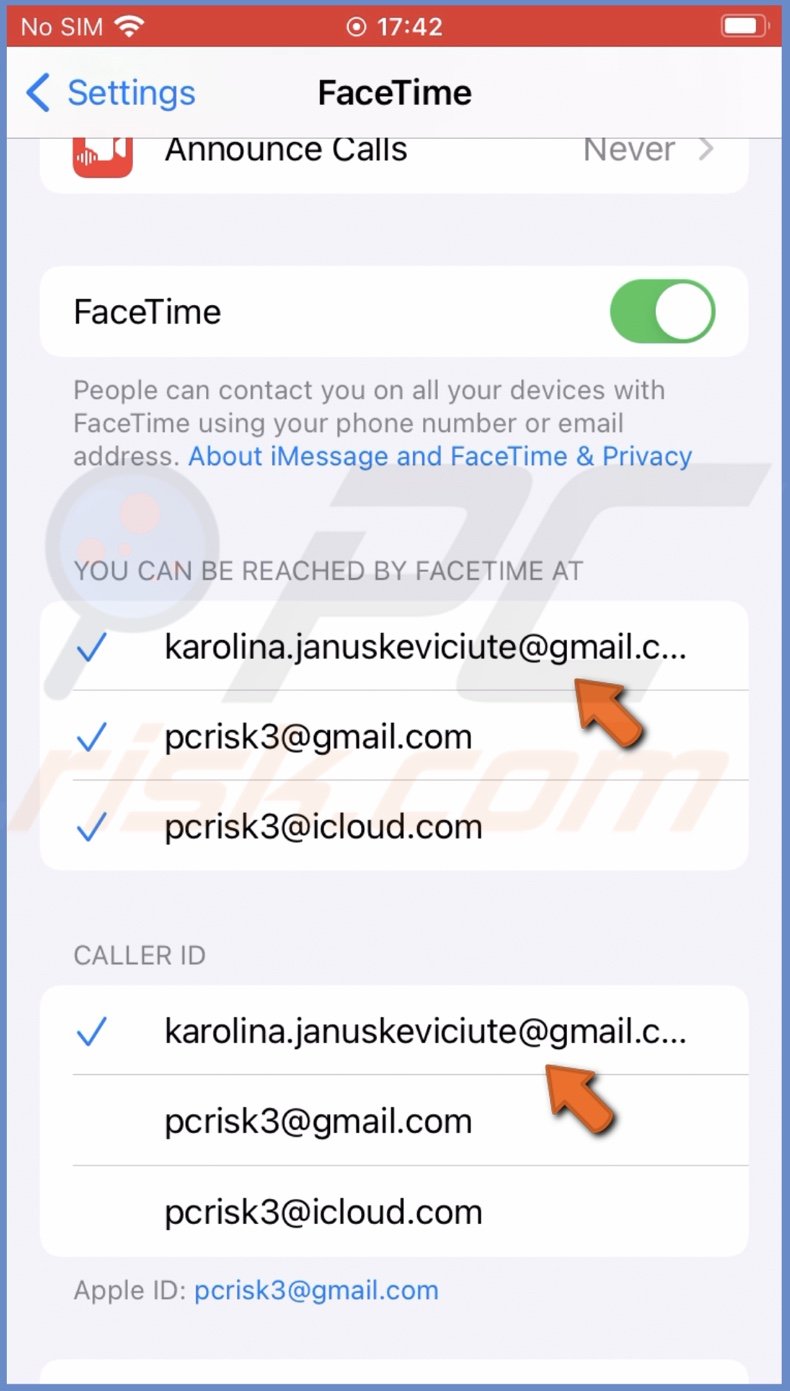
6. Go back to settings and tap on "FaceTime".
7. If you want people to reach you by FaceTime with the new email, select the newly added email in the first option. A checkmark should appear.
8. If you want other users to see the newly added email as your caller ID and not your phone number or other email address, select it in the second option as well. A checkmark should appear.
Remove a new email to FaceTime and iMessage on iPhone and iPad
To remove email from FaceTime and iMessage on iPhone and iPad, follow the steps below:
1. Open the Settings app.
2. Tap on your Apple ID name at the top.
3. Then, tap on "Name, Phone Numbers, Email".

4. Next to "Contactable at", tap on "Edit".
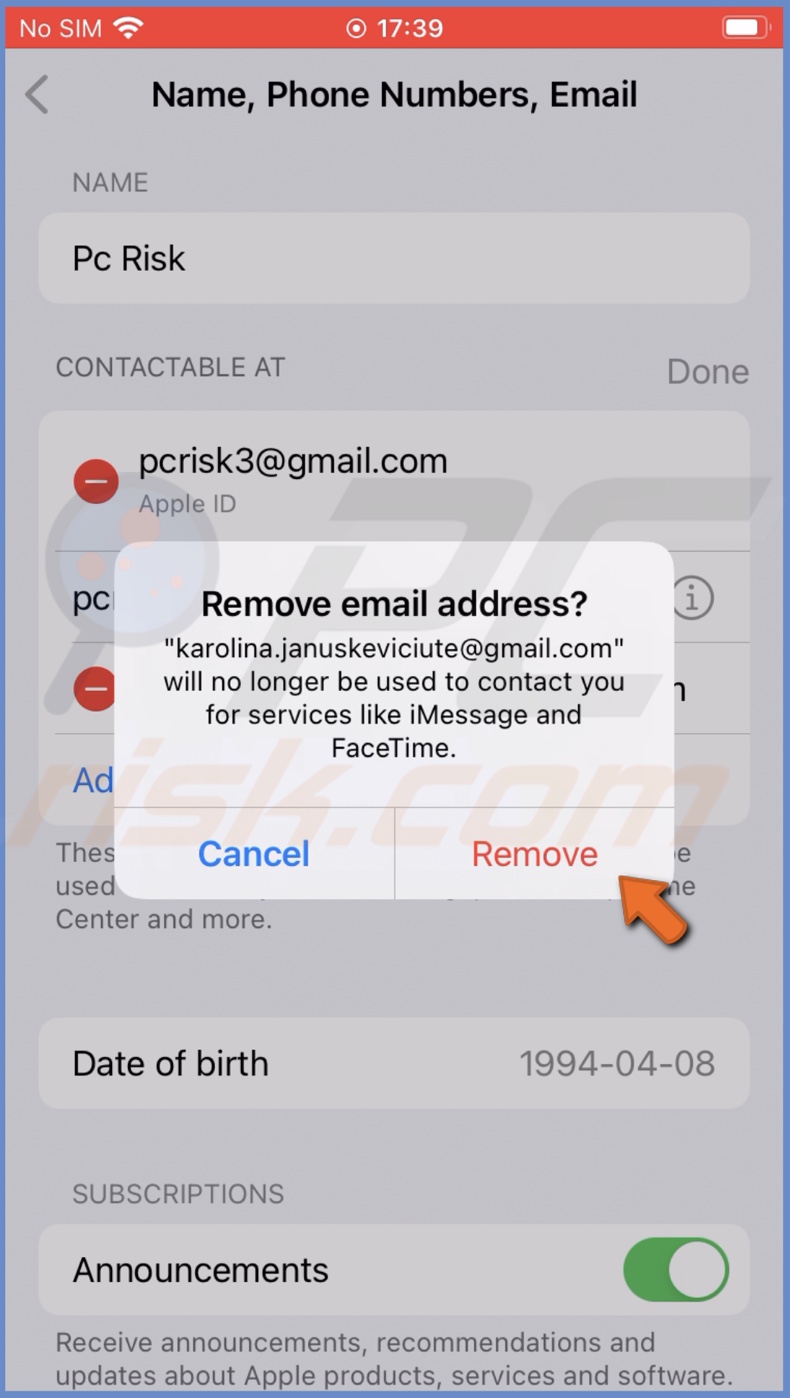
5. Next to the email address you want to delete, tap on the red minus (-) icon.
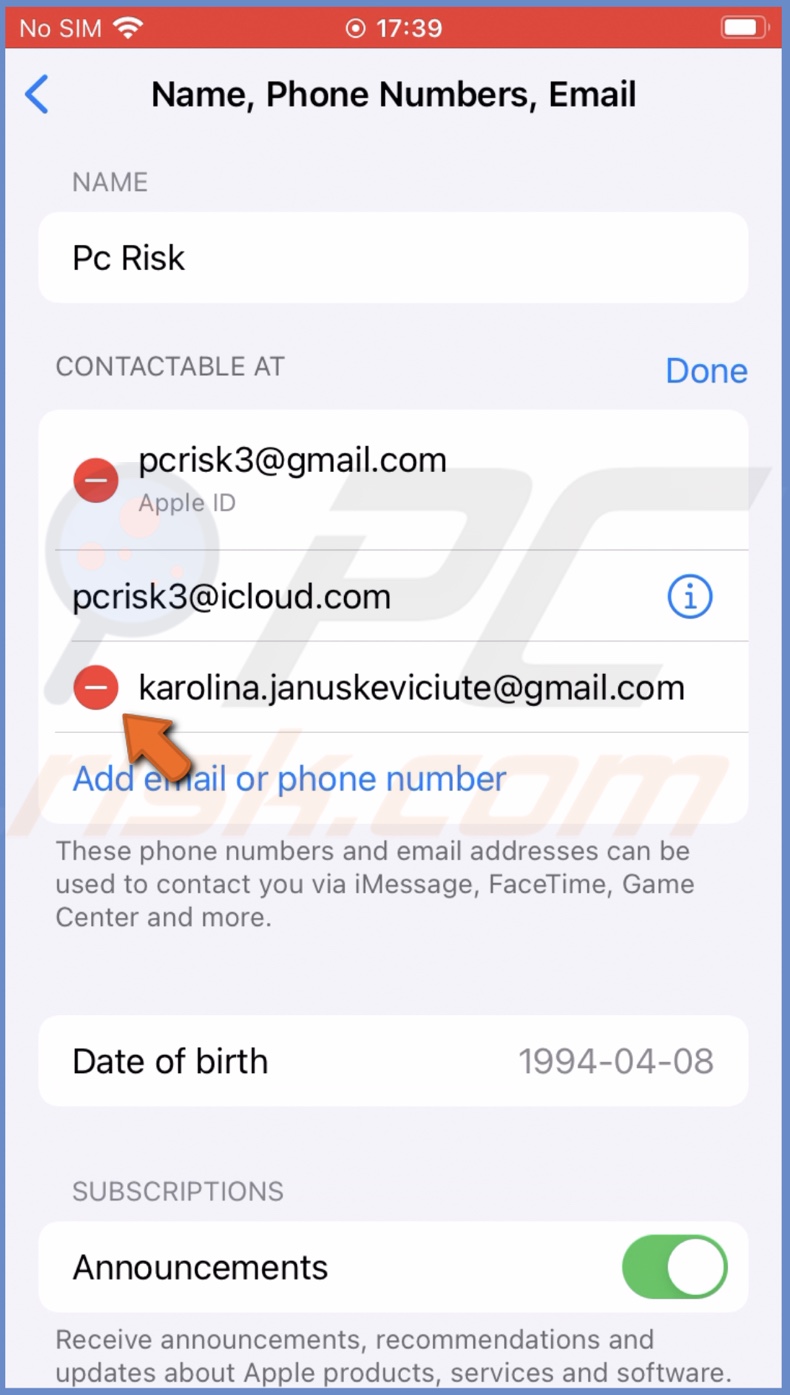
6. Then, tap on "Delete" and select "Remove".
Add a new email to FaceTime and iMessage on Mac
To add a new email to FaceTime and iMessage on Mac, follow the steps below:
1. Click on the Apple logo.
2. Select "System Preferences".
3. Then, click on "Apple ID".
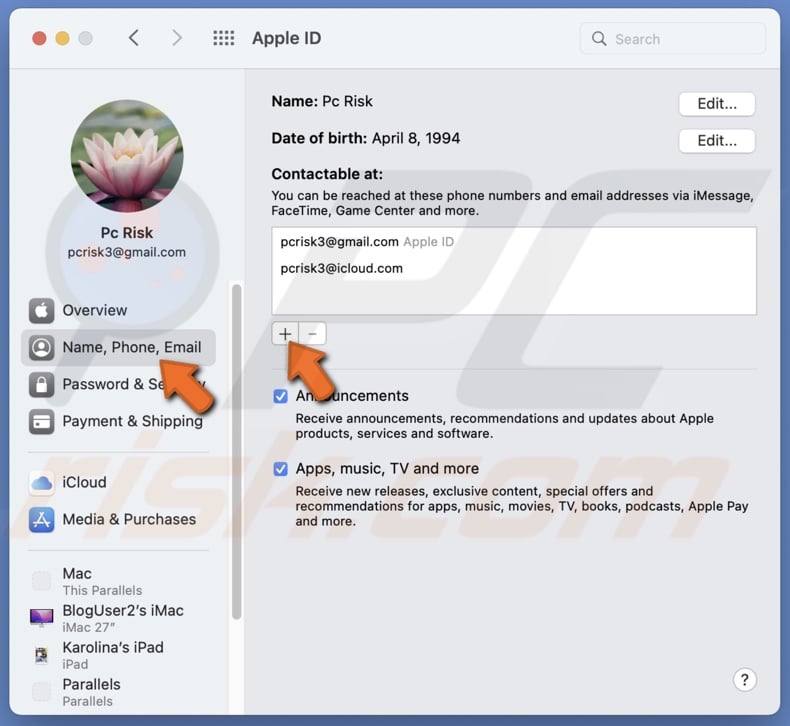
4. From the left sidebar, select the "Name, Phone, Email" option.
5. Under the "Contactable at" box, click on the plus (+) button.
6. Enter the new email address you want to add and click on "Next".
7. Go to that email address and copy the verification code.
8. Then, go back to Apple ID settings and paste the code in the appropriate box.
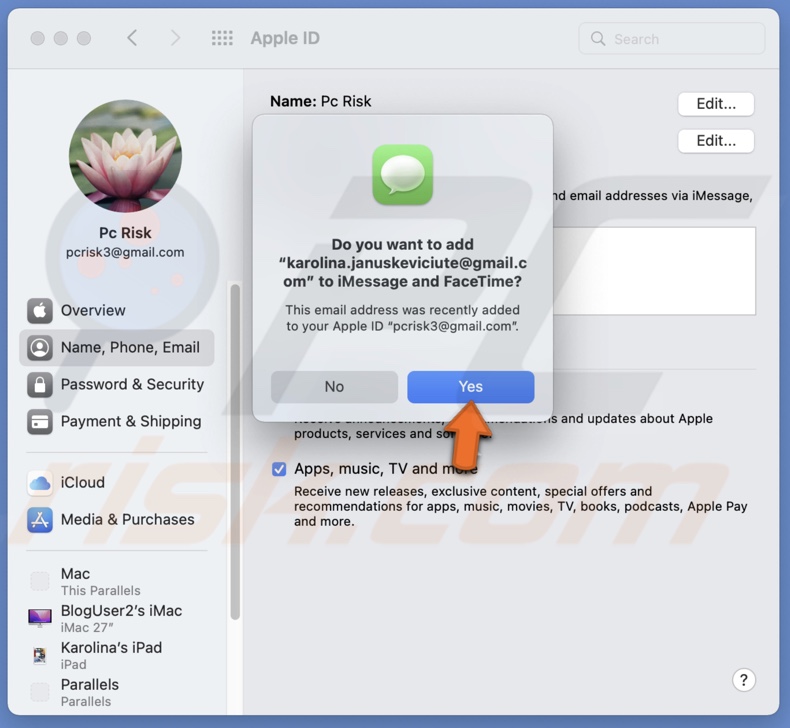
9. After a few seconds, a pop should appear asking to add the new email address for iMessage and FaceTime. Tap on "Yes".
If the pop-up doesn't appear, follow the steps below:
1. Open the Messages app.
2. On your keyboard, press the Command + Comma (,) keys on your keyboard.
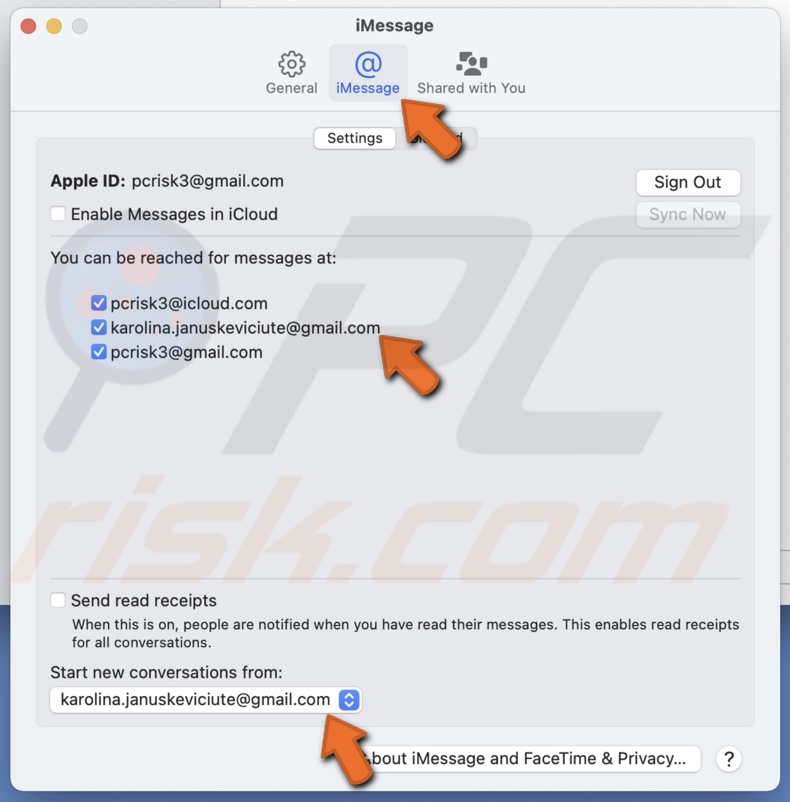
3. When a new window appears, select the "iMessage" tab.
4. Then, under "You can be reached for messages at", check the box next to the new email address.
5. Under "Start new conversations from", click on the drop-down menu and choose the newly added email address if you want to start conversations with the new email.
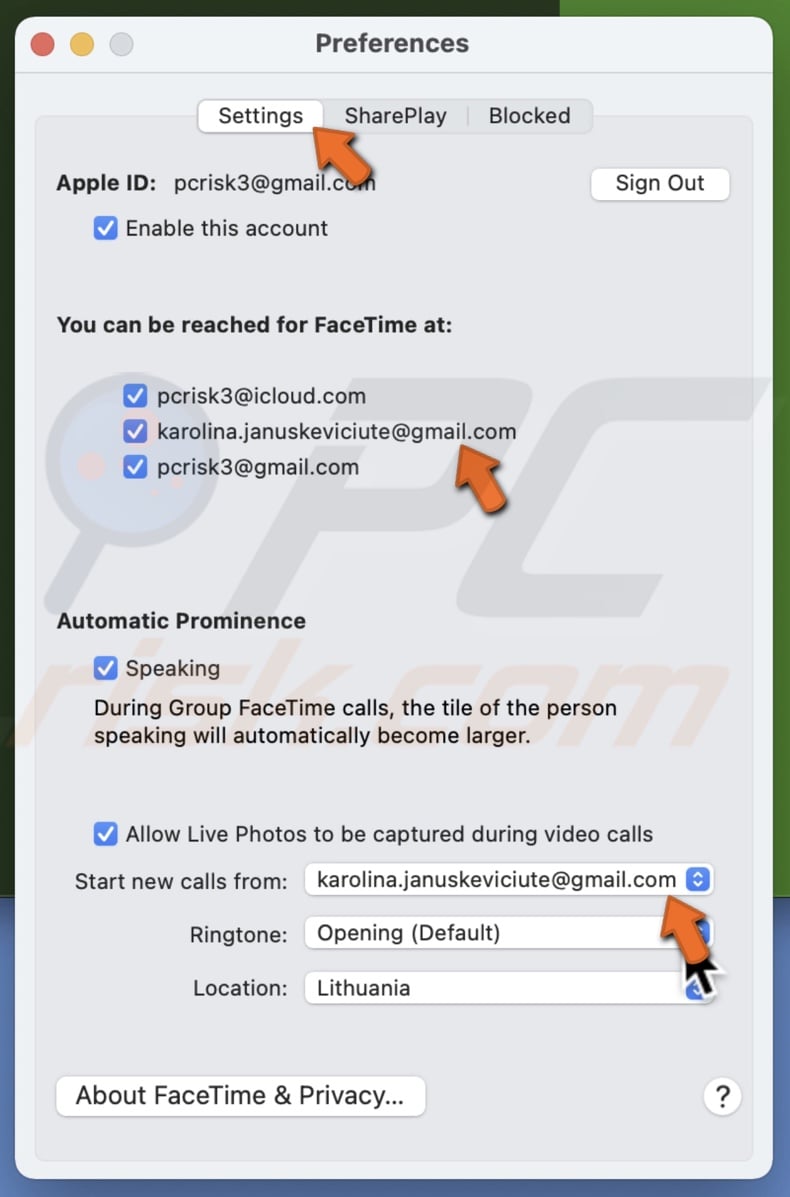
6. Next, open the FaceTime app.
7. On your keyboard, press the Command + Comma (,) keys on your keyboard.
8. Select the "Settings" tab.
9. Under "You can be reached for FaceTime at", check the box next to the newly added email.
10. Next to "Start new calls from", click on the drop-down menu and choose the newly added email address if you want to start calls with the new email.
Remove a new email to FaceTime and iMessage on Mac
To remove email from FaceTime and iMessage on Mac, follow the steps below:
1. Click on the Apple logo.
2. Select "System Preferences".
3. Then, click on "Apple ID".
4. From the left sidebar, select the "Name, Phone, Email" option.
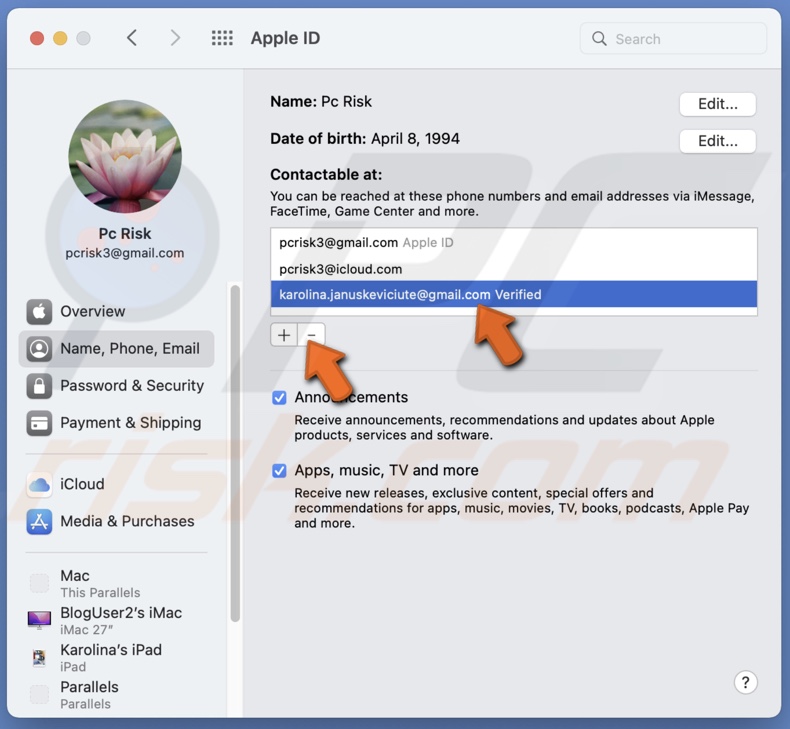
5. Select the email you want to remove, and under the "Contactable at" box, click on the minus (-) button.
6. Click on "Delete Address".
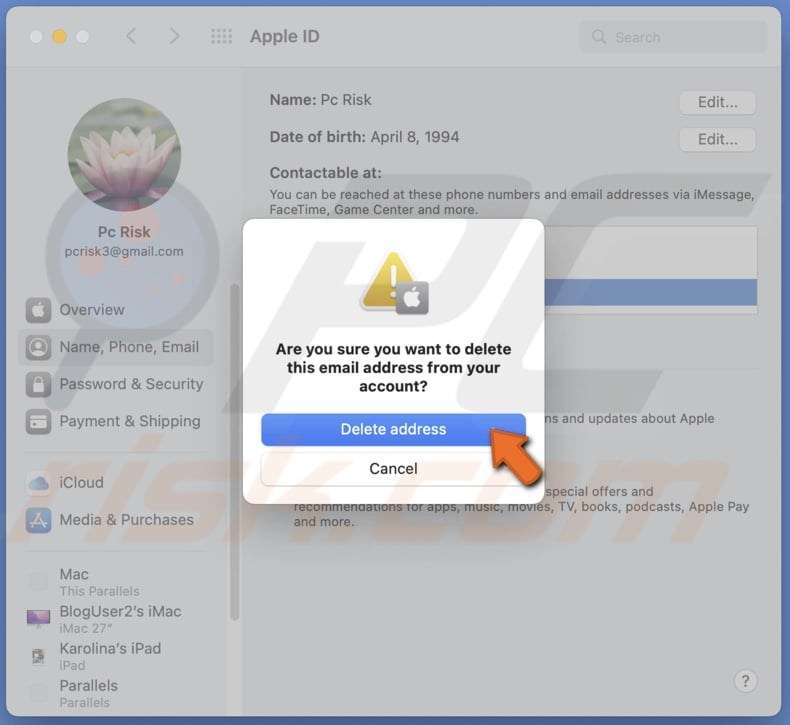
The email address will be removed from both iMessage and FaceTime.
We hope this guide provided you with the information you were looking for, and now you know how to add and remove email addresses for iMessage and FaceTime on iPhone, iPad, and Mac.
Share:

Karolina Peistariene
Author of how-to guides for Mac users
Responsible for collecting, analyzing, and presenting problem-solving solution articles related to macOS issues. Years of macOS experience combined with solid research and analyzing skills help Karolina provide readers with working and helpful solutions as well as introduce various features Mac has to offer.
▼ Show Discussion