Need to compress an image? Here are 4 ways how!

Get Free Scanner and check your computer for errors
Fix It NowTo fix found issues, you have to purchase the full version of Combo Cleaner. Free trial available. Combo Cleaner is owned and operated by Rcs Lt, the parent company of PCRisk.com read more.
How to compress your images on Mac?
Even though we're used to taking and seeing high-quality images, they can take up a lot of space. When an image is large in size, it can get difficult and take much longer to send it to people you need to. They will also fill up your storage much faster. To lower the image quality, you can compress them.
There are many benefits to compressing an image. If you're not going to use the image for a large format print, you don't need to have it at the highest quality. There are plenty of formats you can choose from that won't harm the quality a lot but will reduce the image size significantly.
This guide will provide you with four ways to compress your images, mainly using Mac built-in features.
Video on Need to compress an image? Here are 4 ways how!
Table of Contents:
- Introduction
- Change the image format
- Resize the image
- Compress the image using Quick Actions
- Compress the image using Preview
- Compress the image using the Photos app
- Use a third-party app or a website
- Video on Need to compress an image? Here are 4 ways how!
Download Computer Malware Repair Tool
It is recommended to run a free scan with Combo Cleaner - a tool to detect viruses and malware on your device. You will need to purchase the full version to remove infections. Free trial available. Combo Cleaner is owned and operated by Rcs Lt, the parent company of PCRisk.com read more.
Change the image format
One of the main things that can change the size of the image is its format. For example, a PNG format takes up much more space than, let's say, a JPEG format. If you converted your image from PNG to JPEG, it would have almost the same image quality, but the size would reduce significantly.
Resize the image
Another important factor in reducing image size is its size. If you have an image with a lot of px, reducing the pixel number will lower its storage space. To simply put, decreasing image dimensions will compress it.
Compress the image using Quick Actions
One of the fastest ways to compress an image is to use the Quick Actions menu.
To compress an image using Quick Actions, follow the steps below:
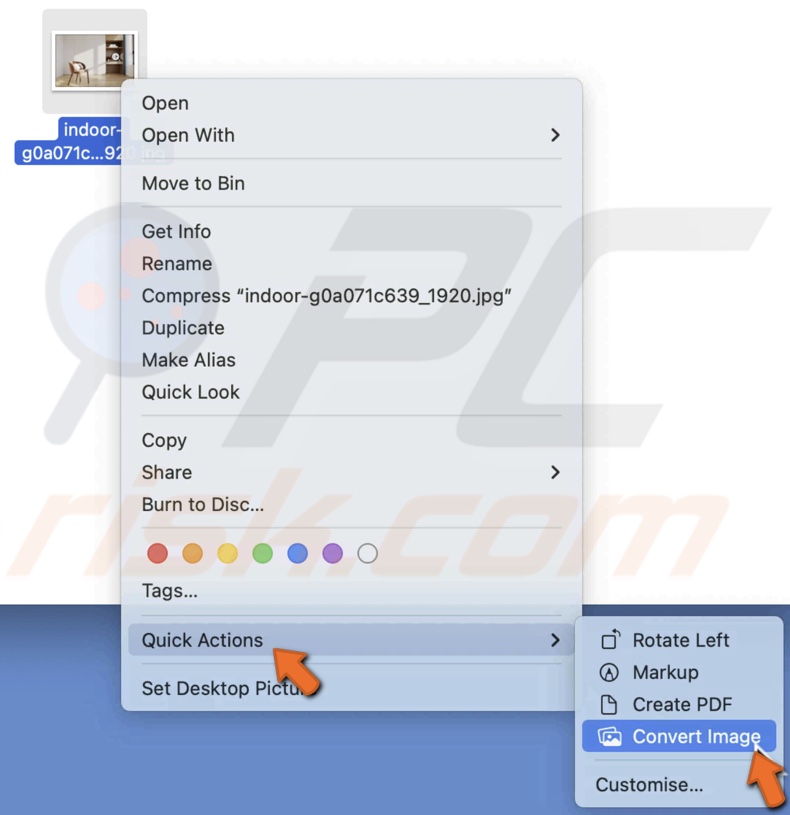
1. Locate your image or multiple images and right-click on the selection.
2. When a menu appears, hover over the "Quick Actions" option and select "Convert Image".
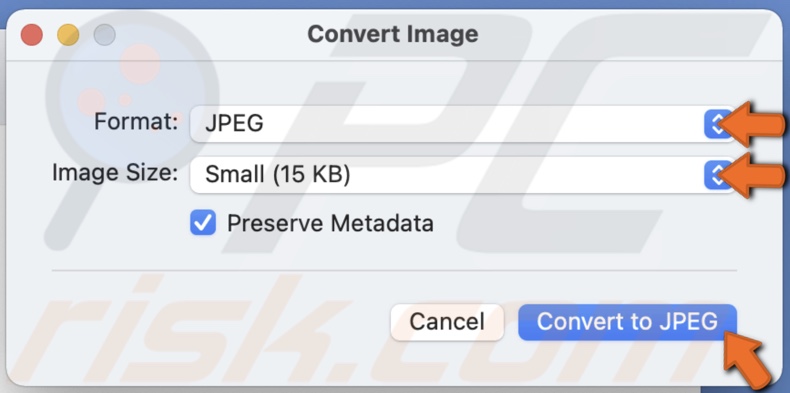
3. Next to "Format", select the format you want. If JPEG is suitable for you, leave it as it is.
4. Then, next to "Image Size", tap on the drop-down menu and choose "Small", "Medium", or "Large". You'll see the size of the image with each option.
5. When you're done, click on "Convert to (format name)".
Compress the image using Preview
You can also compress your images using the Preview app. It offers an image compression feature for one or multiple images at once.
To compress one image using the Preview app, follow the steps below:
1. Locate your image and double-click it to view it in the Preview app.
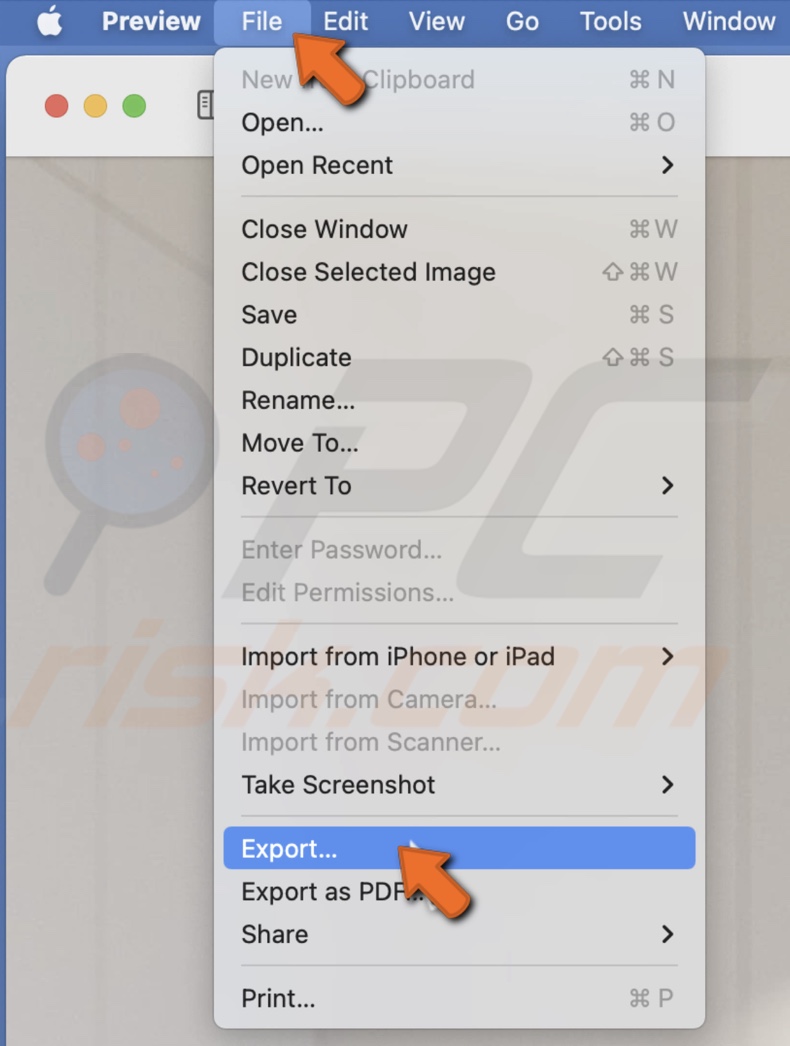
2. From the menu bar, click on "File" and select the "Export" option.
3. Next to "Export As", you can rename the image.
4. Next to "Format", click on the drop-down menu and select a format you want to convert the image to.
5. Then, next to "Quality", move the slider to change the quality of the image. Next to "File Size", you'll see what the image size will be when exported.
6. When you're done, click on "Save".
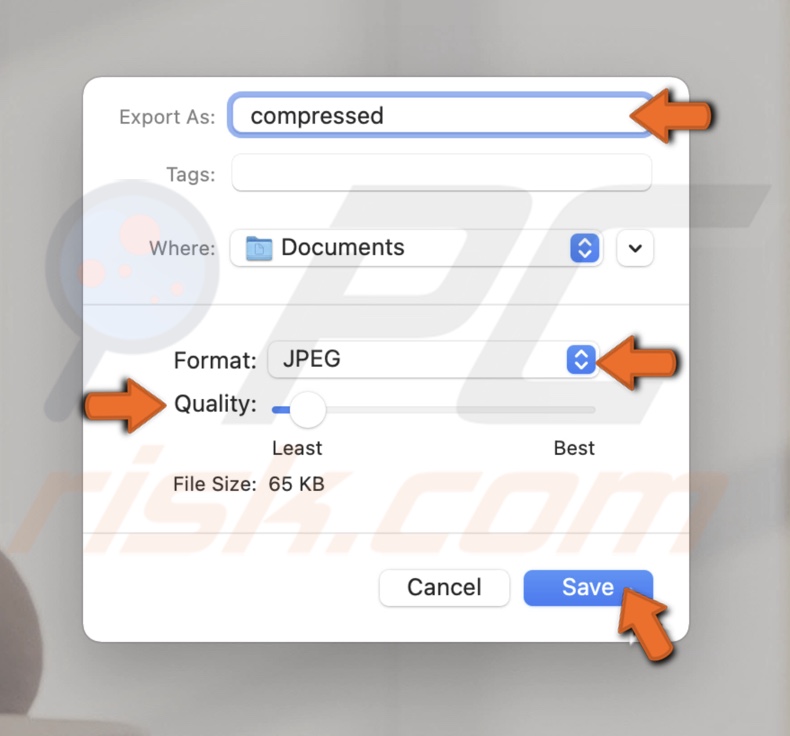
To compress multiple images using the Preview app, follow the steps below:
1. Locate your images and select them. Hold the Command key to select images one by one or hold the Command + A keys combination to select all pictures in the folder.
2. Right-click on the selection, hover over the "Open With" option and select "Preview".
3. When the Preview app opens, select an image and press the Command + A key combination on the left side.
4. When all the images are selected from the menu bar, click on "File" and select "Export Selected Images".
5. Then, click on "Options".
6. Next to "Format", click on the drop-down menu and select the image format.
7. Next to "Quality", drag the slider to adjust the image quality.
8. When done, click on "Choose" and save the pictures.
What to do when you see the "Cannot export selected items" message:
1. If the message appears, click on "OK".
2. Then, press the Command key and unselect the images with different formats on the left sidebar.
3. Now, follow the steps above again to compress the images.
If this doesn't work, start over by selecting only the images with the same format and then compress them.
Compress the image using the Photos app
Another option is to use the Photos app. Same as the preview app, it offers image compression.
To compress images using the Photos app, follow the steps below:
1. Open the Photos app.
2. Select the images you want to compress.
3. Then, from the menu bar, click on "File", hover over "Export", and select "Export Photos".
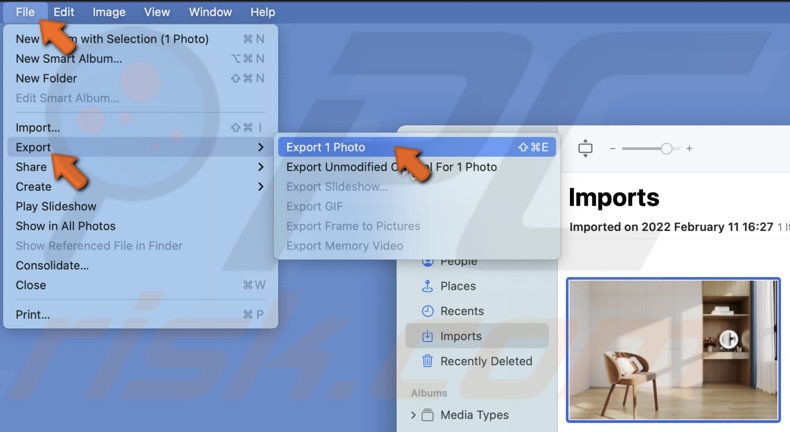
4. Next to the "Photo Kind" drop-down menu, click on the down arrow to see more options.
5. Now, choose the photo format, quality, and size.
6. When you're finished, click on "Export".
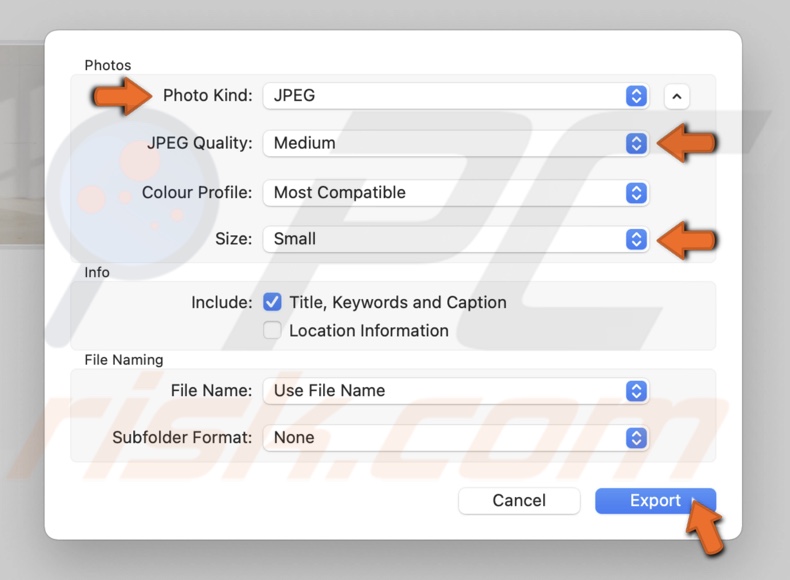
7. Select the location where you want to save the images and click on "Export".
Use a third-party app or a website
Using a third-party app to compress your images is also an option.
The App Store has a few apps that you can use. In the search field, just search for something with keywords like Compress and Photo.
You can also go to your browser and, in the search field, enter "compress images". You'll see results for websites that do just that.
We hope this guide provided you with the information you were looking for, and now you know how to compress your images.
Share:

Karolina Peistariene
Author of how-to guides for Mac users
Responsible for collecting, analyzing, and presenting problem-solving solution articles related to macOS issues. Years of macOS experience combined with solid research and analyzing skills help Karolina provide readers with working and helpful solutions as well as introduce various features Mac has to offer.
▼ Show Discussion