Learn how to record iPhone's screen on iPhone and on Mac

Get Free Scanner and check your computer for errors
Fix It NowTo fix found issues, you have to purchase the full version of Combo Cleaner. Free trial available. Combo Cleaner is owned and operated by Rcs Lt, the parent company of PCRisk.com read more.
Learn how to record iPhone's screen on iPhone and on Mac
The screen recording feature can be very helpful and beneficial. You can use it to show someone how to access specific settings, create a video for fun or work purposes, and so on. There are many Screen recording software out there. But Apple users don't have to worry about it as they already have a built-in one.
This guide will show you how to use the built-in Screen Recording feature. You'll learn how to access it easily when needed, record videos with only the internal audio or with both internal and external. You'll also learn how to record your iPhone's screen using the QuickTime Player on Mac, so you don't have to transfer the video from your iPhone to Mac later on.
Video on Learn how to record iPhone's screen on iPhone and on Mac
Table of Contents:
- Introduction
- How to add screen recording to Control Center?
- How to record your iPhone screen?
- How to record your iPhone screen with internal and external sounds?
- How to record your iPhone screen only with internal sound?
- How to record your iPhone screen using QuickTime Player on Mac?
- Other alternatives to record your iPhone screen
- Video on Learn how to record iPhones screen on iPhone and on Mac
Download Computer Malware Repair Tool
It is recommended to run a free scan with Combo Cleaner - a tool to detect viruses and malware on your device. You will need to purchase the full version to remove infections. Free trial available. Combo Cleaner is owned and operated by Rcs Lt, the parent company of PCRisk.com read more.
How to add screen recording to Control Center?
To record your screen, you need to add the Screen recording icon to the Control Center for quick and easy access.
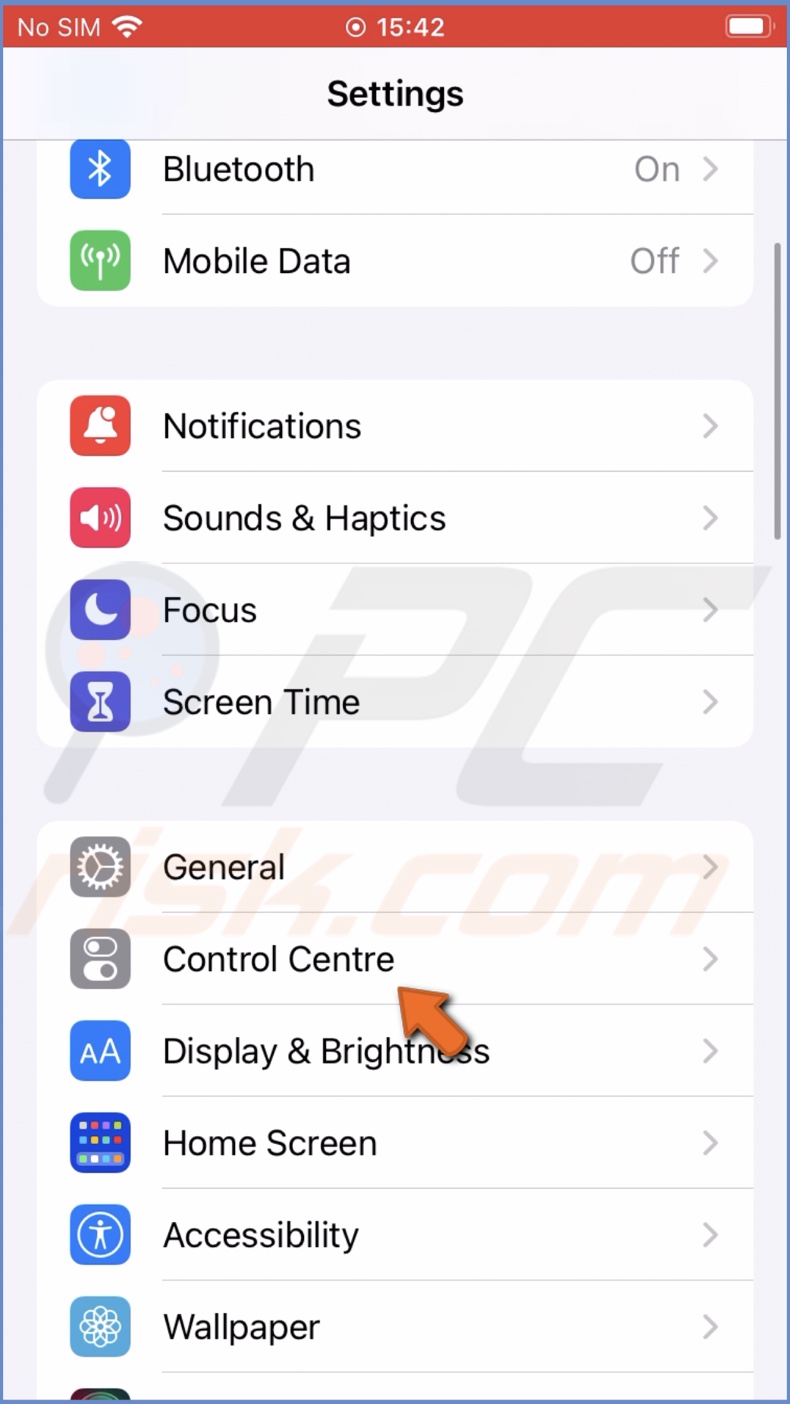
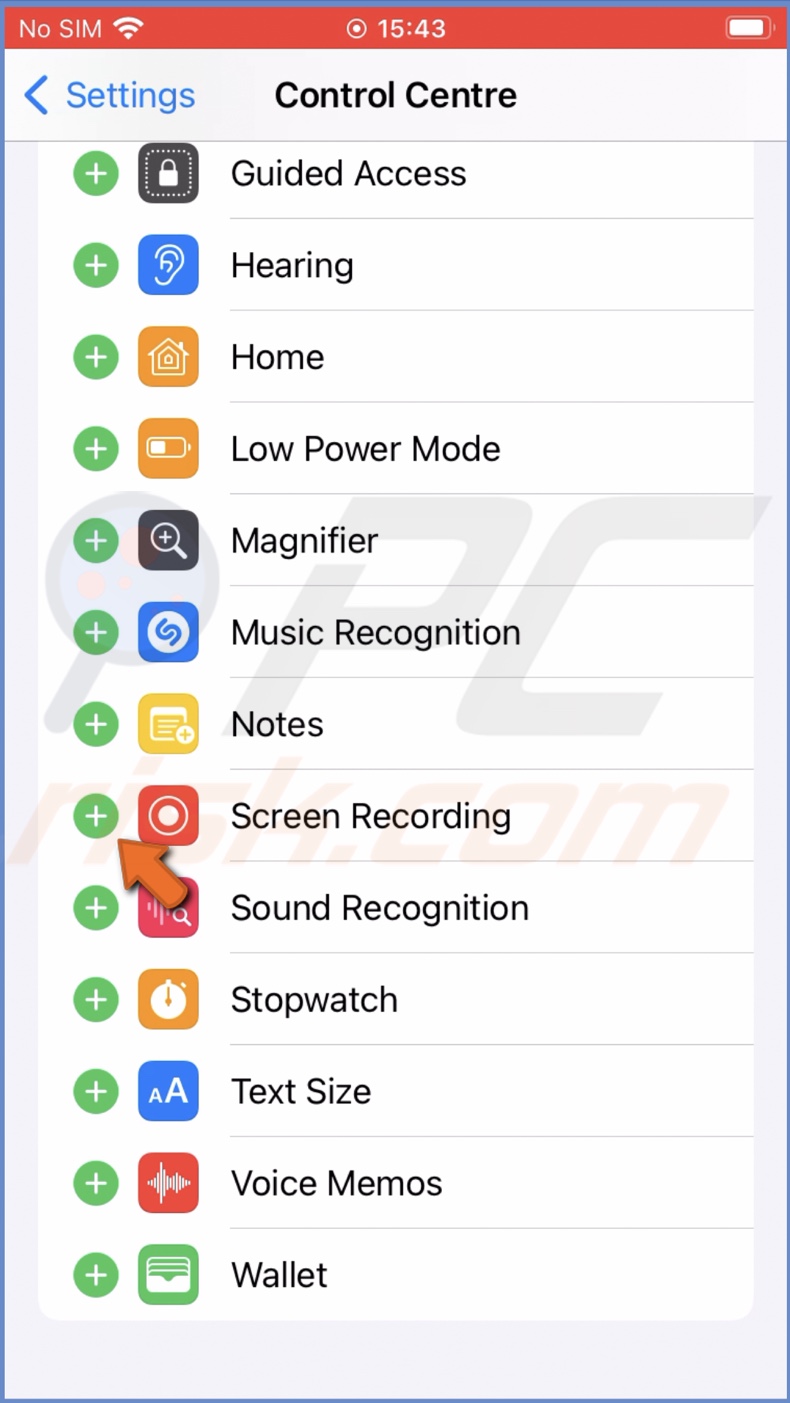
To add the Screen Recording icon to Control Center, follow the steps below:
1. Open the Settings app.
2. Scroll down and tap on "Control Center".
3. Now, locate the "Screen Recording" option and tap on the green plus icon to add it to Control Center.
Now you can start your recordings.
How to record your iPhone screen?
Recording your iPhone screen is very simple. All you need to do is enable the feature and when done, disable it with two taps.
To start iPhone screen recording, follow the steps below:
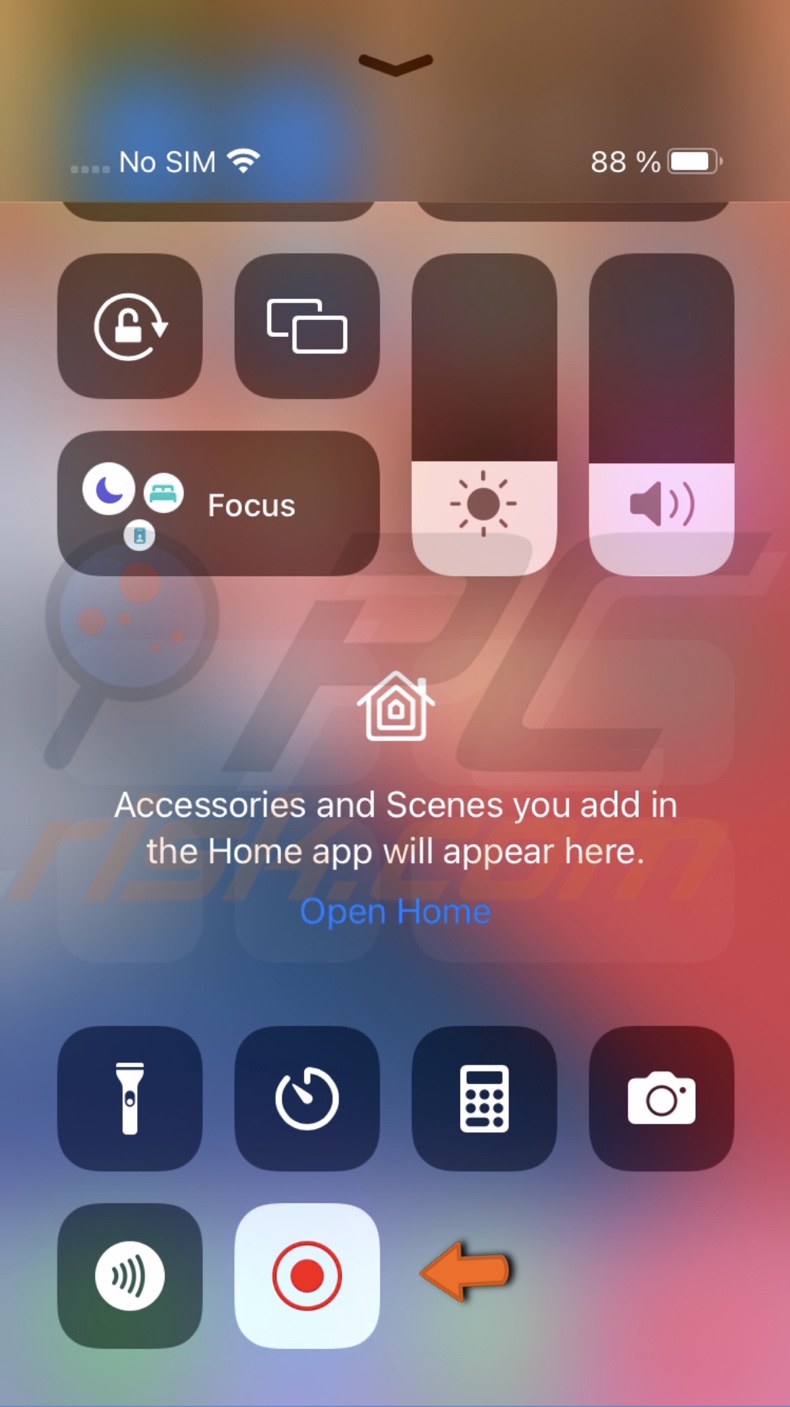
1. Go to your Home screen and from the top right corner, swipe down to open the Control Center for iPhones with Face ID.
For iPhone with the Home button, swipe up from the bottom of the screen.
2. At the bottom, you'll see the Screen Recording icon.
3. When you're ready to record, tap on it, and you'll see the countdown from 3 on the icon.
4. Exit the Control Center and record what you need.
5. When done recording the screen, tap on the red bar or the red screen recording icon at the top of your screen and tap on "Stop".
6. A message saying your "Screen Recording video saved to Photos" will appear.
Depending on the length of the video, it can take some time for the video to get saved and the message to appear. If you don't see the message instantly, don't panic and wait for a bit more.
Note: The recording will automatically stop when you lock your screen.
How to record your iPhone screen with internal and external sounds?
When recording the screen, you have an option to record with external and internal sounds. This feature can be helpful if you want to hear the iPhone sounds as well as your own voice.
To record screen with internal and external sounds, follow the steps below:
1. Go to your Home screen and from the top right corner, swipe down to open the Control Center for iPhones with Face ID.
For iPhone with the Home button, swipe up from the bottom of the screen.
2. Then, tap and hold the Screen Recording icon.
3. Now, tap on the "Microphone" button to enable the external audio.
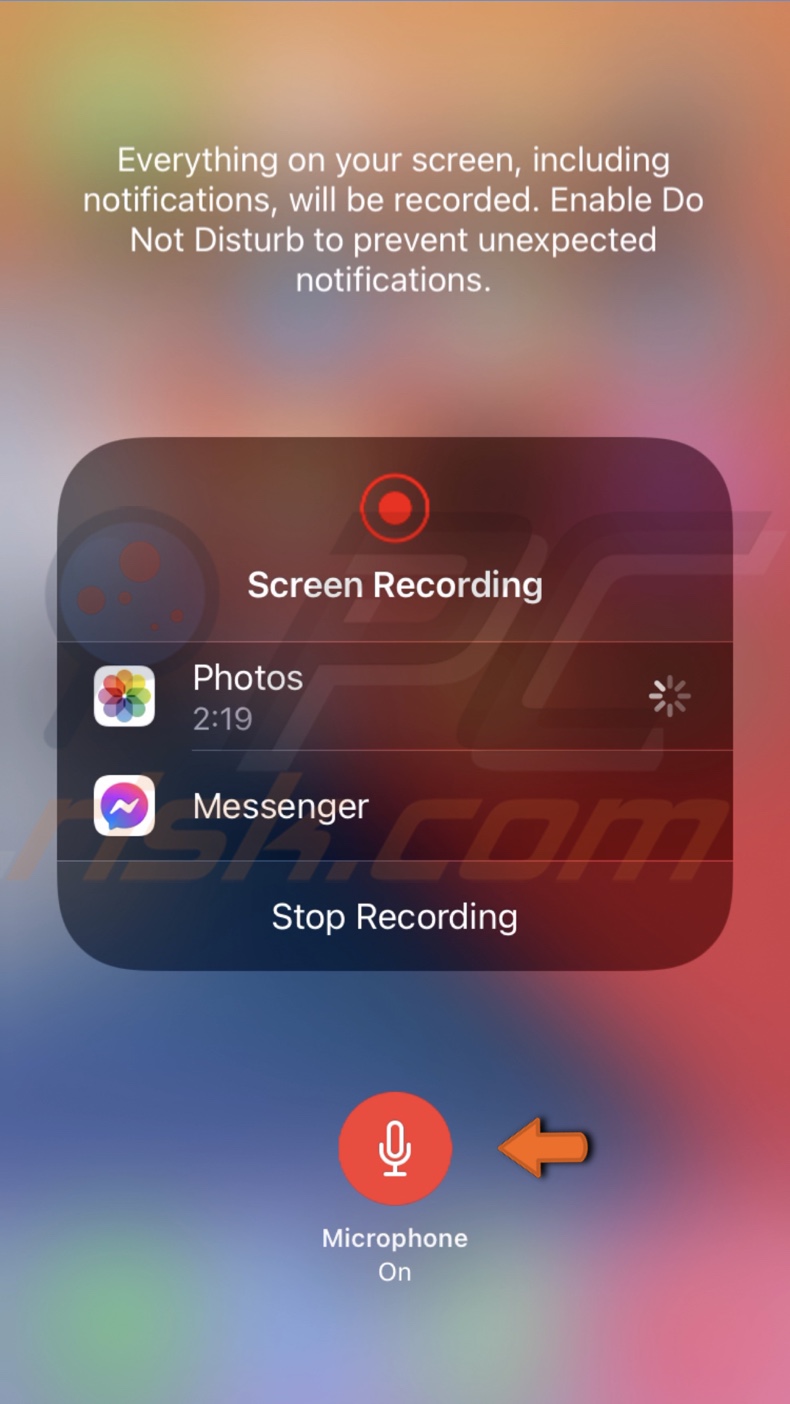
4. When done, tap on the "Screen Recording" icon to start the recording.
5. When done recording the screen, tap on the red bar or the red screen recording icon at the top of your screen and tap on "Stop".
6. A message saying your "Screen Recording video saved to Photos" will appear.
How to record your iPhone screen only with internal sound?
To record the iPhone screen only with the internal sound, all you need to do is disable the external sound. The internal sound is always turned on.
To record iPhone screen with the internal audio-only, follow the steps below:
1. Go to your Home screen and from the top right corner, swipe down to open the Control Center for iPhones with Face ID.
For iPhone with the Home button, swipe up from the bottom of the screen.
2. Then, tap and hold the Screen Recording icon.
3. Now, tap on the "Microphone" button to turn off the external audio.
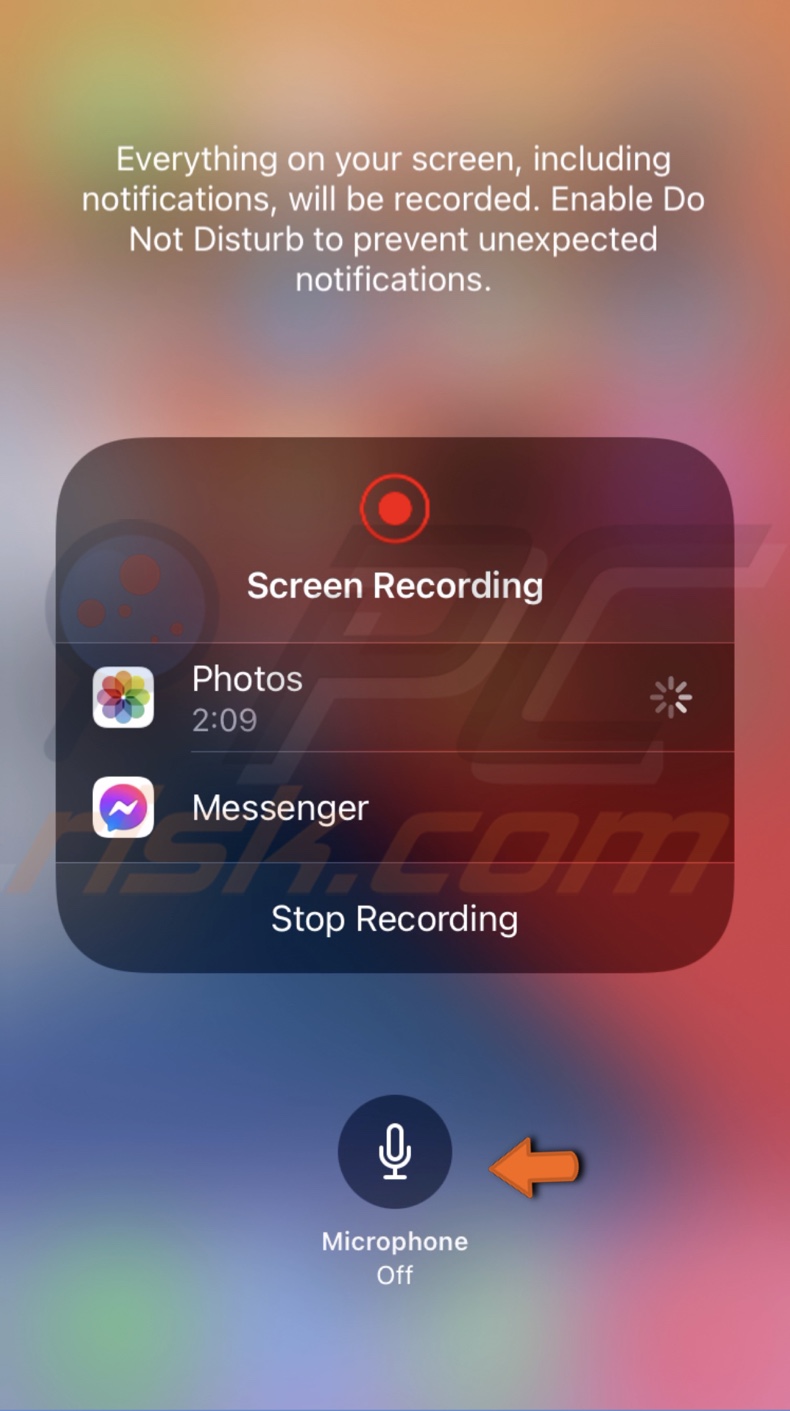
4. When done, tap on the "Screen Recording" icon to start the recording.
5. When done recording the screen, tap on the red bar or the red screen recording icon at the top of your screen and tap on "Stop".
6. A message saying your "Screen Recording video saved to Photos" will appear.
How to record your iPhone screen using QuickTime Player on Mac?
If, later on, you'll need to upload the screen recording to a Mac, you can do the recording using the QuickTime player immediately on that Mac.
To record iPhone screen on Mac, follow the steps below:
1. Connect your iPhone to the Mac with a Lightning cable.
2. Open the QuickTime player.
3. Then, from the menu bar, click on "File" and select "New Movie Recording".

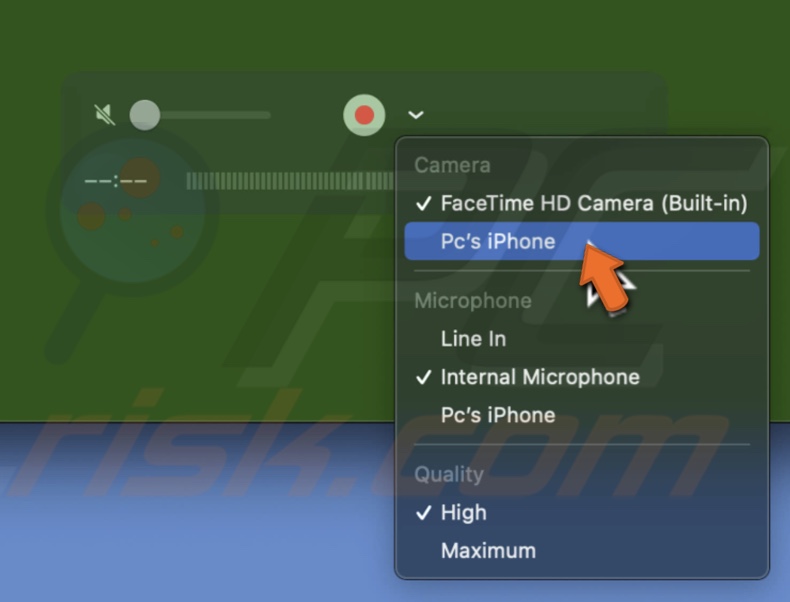
4. Click on the arrow icon next to the recording button.
5. From the menu, select your iPhone for both camera and microphone and click on "Allow".
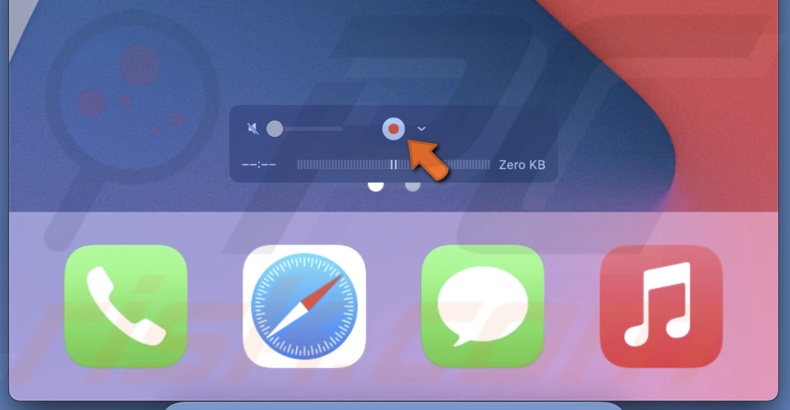
6. Now, take your iPhone and unlock it. When ready to record, click on the record button on the QuickTime window.
7. When you're done recording the screen, go back to the QuickTime Player window on Mac and click on the Stop icon.
Note: when the iPhone's screen is locked, you won't be able to record.
Other alternatives to record your iPhone screen
You can also record your iPhone's screen using third-party screen recording apps. There are plenty of different apps with various features and price points. You can also find some free ones.
If the built-in screen recording tool isn't enough, look for the ones that will satisfy your needs.
We hope you found the information you were looking for and learned how to use the built-in Screen Recording features to make your recordings.
Share:

Karolina Peistariene
Author of how-to guides for Mac users
Responsible for collecting, analyzing, and presenting problem-solving solution articles related to macOS issues. Years of macOS experience combined with solid research and analyzing skills help Karolina provide readers with working and helpful solutions as well as introduce various features Mac has to offer.
▼ Show Discussion