How You Can Convert M4A to MP3/AAC on MacOS Big Sur?

(updated)
Get Free Scanner and check your computer for errors
Fix It NowTo fix found issues, you have to purchase the full version of Combo Cleaner. Free trial available. Combo Cleaner is owned and operated by Rcs Lt, the parent company of PCRisk.com read more.
How to Convert M4A to MP3/AAC on Your Mac?
M4A is a file extension that's used with the AAC format. The M4A and the MP3 files are both used for audio files, but the M4A sounds better while at the same bitrate as MP3. It also takes up less space. But unfortunately, not all players support the M4A format. That means you'll need to convert the file to MP3 or AAC.
Either you want to convert your audio file(s) to an MP3 or AAC format, the easiest way to do that is with iTunes and Apple Music. You can either select files from your music library or import audio from your Mac to the music library. That way you can convert any audio file you need.
When converting a compressed audio file (like MP3) to an uncompressed format (Like Wav), you won't notice a loss in sound quality. When converting an uncompressed audio file to a compressed one, the sound quality will be reduced. If you want the best result converting a file, we recommend using original audio.
Video on How to Convert M4A to MP3/AAC on Your Mac?
Table of Contents:
- Introduction
- How to Convert M4A to MP3 on Your Mac
- How to Convert M4A to AAC on Your Mac
- Video on How to Convert M4A to MP3/AAC on Your Mac?
Download Computer Malware Repair Tool
It is recommended to run a free scan with Combo Cleaner - a tool to detect viruses and malware on your device. You will need to purchase the full version to remove infections. Free trial available. Combo Cleaner is owned and operated by Rcs Lt, the parent company of PCRisk.com read more.
How to Convert M4A to MP3 on Your Mac
You can easily import a song or multiple songs into MP3 format using iTunes or the Music app. If you're Mac runs on macOS Mojave or older, you can use the iTunes app. If you're Mac runs on macOS Catalina or later, you can use the Music app.
To convert M4A to MP3 in iTunes, follow the steps below:
1. Open the iTunes app.
2. From the menu bar, click on "iTunes" and select "Preferences".
3. Then, click on "Import Settings".
4. Next to "Import Using", click on the drop-down menu and select "MP3 Encoder".
5. Next to "Settings", click on the drop-down menu and select the MP3 bitrate.
6. Now, click on "OK" two times.
7. Go to the "Music" section in iTunes. If you have any music files outside the iTunes library, drag them to the library.
8. Select all songs you want to convert, right-click on the selection and click on "Create MP3 Version".
You can also click on "File" from the menu bar, hover over "Create New Version", and select "Convert to AAC" or "Create MP3 Version".
9. An MP3 version of the selection will be created and will appear in the Music list. Select the MP3 file and drag it out of iTunes and place it where you want.
Note: You can only convert files from the iTunes Store if they're iTunes Plus.
To convert M4A to MP3 in Music, follow the steps below:
1. Open the Music app.
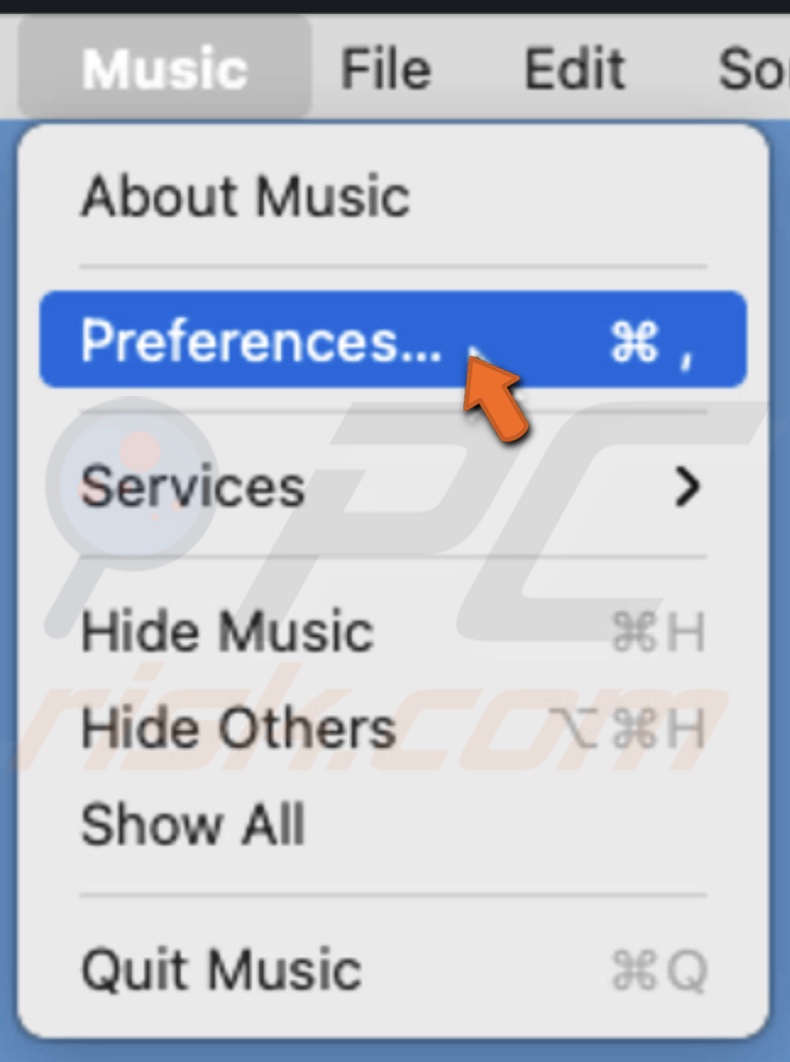
2. From the menu bar, click on "Music" and select "Preferences".
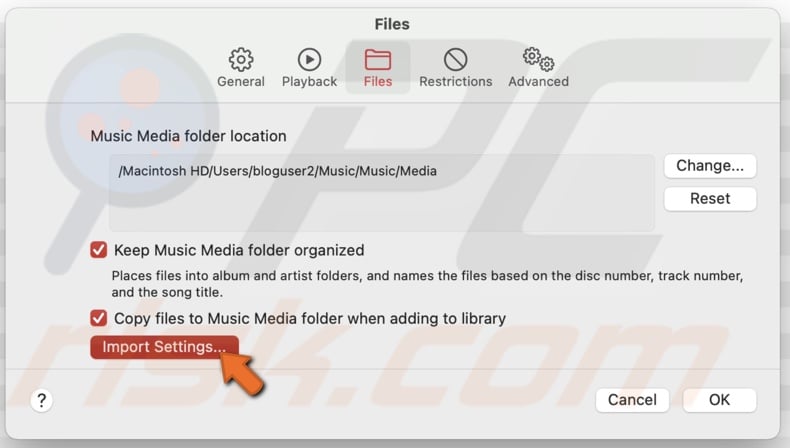
3. Go to the "Files" tab.
4. Click on "Import Settings".
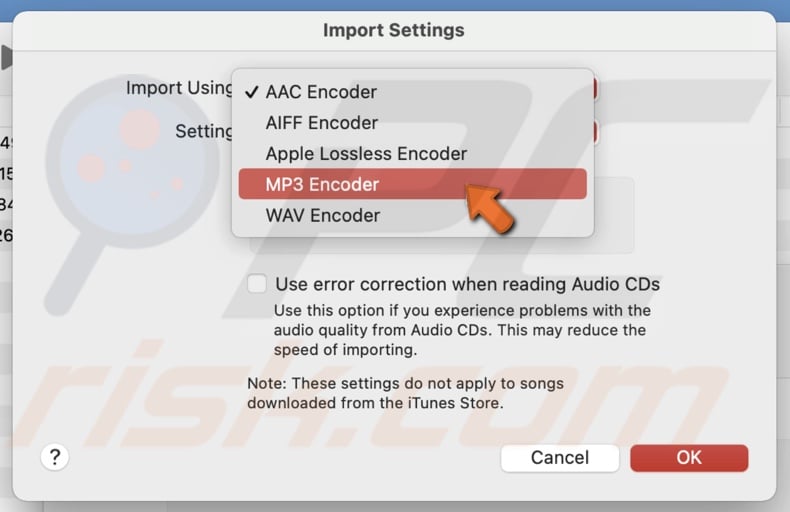
5. Next to "Import Using", click on the drop-down menu and select "MP3 Encoder".
6. Next to "Settings", click on the drop-down menu and select the quality of the file.
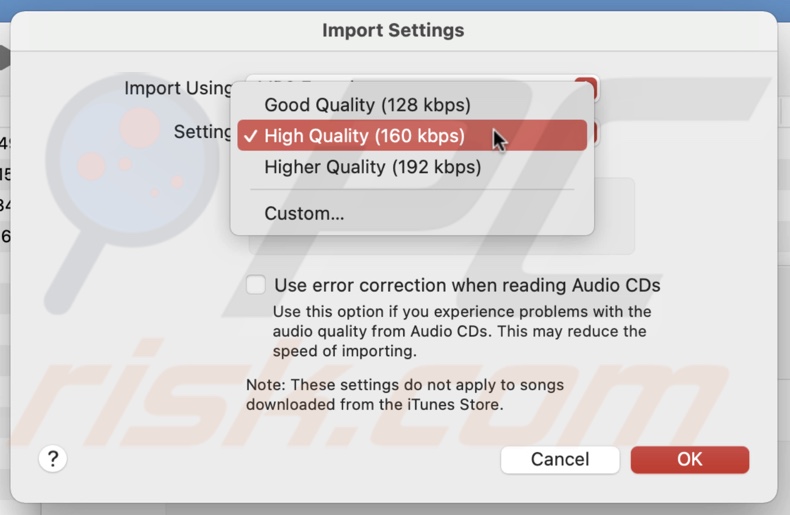
7. When done, click on "OK" two times to save the settings.
8. In the Music app, go to the music library and select one or more songs you want to convert.
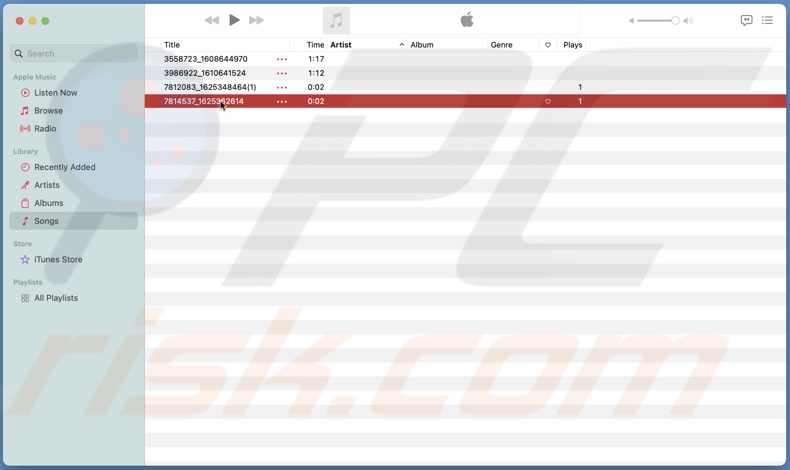
9. From the menu bar, click on "File", hover over "Convert", and select "Convert to MP3" or "Create MP3 Version. If the option is grayed out, select the song(s), press the Option key, and repeat the last step.
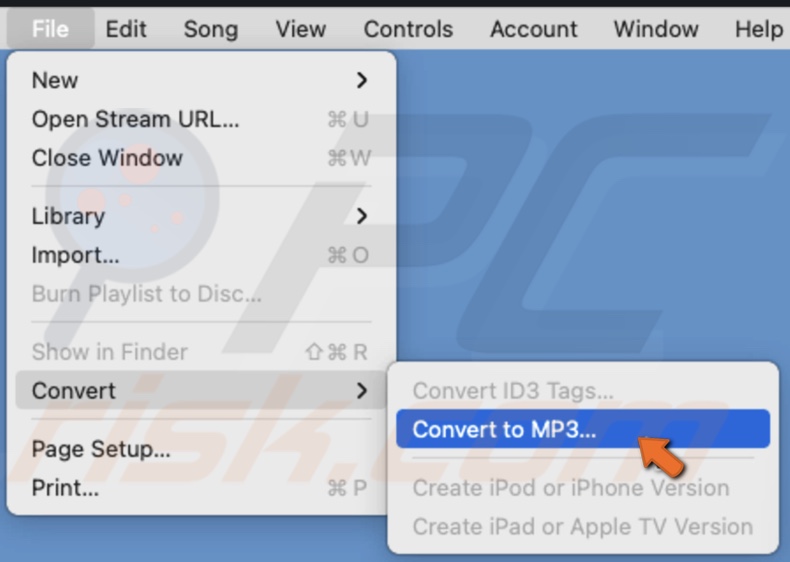
By using this method, you can convert your music files to other formats as well. When importing settings, instead of selecting MP3, choose a different format.
How to Convert M4A to AAC on Your Mac
Converting M4A files to AAC is almost the same process as converting the file to MP3. All you need to do is change the former. But if you're not sure, just follow the steps.
To convert M4A to AAC in iTunes, follow the steps below:
1.Open the iTunes app.
2. From the menu bar, click on "iTunes" and select "Preferences".
3. Then, click on "Import Settings".
4. Next to "Import Using", click on the drop-down menu and select "AAC Encoder". If it's already chosen by default, you don't need to select it.
5. Next to "Settings", click on the drop-down menu and select the quality of the file.
6. Now, click on "OK" two times.
7. Go to the "Music" section in iTunes. If you have any music files outside the iTunes library, drag them to the library.
8. Select the files you want to convert to AAC.
9. Right-click on the selection and click on "Create AAC Version".
You can also click on "File" from the menu bar, hover over "Create New Version", and select "Convert to AAC" or "Create AAC Version".
10. A duplicate of your songs in the AAC format will be created. You can drag the converted file from iTunes anywhere you want.
To convert M4A to AAC in Music, follow the steps below:
1. Open the Music app.
2. From the menu bar, click on "Music" and select "Preferences".

3. Go to the "Files" tab.
4. Click on "Import Settings".

5. Next to "Import Using", click on the drop-down menu and select "AAC Encoder". If it's already selected, you don't need to select it again.
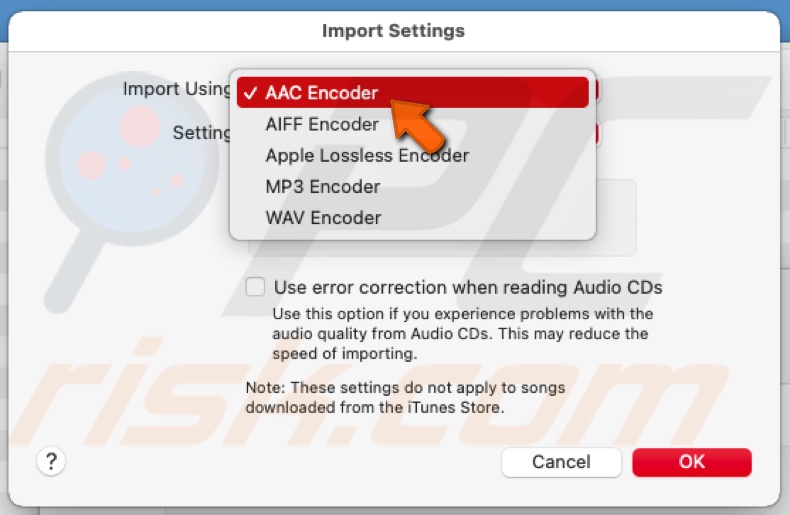
6. Next to "Settings", click on the drop-down menu and select the quality of the file.

7. When done, click on "OK" two times to save the settings.
8. In the Music app, go to the music library and select one or more songs you want to convert.
9. From the menu bar, click on "File", hover over "Convert", and select "Convert to AAC" or "Create ACC Version". If the option is grayed out, select the song(s), press the Option key, and repeat the last step.
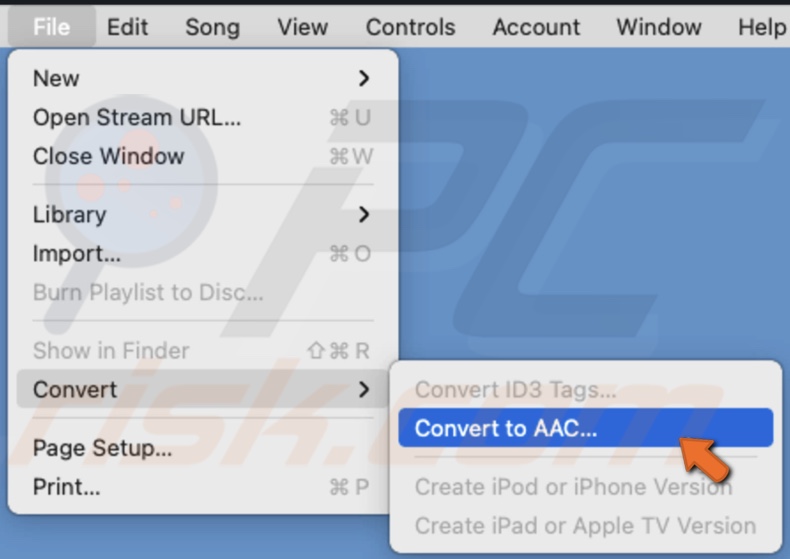
When the converted file is created, you can drag it from the Music app and use it where you want.
We hope you've managed to convert your music files easily.
You can also check out the video above for a step-by-step tutorial.
Share:

Karolina Peistariene
Author of how-to guides for Mac users
Responsible for collecting, analyzing, and presenting problem-solving solution articles related to macOS issues. Years of macOS experience combined with solid research and analyzing skills help Karolina provide readers with working and helpful solutions as well as introduce various features Mac has to offer.
▼ Show Discussion