10 Ways to Fix "Verification Failed: There Was an Error Connecting To The Apple ID Server"

(updated)
Get Free Scanner and check your computer for errors
Fix It NowTo fix found issues, you have to purchase the full version of Combo Cleaner. Free trial available. Combo Cleaner is owned and operated by Rcs Lt, the parent company of PCRisk.com read more.
How to Connect to Your Apple ID Server
When you dive into the world of Apple, one of the first things you're asked to do is to create an Apple ID. When you have issues with your Apple ID, you know how frustrating it can be not having access to some apps and downloaded content. You might encounter various problems related to your Apple ID. But what to do when you see an error message saying, "Verification Failed: There was an error connecting to the Apple ID server" on your Mac or iOS device like iPhone and iPad?
To solves this problem, you need to know what might be the issue that triggers the error. Usually, the error message says that the connection with the Apple ID server failed appears when you try to log in to iTunes, Apple Store, iCloud, or try to back up using iCloud. When your connection gets denied, your Wi-Fi connection can be a problem.
If you use a VPN, it can interfere as well. Also, a bug in the operating system can cause an issue when connecting to the Apple ID server. But the most reported reason for this error appears to be date and time settings which you might not even think about as the root cause.
To solve the Apple ID server connection problem, follow the provided methods below step-by-step.
Video on 10 Ways to Fix "Verification Failed: There Was an Error Connecting To The Apple ID Server"
Table of Contents:
- Introduction
- Method 1. Make Sure Apple Servers are Up and Running
- Method 2. Reset Date and Time Settings
- Method 3. Check Your Internet Connection and Reboot The Router
- Method 4. Remove All Network Connections and Add a New One
- Method 5. Make Sure The Internet Isn't Paused on Your Device
- Method 6. Disable Your VPN
- Method 7. Reset All Settings in iOS
- Method 8. Change Your Apple ID Password
- Method 9. Get an Apple ID Verification Code
- Method 10. Update and Restart Your Device
- Video on 10 Ways to Fix "Verification Failed: There Was an Error Connecting To The Apple ID Server"
Download Computer Malware Repair Tool
It is recommended to run a free scan with Combo Cleaner - a tool to detect viruses and malware on your device. You will need to purchase the full version to remove infections. Free trial available. Combo Cleaner is owned and operated by Rcs Lt, the parent company of PCRisk.com read more.
Make Sure Apple Servers are Up and Running
The first thing you need to do before anything is to check if Apple servers are not down. If they are, there's not much you can do except wait for Apple to resolve any issues that might've occurred.
To check Apple servers, follow the steps below:
1. Go to apple.com/support/systemstatus
2. Locate the servers you need. For example, if you're trying to log into iCloud and see the error message, check if the iCloud servers are available.
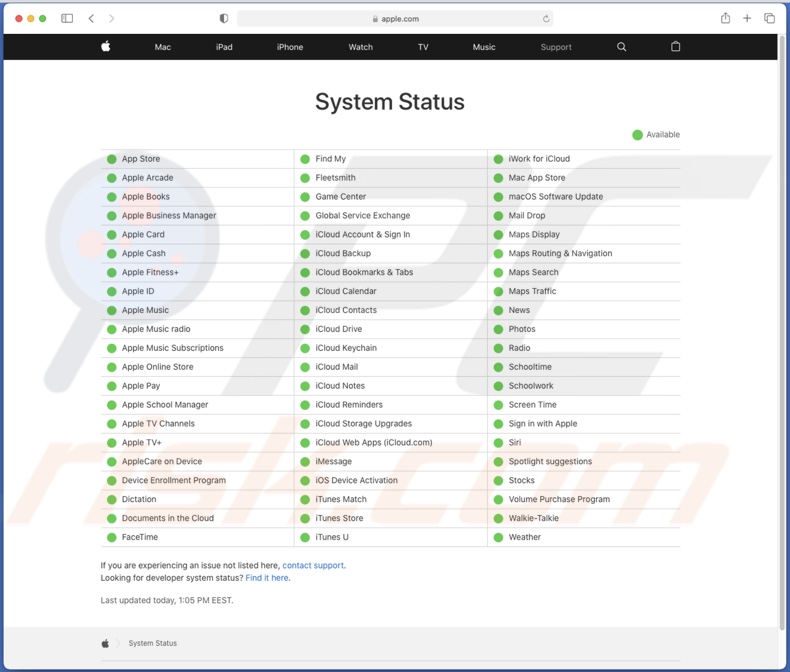
If all servers you need are available, proceed to the troubleshooting steps below.
Reset Date and Time Settings
Resetting date and time settings most of the time helps to resolve the issue.
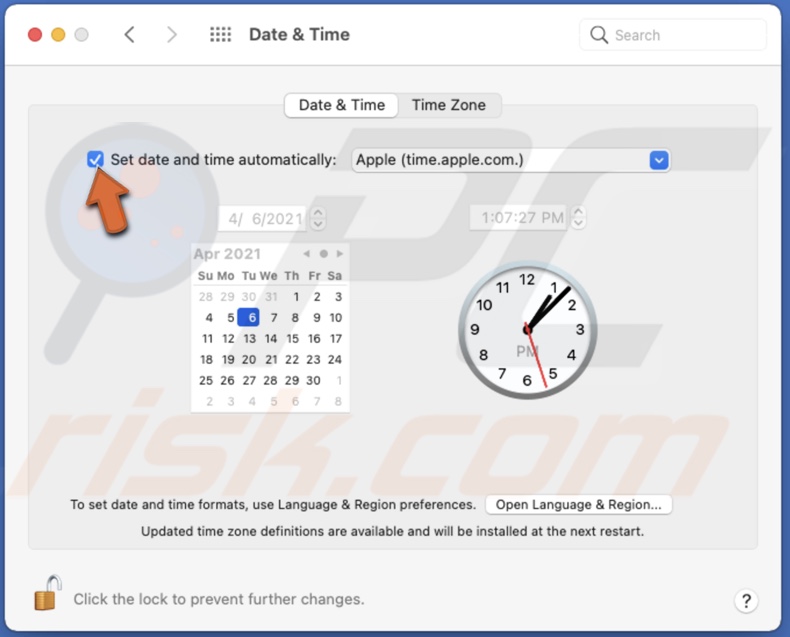
To reset the date and time settings on Mac, follow the steps below:
1. In the menu bar, click on the Apple logo to open the Apple menu.
2. Go to "System Preferences".
3. Then, click on "Date & Time".
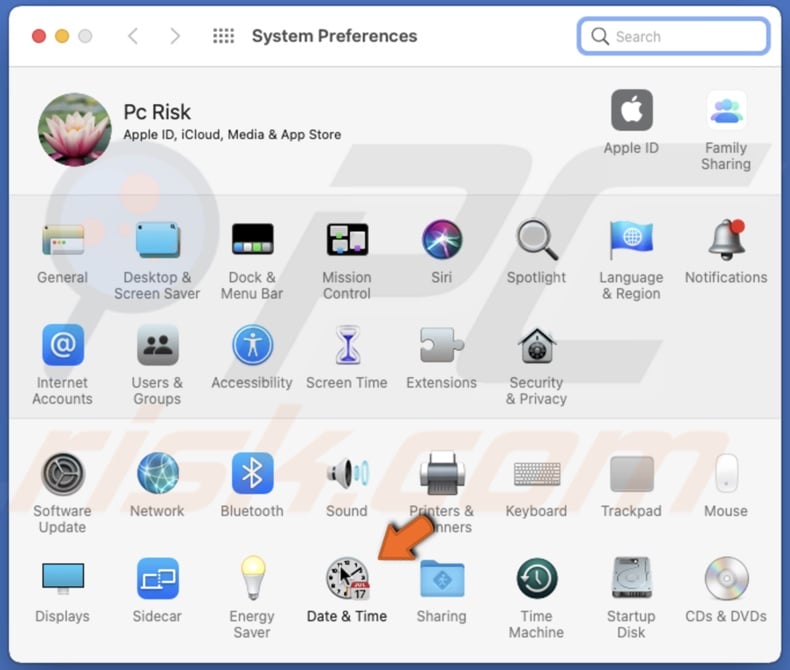
4. In the date and time settings, click on the lock at the bottom left corner and enter your Mac's password.
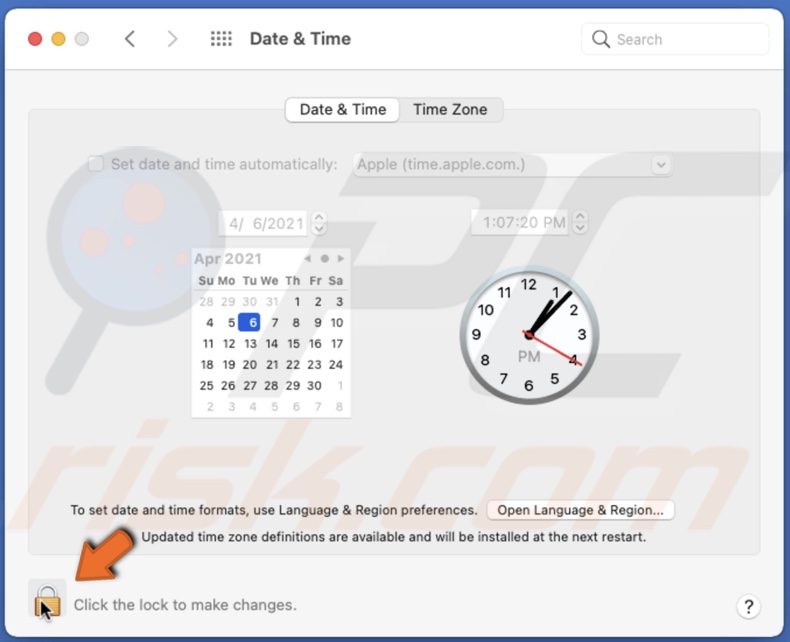
5. Check the box next to "Set date and time automatically".
To reset the date and time settings on iOS, follow the steps below:
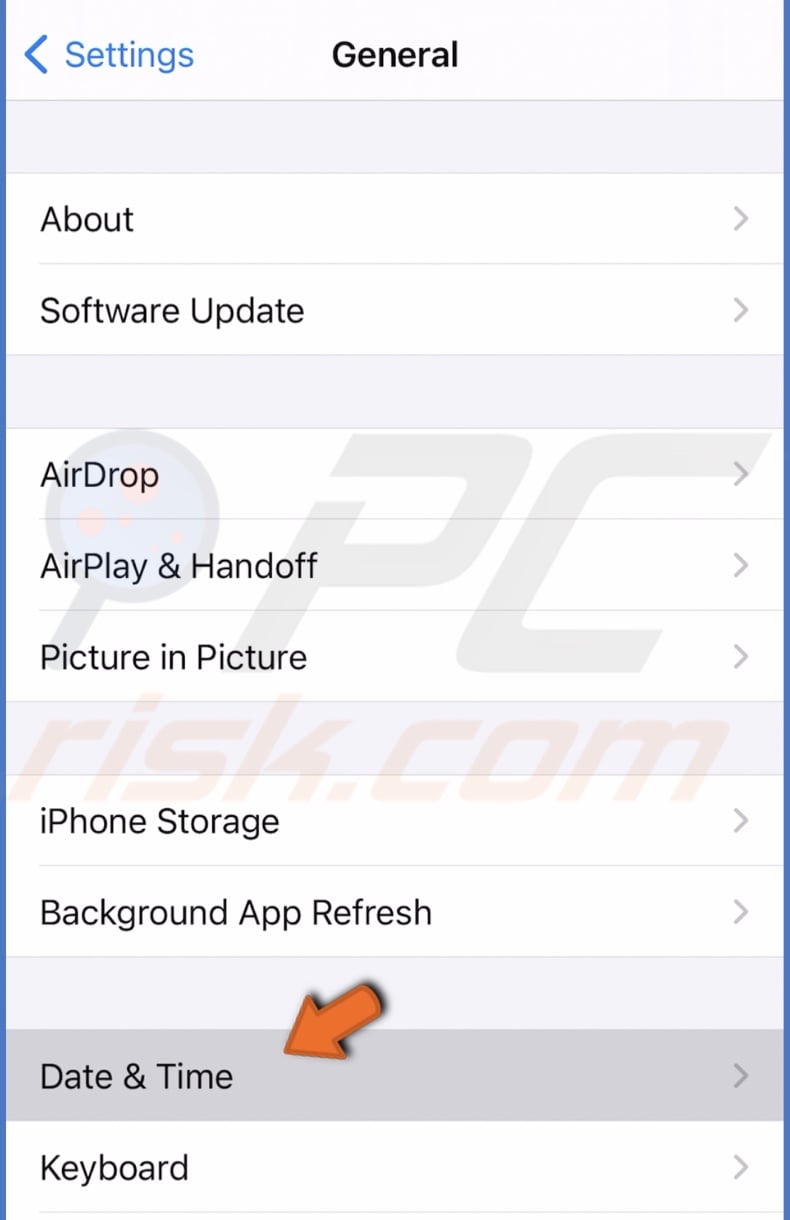
1. Go to device settings.
2. Then go to "General" settings.
3. Scroll down and tap on "Date & Time".
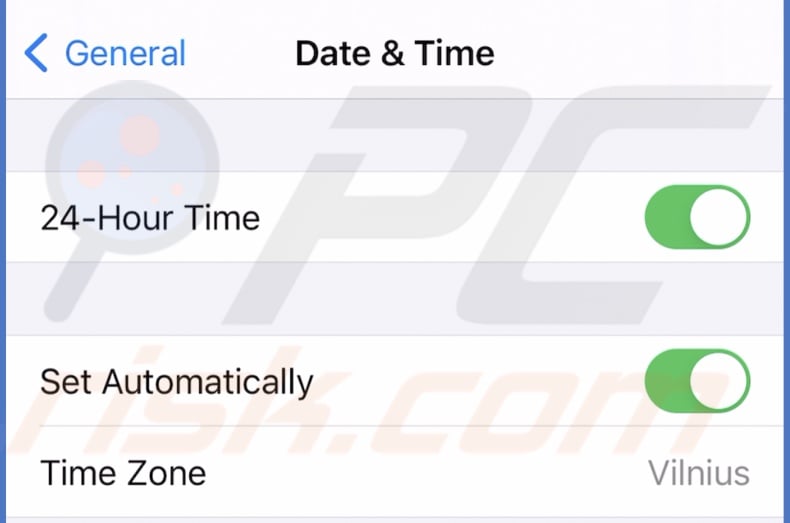
4. Enable 24-Hour Time and toggle "Set Automatically".
Check Your Internet Connection and Reboot The Router
If your internet connection is unstable, it can have a hard time connecting to Apple ID servers resulting in a connection error. First, run an internet speed test to see if your network is stable.
To run a network speed test, follow the steps below:
1. Go to an internet speed test website like speedtest.net
2. Click on "Go" to start the test.
3. Wait for the website to calculate your internet speed.
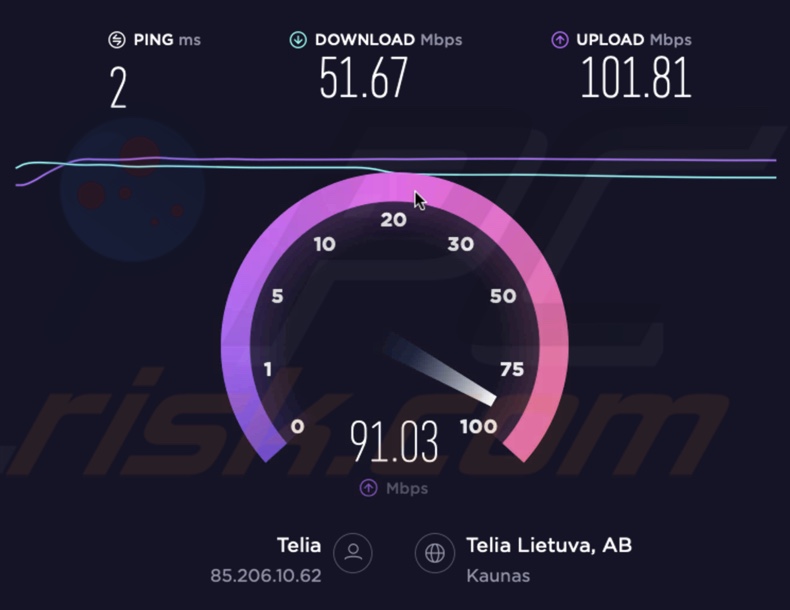
If your internet speed is lower than the one you agreed on with your internet service provider, contact it to solve the issue.
If the problem remains, if possible, connect to a different wi-fi network, personal hotspot (if using Mac) or disable your Wi-Fi and use your cellular data. Then check if you're able to connect to Apple servers.
You can also try resting your router/modem. To do that, just turn it off, wait for 10 seconds and turn it back on.
Remove All Network Connections and Add a New One
Some users have reported that removing all network connections from settings and adding a new one helped fix the server connection problem.
To remove and add network on Mac, follow the steps below:
1. In the menu bar, click on the Apple logo to open the Apple menu.
2. Go to "System Preferences".
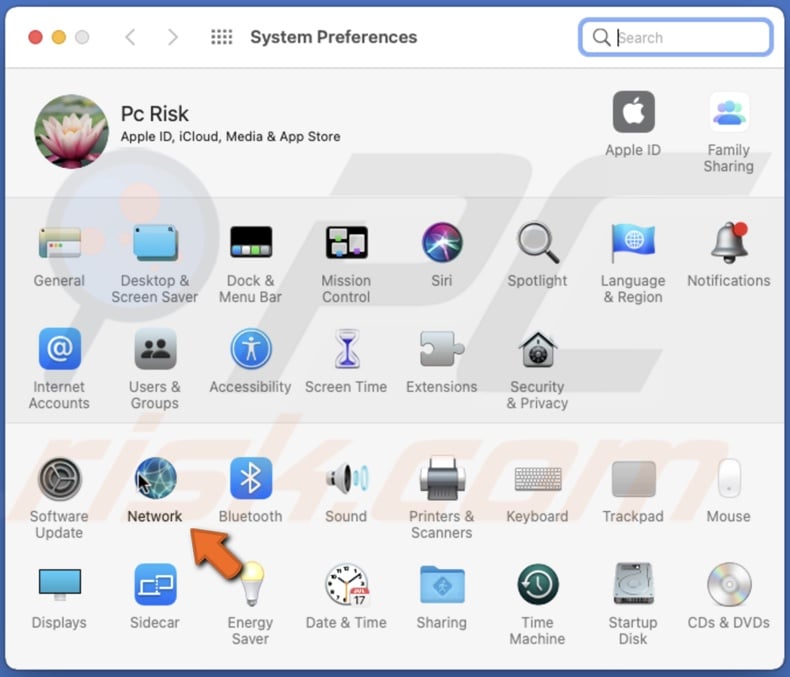
3. Then, click on "Network".
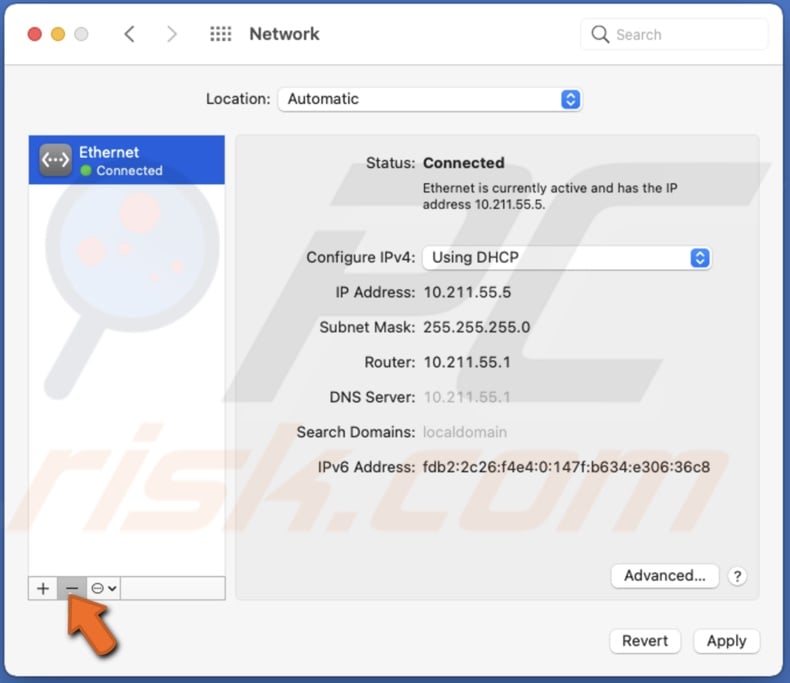
4. Choose every saved network one by one and click on the "-" button at the bottom to remove them.
5. When you've removed all of them, connect to your internet again.
To remove and add network on iOS, follow the steps below:
1. Go to device settings.
2. Tap on "Wi-Fi".
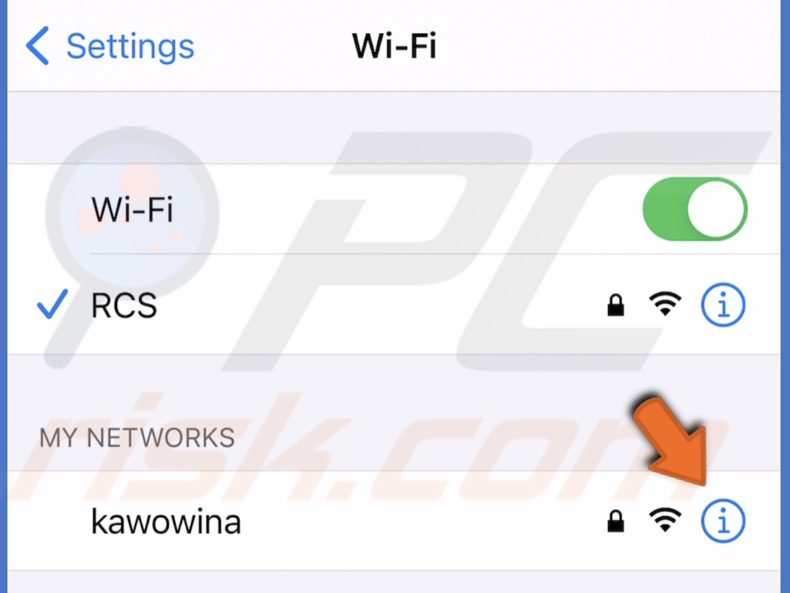
3. Under "My Networks", next to each network tap on the information button.
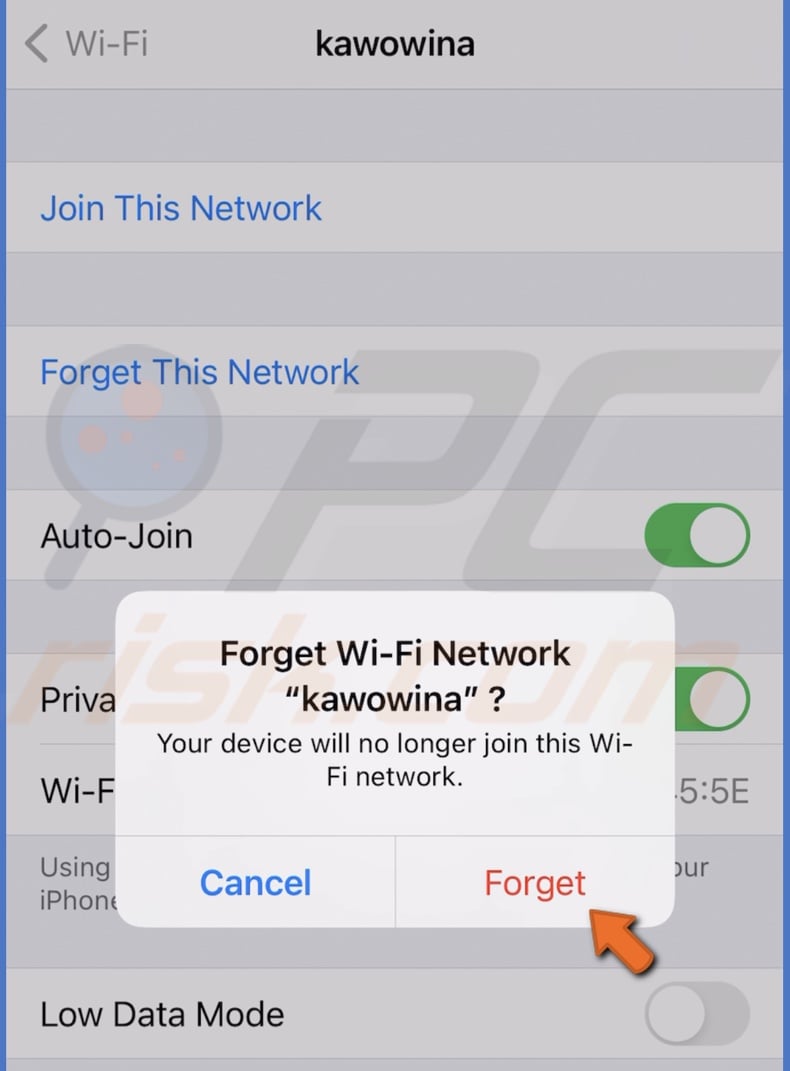
4. Then, tap on "Forget This Network" and then on "Forget".
5. After you did that with all the saved networks, connect to your internet again.
Make Sure The Internet Isn't Paused on Your Device
If you've paused internet access to your device and forget to unpause it, you'll be getting the error "Verification Failed: There was an error connecting to the Apple ID server". Check if your device is unpaused and try to log in again.
Disable Your VPN
If you have VPN enabled, turn it off and connect to iCloud, App Store, or another Apple service you were trying to connect.
Reset All Settings in iOS
If you've encountered an Apple server error on your iOS device, reset all device settings. This method, most of the time, fixes the problem.
To reset all iOS device settings, follow the steps below:
1. Go to settings.
2. Tap on "General".
3. Scroll down to the bottom and tap on "Reset".
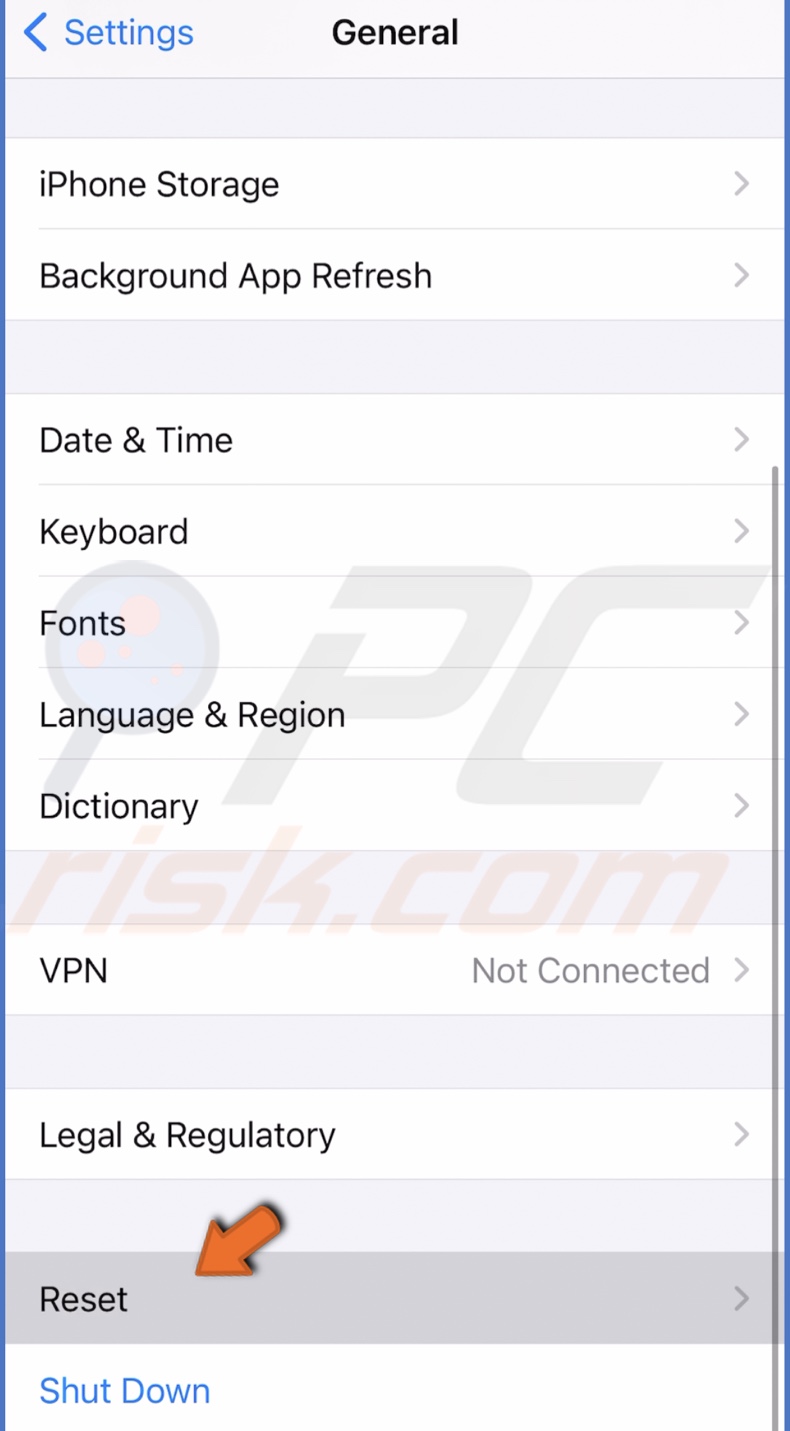
4. Then, tap on "Reset All Settings" and enter your device passcode.
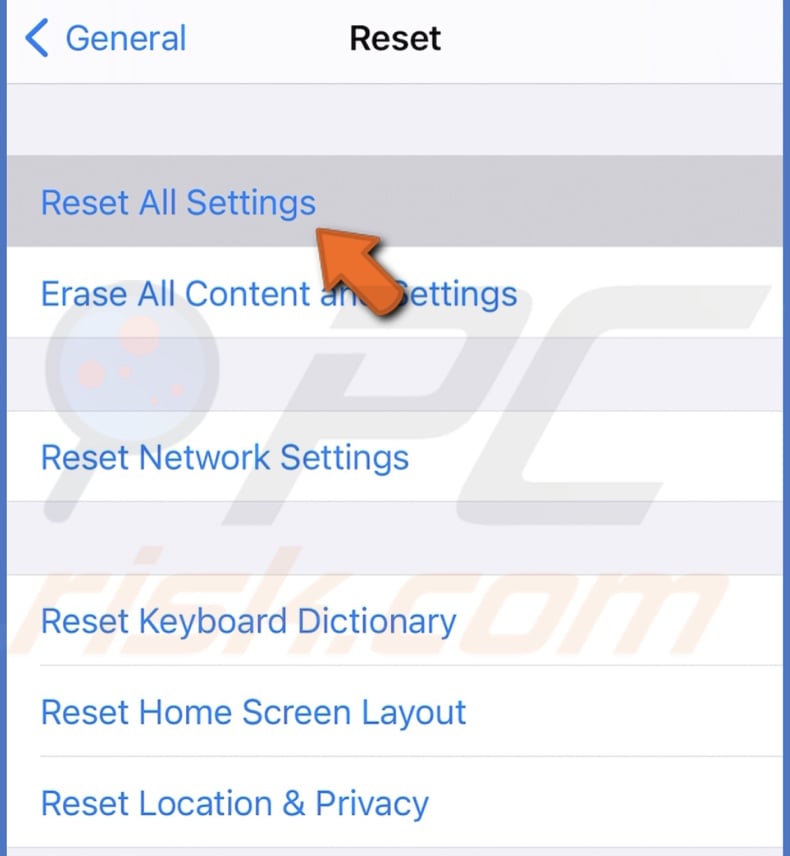
5. Tap on "Reset All Settings" again to confirm the action.
Change Your Apple ID Password
If previous methods didn't help, this might be a verification issue. If you didn't change your Apple ID password for a long time, it might not meet password recommendations as they change from time to time. Try solving the error by changing your Apple ID password.
To change your Apple ID password, follow the steps below:
1. Go to appleid.apple.com
2. Under "Manage your Apple account", enter your Apple ID credentials or click on "Continue with Password".
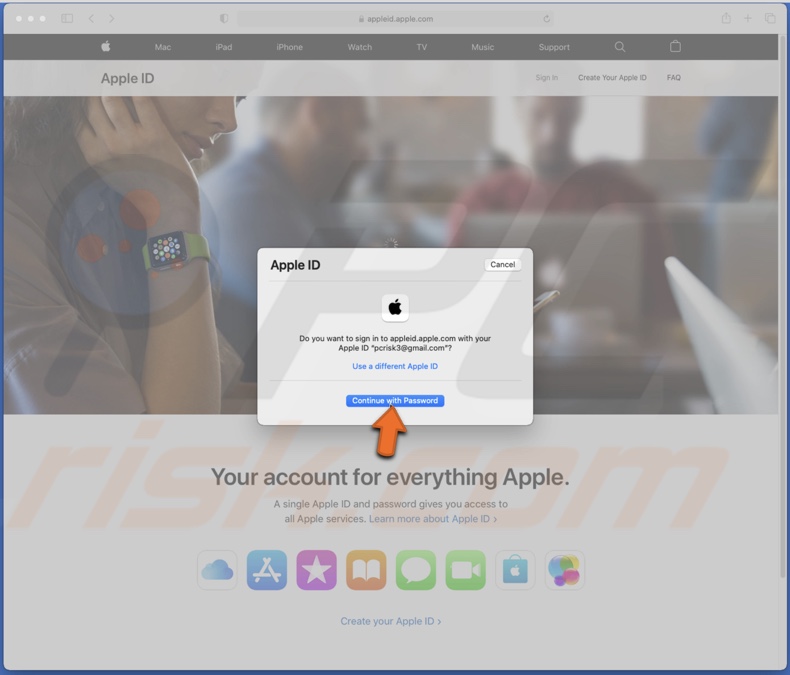
3. If asked enter a code.
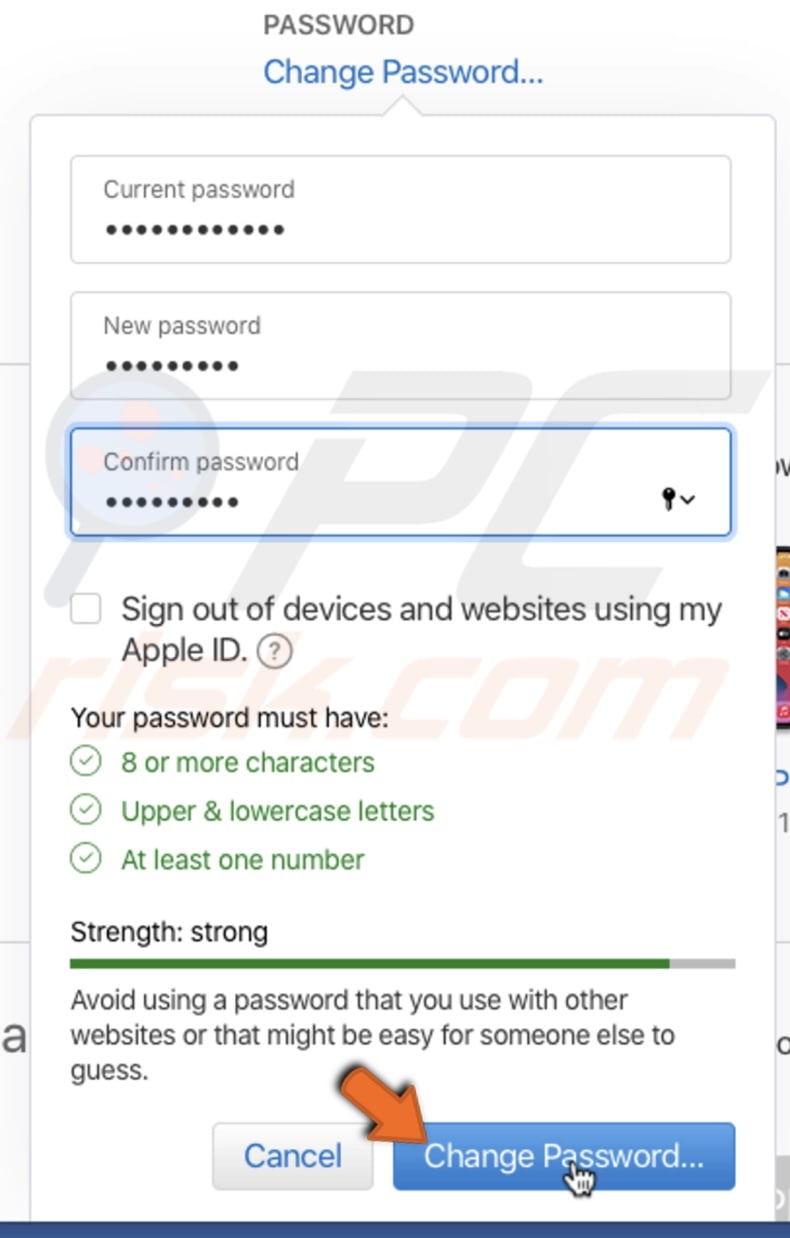
4. In the "Security" section, under "Password", click on "Change Password".
5. In the pop-up window, enter your old and new password.
6. Then, click on "Change Password" and exit your account.
Get an Apple ID Verification Code
Try signing in with a verification code. To do this, you need to have another Apple device. Also, both devices need to be connected to the same Apple ID and connected to Wi-Fi.
To get a verification code using iOS for Mac, follow the steps below:
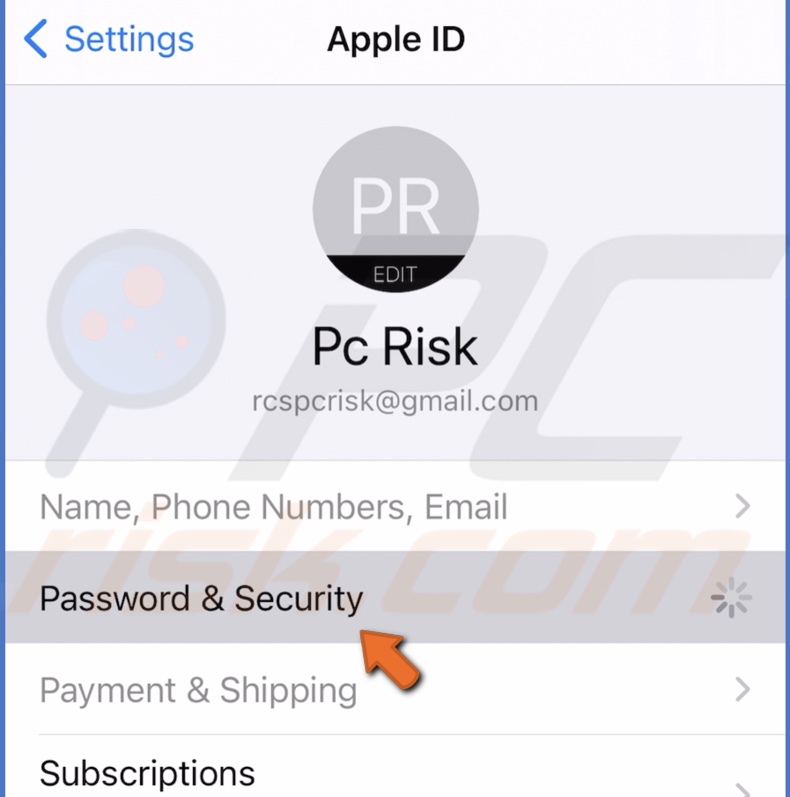
1. Go to settings and tap on your name.
2. Go to "Password & Security".
3. Tap on "Get Verification Code".
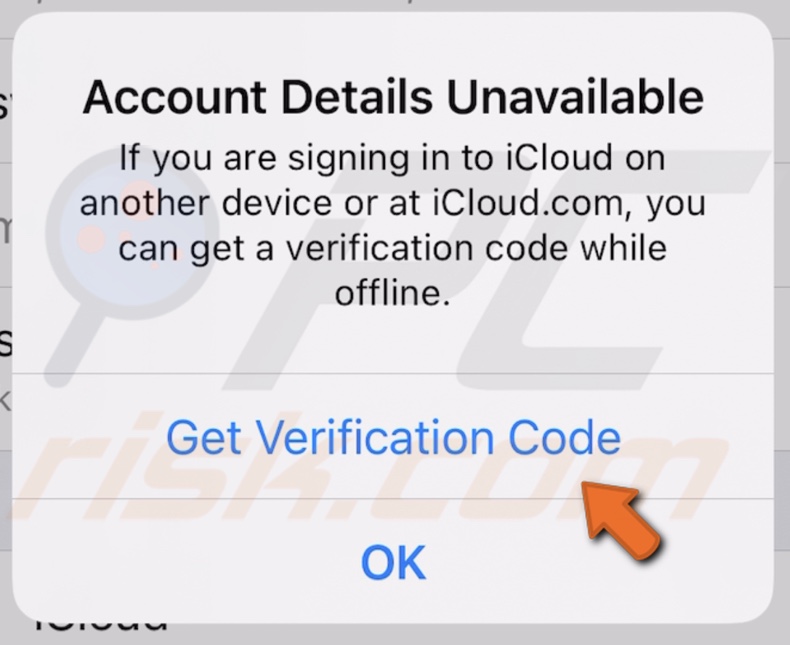
4. Then, go to your Mac and enter the verification code.
To get a verification code using Mac for iOS, follow the steps below:
1. Click on the Apple logo to access the Apple menu.
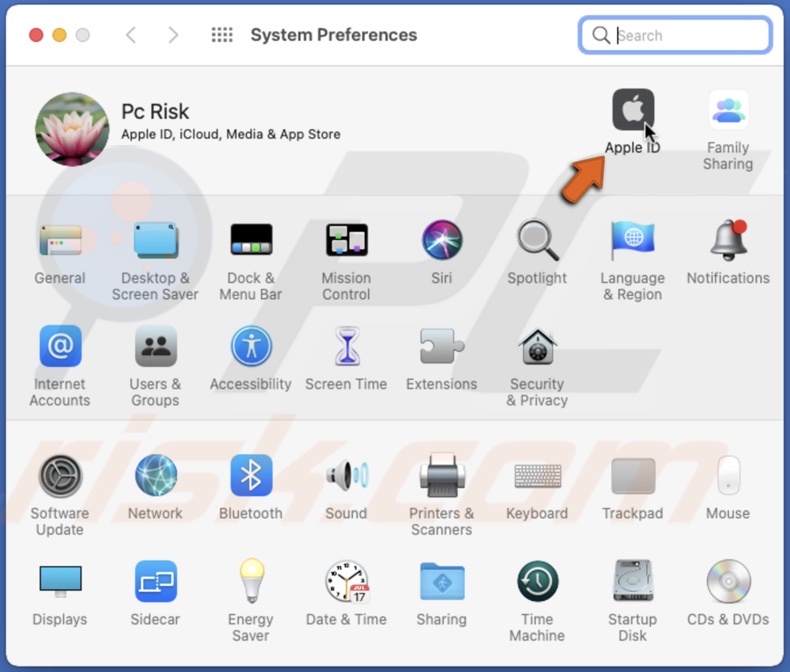
2. Go to "System Preferences".
3. Click on "Apple ID" and go to the "Password & Security" section.
4. Click on "Get Verification Code".
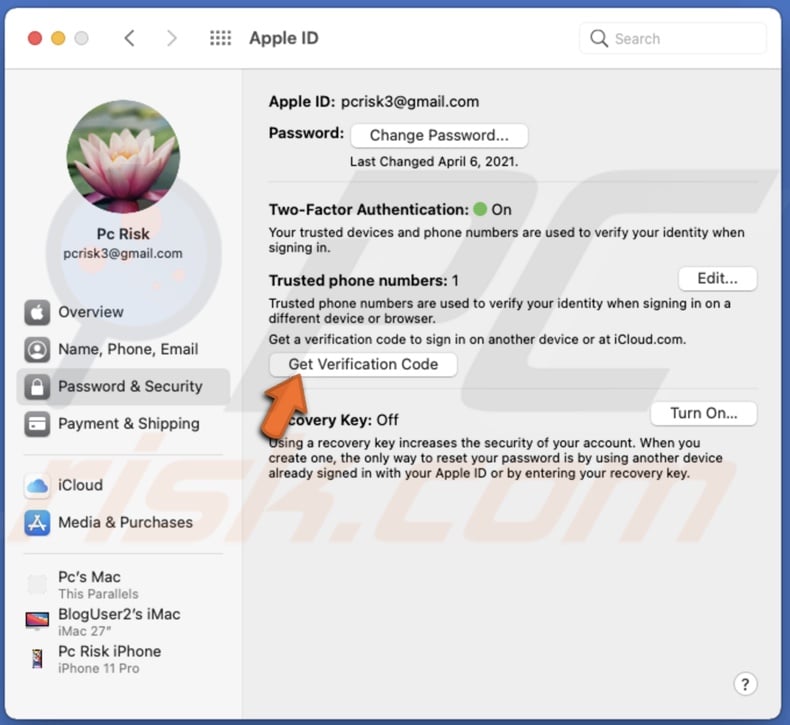
5. Then, go to your iOS device and enter the verification code.
Update and Restart Your Device
The last thing you can try is to update your device (if available) and restart it.
To update your Mac, follow the steps below:
1. Click on the Apple logo to access the Apple menu.
2. Go to "System Preferences".
3. Click on "Software Updates" and wait for your Mac to search for updates.

4. Update if possible.
To update your iPhone, follow the steps below:
1. Go to iPhone settings and tap on your Apple ID.
2. Go to "General".
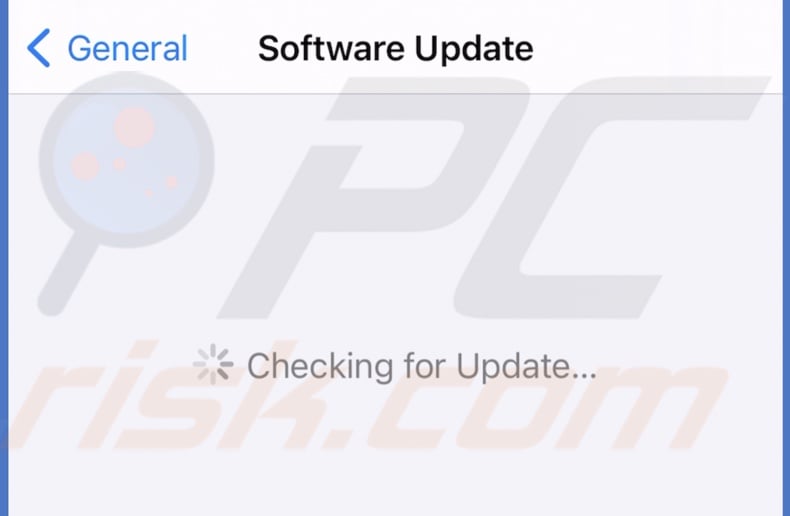
3. Tap on "Software Update".
4. Wait while your iPhone searches for updates. Update if found any.
Restart your Mac or iPhone if an update is not possible at the moment.
We hope these methods helped you solve the Apple ID server connection issue.
You can also check out the video below for a step-by-step tutorial of each method.
Share:

Karolina Peistariene
Author of how-to guides for Mac users
Responsible for collecting, analyzing, and presenting problem-solving solution articles related to macOS issues. Years of macOS experience combined with solid research and analyzing skills help Karolina provide readers with working and helpful solutions as well as introduce various features Mac has to offer.
▼ Show Discussion