How You Can Share Mac's Internet Connection With iPad and iPhone?

(updated)
Get Free Scanner and check your computer for errors
Fix It NowTo fix found issues, you have to purchase the full version of Combo Cleaner. Free trial available. Combo Cleaner is owned and operated by Rcs Lt, the parent company of PCRisk.com read more.
4 Ways You Can Share Your Mac's Internet Connection to iPad and iPhone
If you've run into a situation where you need a Wi-Fi connection for multiple devices but can only connect to one, don't worry, we've got you covered. It doesn't matter if you can't connect your devices due to having access only to an ethernet cable, or you don't want to pay extra to connect your iPhone or iPad. There are four ways you can set your own internet connection using a Mac.

Let's say you're someplace where only an ethernet cable is provided. The issue occurs when you want to connect your iPhone or iPad that doesn't have ethernet ports. In this case, you can connect the ethernet cable to your Mac and tether the internet connection to other devices.
If you only have access to a USB modem, you can set Your Mac as a personal hotspot for other devices. You can also share an internet connection from your Mac with your iPhone or iPad through a Lightning to USB cable.
Depending on your situation, pick a method and follow the steps to connect to Wi-Fi with your other devices.
Video on 4 Ways You Can Share Your Mac's Internet Connection to iPad and iPhone
Table of Contents:
- Introduction
- How to Share Mac's Wi-Fi to iPhone and iPad Using Bluetooth
- How to Set Mac as a Personal Hotspot For iPhone and iPad When Connected to Ethernet
- How to Share Internet Connection to iPhone and iPad From Mac Using Cellular Data
- How to Share Mac's Internet Connection using USB Cable
- Video on 4 Ways You Can Share Your Mac's Internet Connection to iPad and iPhone
Download Computer Malware Repair Tool
It is recommended to run a free scan with Combo Cleaner - a tool to detect viruses and malware on your device. You will need to purchase the full version to remove infections. Free trial available. Combo Cleaner is owned and operated by Rcs Lt, the parent company of PCRisk.com read more.
By using Bluetooth and Internet Sharing, you can connect your iPhone and iPad to the Mac's Wi-Fi.
To share your Mac's network connection with your other Apple devices, follow the steps below:
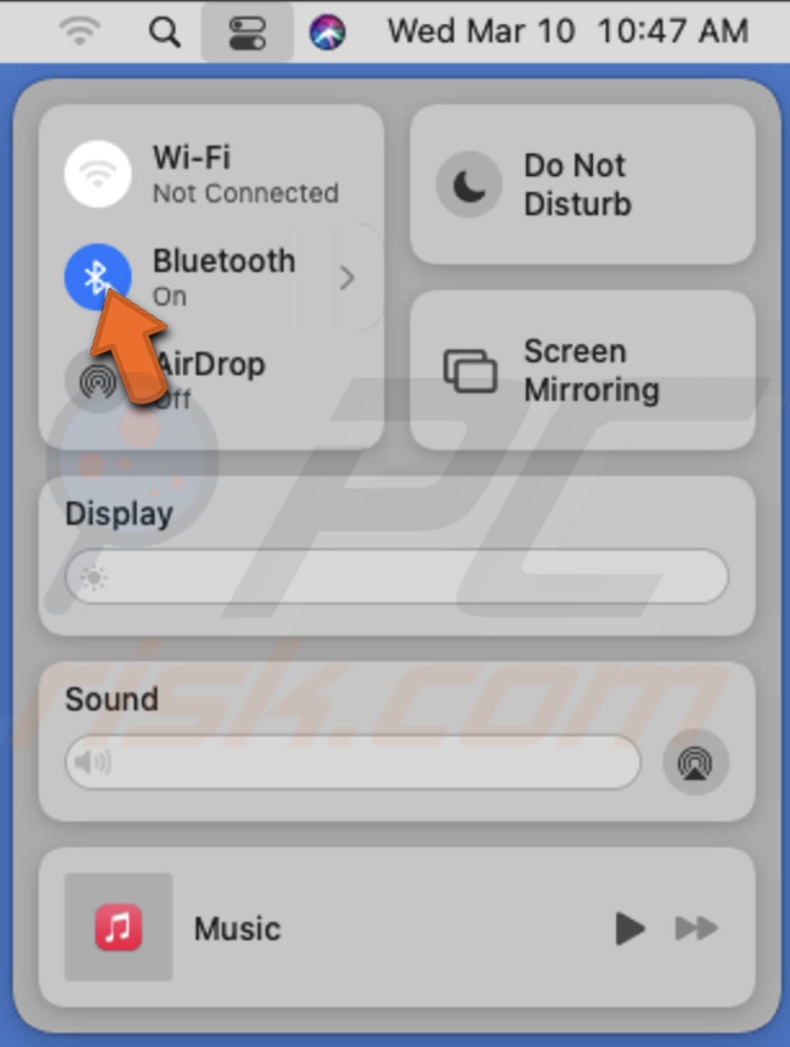
1. Turn on Bluetooth on your Mac. Go to the Control Center and click on "Bluetooth" to enable it.
2. Turn on Bluetooth on your iOS device. Go to Bluetooth settings and turn it on.
3. When Bluetooth is enabled on both devices, go to the iPad/iPhone Bluetooth settings and select your Mac to connect to it. If you've never connected to your Mac, you should see it under "Other Devices".
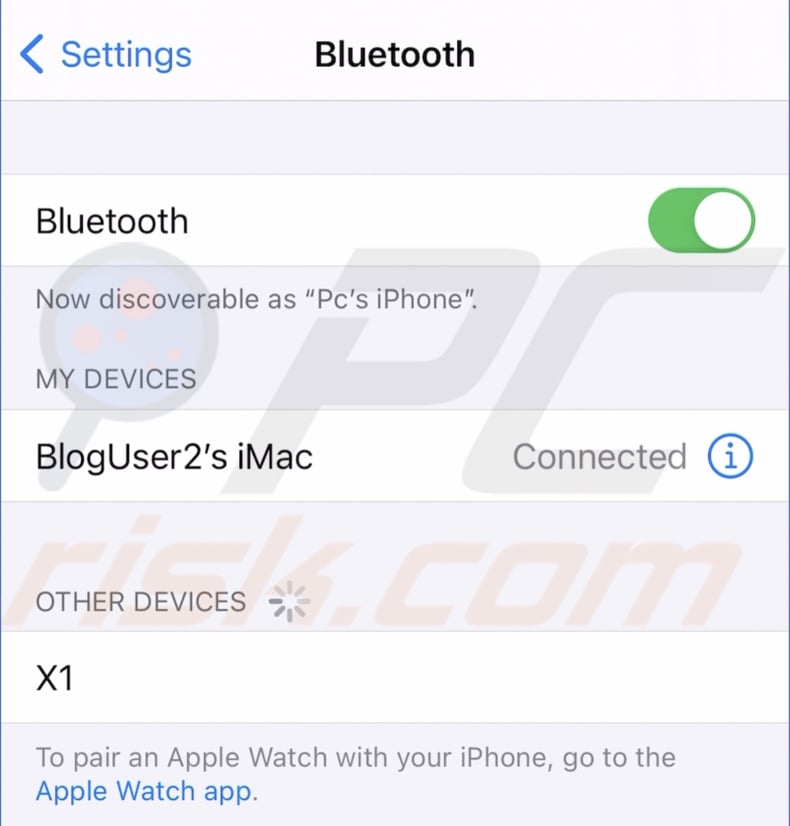
4. On your Mac, a message will pop-up notifying you about the connection request. Click on "Connect" to accept it.
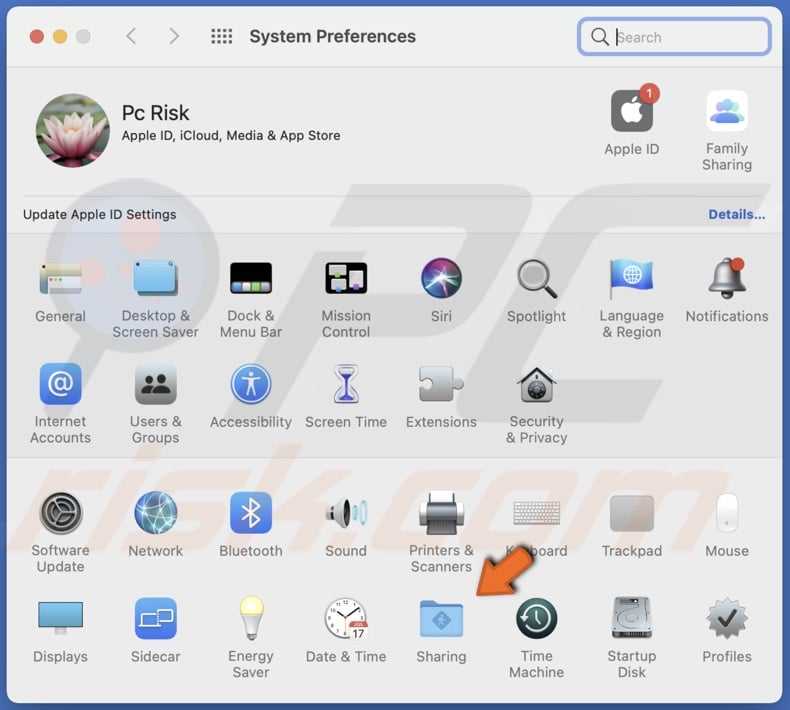
5. When both of your devices are paired, click on the Apple logo and go to "System Preferences".
6. Go to "Sharing" settings.
7. Then, on the left sidebar, select "Internet Sharing". Don't check the box yet!
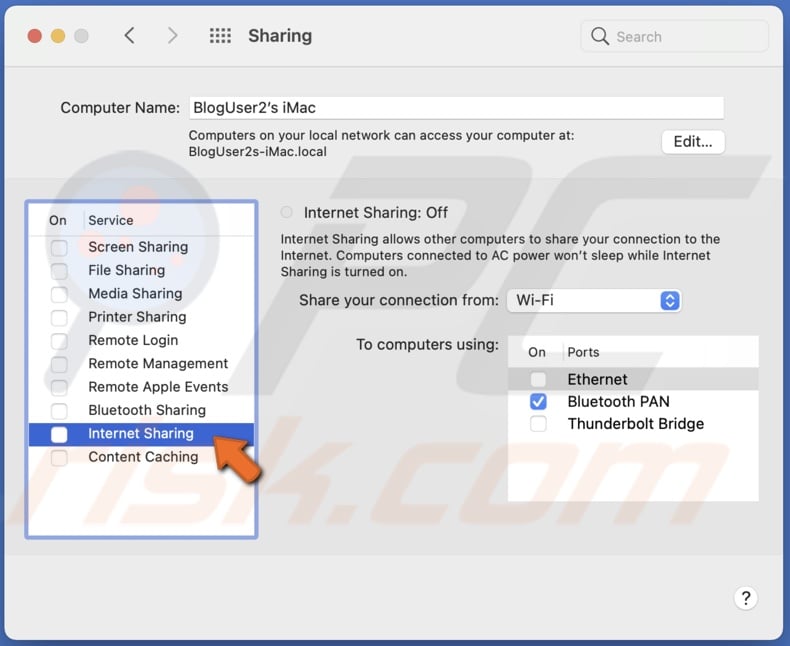
8. Expand the drop-down menu next to "Share your connection from" and select "Wi-Fi".
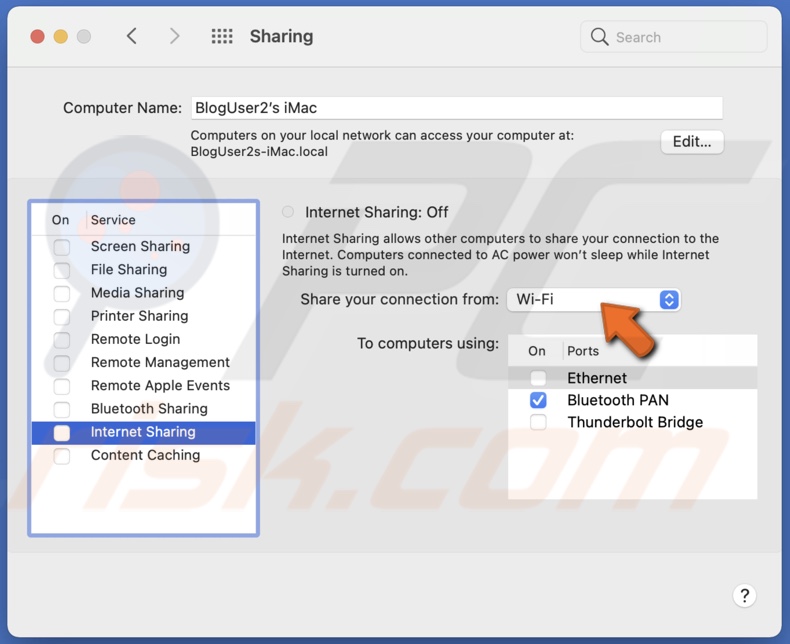
9. In the box below, check the box next to "Bluetooth PAN".
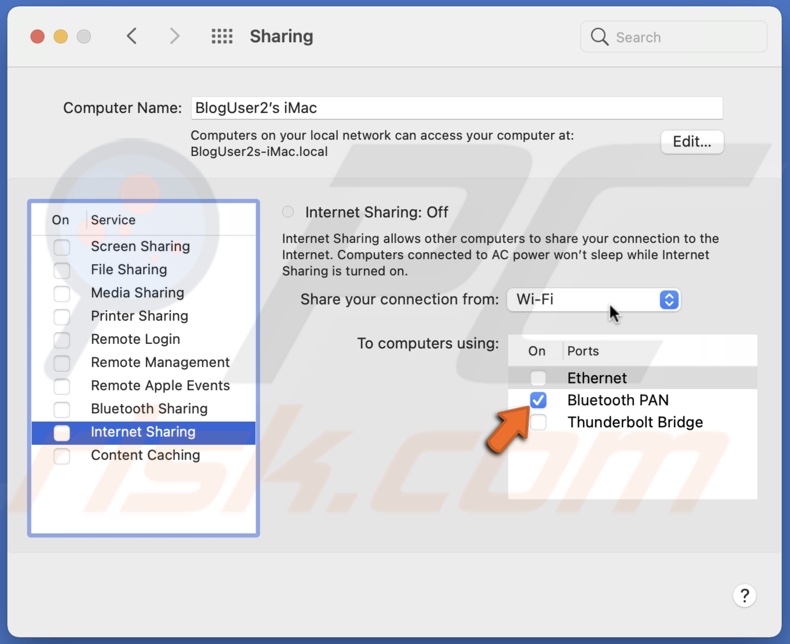
10. Now, check the "Internet Sharing" box and click on "Start".

When Internet Sharing is turned on, you'll see an icon appear on the right side of the menu bar.
If your Mac is connected to an ethernet cable, you can still share the internet connection with your iPhone and iPad.
To set your Mac as a personal hotspot, follow the steps below:
1. On your Mac, click on the Apple logo and go to "System Preferences".
2. Then, go to "Sharing".
3. On the left sidebar, select "Internet Sharing". Don't check the box yet!
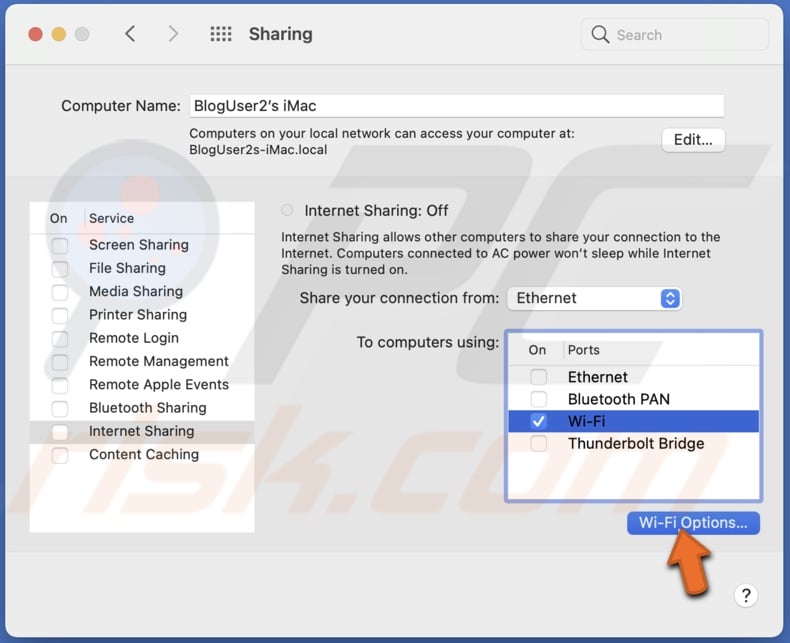
4. On the right side of the window, next to "Share your connection from", expand the drop-down menu and select "Ethernet".
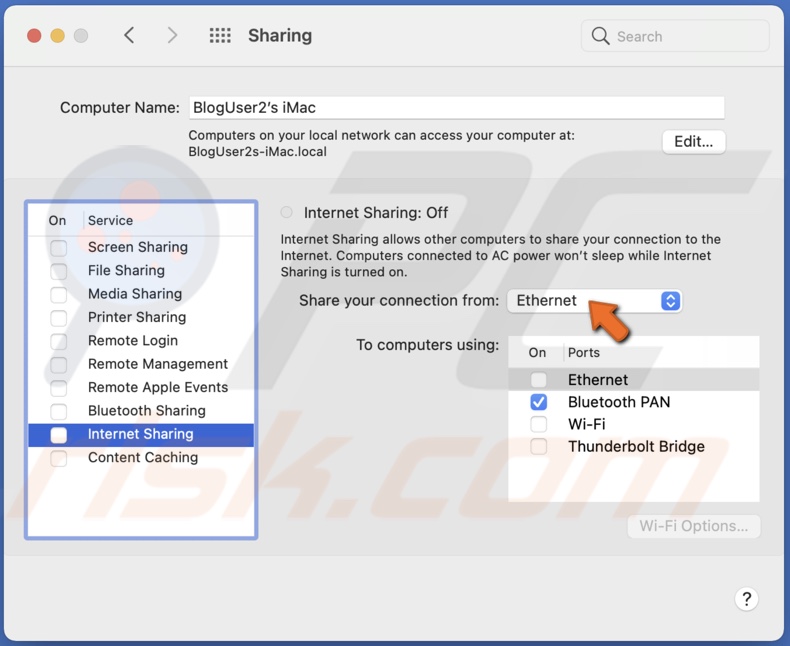
5. In the box below, check the box next to "Wi-Fi".
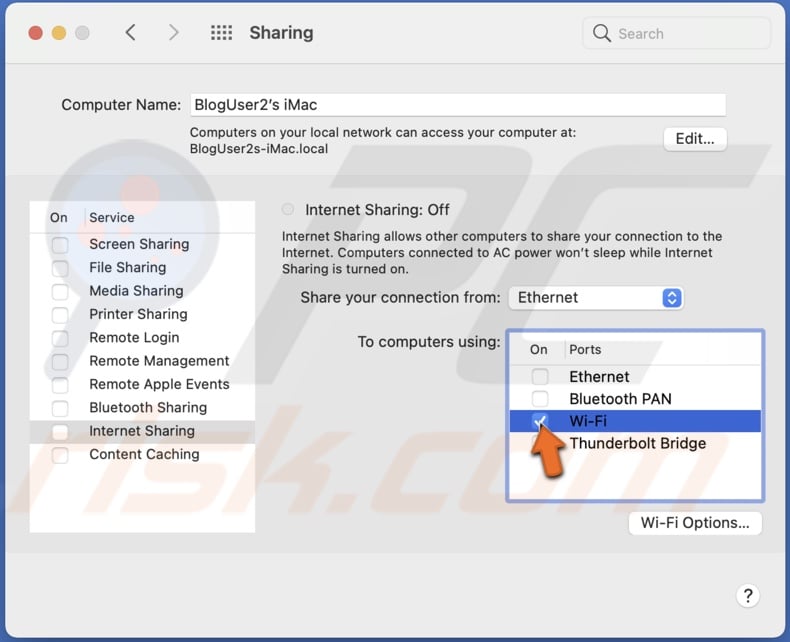
6. Then, at the bottom, click on "Wi-Fi Option".
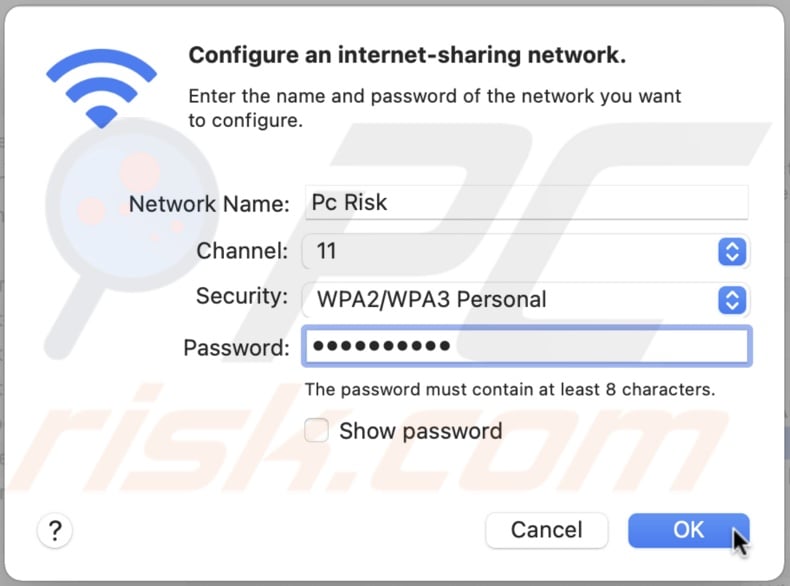
7. In the text field next to "Network Name", enter your internet name.
8. Next to "Security", expand the drop-down menu and select "WPA2 Personal".
9. Then, enter your hotspot password and click on "OK".
10. Now, check the box next to "Internet Sharing" and click on "Start".
Now, you can connect to your created Personal Hotspot with your iPhone and iPad.
If your Mac is connected to a USB modem that doesn't have a built-in tethering, you can set your Mac to share the network connection.
To share Mac's internet connection using cellular data, follow the steps below:
1. Connect the USB modem to your Mac with a USB cable.
2. Then, click on the Apple logo and go to "System Preferences".
3. Go to "Sharing" settings.
4. On the left sidebar, select "Internet Sharing," but don't check the box yet.
5. Expand the drop-down menu next to "Share your connection from" and select "Cellular Modem" or the name of the modem brand.
6. In the box below, check the box next to "Wi-Fi".
7. Then, click on "Wi-Fi Options".
8. In the text field next to "Network Name", enter your internet name.
9. Next to "Security", expand the drop-down menu and select "WPA2 Personal".
10. Then, enter your hotspot password and click on "OK".
11. Now, check the box next to "Internet Sharing" and click on "Start".
Now you can connect to the Wi-Fi network using your iOS devices by entering its password.
This method is useful if you're not able to share Mac's internet connection using previous methods. Unfortunately, by using a USB cable, you can share the internet with only one device and only when the cable connects both devices.
To share Mac's internet connection using a USB cable, follow the steps below:
1. Connect your Mac and your iOS device with a Lightning to USB cable.
2. Then, on your Mac, click on the Apple logo and go to "System Preferences".
3. Go to "Sharing" settings.
4. On the left sidebar, select "Internet Sharing". Don't check the box next to it yet!
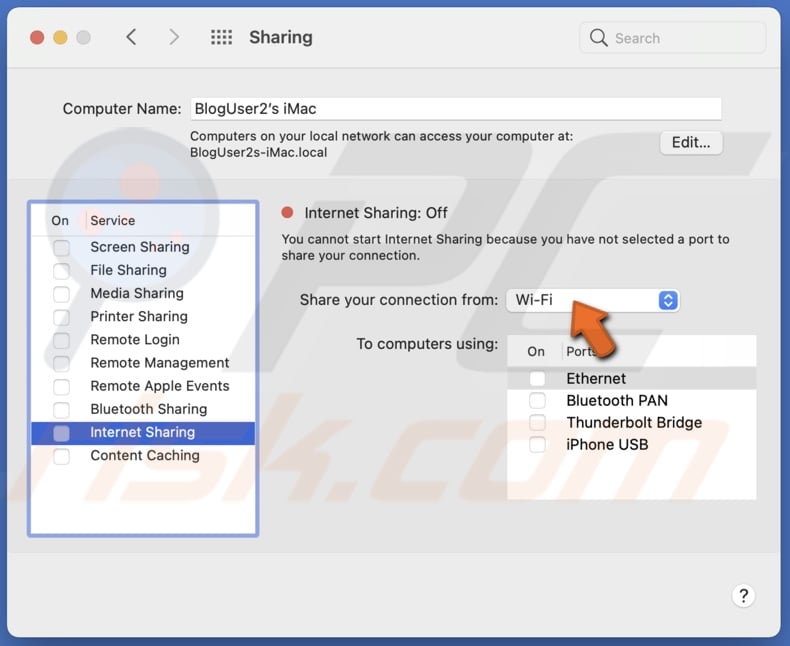
5. Then, on the right side of the window, next to "Share your connection from", expand the drop-down menu and select "Wi-Fi".
6. In the box below, check "iPhone/iPad USB".
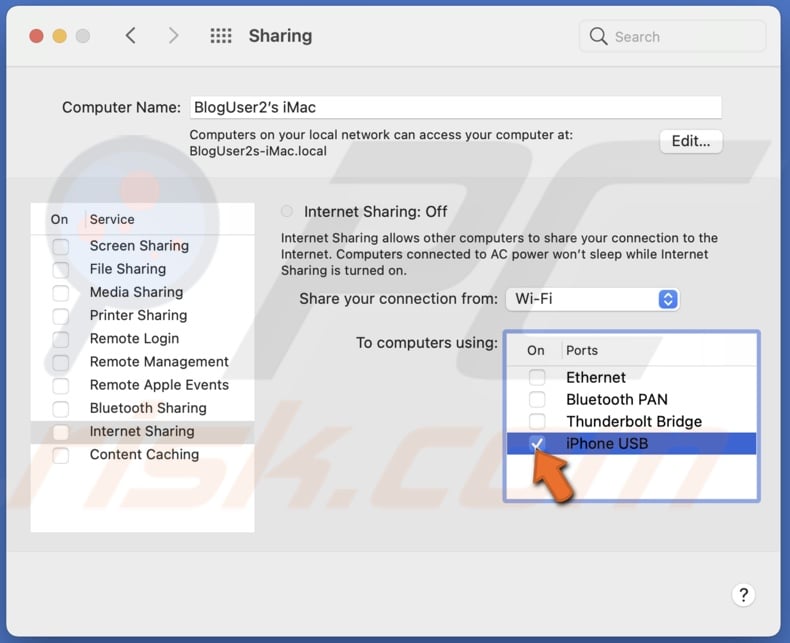
7. Now, you can check the box next to "Internet Sharing" and click on "Start".
Now, you'll be able to use Wi-Fi on your iOS device. Keep in mind that you'll be able to use the Wi-Fi connection while you're connected to your Mac through the cable.
We hope the information above was useful!
You can also check out the video above.
Share:

Karolina Peistariene
Author of how-to guides for Mac users
Responsible for collecting, analyzing, and presenting problem-solving solution articles related to macOS issues. Years of macOS experience combined with solid research and analyzing skills help Karolina provide readers with working and helpful solutions as well as introduce various features Mac has to offer.
▼ Show Discussion