What to Do When My Purchase Can't Be Completed in The App Store on Mac?

(updated)
Get Free Scanner and check your computer for errors
Fix It NowTo fix found issues, you have to purchase the full version of Combo Cleaner. Free trial available. Combo Cleaner is owned and operated by Rcs Lt, the parent company of PCRisk.com read more.
9 Ways You Can Fix "Your Purchase Could Not Be Completed" in The App Store on Mac?
Usually, when you want to download a specific application, the first place you look is probably the App Store. That's because it's very convenient. But sometimes, the App Store can encounter issues, and it can get very frustrating when you try to purchase an app, but the App Store keeps repeating that "Your Purchase Could Not Be Completed".
This problem can appear for several reasons. The error might happen if you're having problems with your network. If your internet connection is unstable, you haven't accepted iTunes's new Terms & Conditions, the application might not be available in your country.
There are quite a few reasons why you might be experiencing this problem. There could also be issues with the servers, app file verification, and so on. But the most important thing is you can fix it by following the steps below.
Video on 9 Ways You Can Fix "Your Purchase Could Not Be Completed" in The App Store on Mac
Table of Contents:
- Introduction
- Method 1. Disable VPN
- Method 2. Reset The App Store
- Method 3. Update Your Payment Method
- Method 4. Your Apple ID is Linked to Too Many Payment Methods
- Method 5. Disable Content and Privacy Restrictions
- Method 6. Delete The App Store Cache
- Method 7. Delete The App Store Temporary Files
- Method 8. Update Device Software
- Method 9. Contact Apple Support
- Video on 9 Ways You Can Fix "Your Purchase Could Not Be Completed" in The App Store on Mac
Download Computer Malware Repair Tool
It is recommended to run a free scan with Combo Cleaner - a tool to detect viruses and malware on your device. You will need to purchase the full version to remove infections. Free trial available. Combo Cleaner is owned and operated by Rcs Lt, the parent company of PCRisk.com read more.
Disable VPN
VPN can sometimes be the reason that prevents you from purchasing apps. Disable your VPN and try buying the app again.
Reset The App Store
Sign out and sign back into the App Store with your Apple ID. If App Store is having some software issues in your Mac, this should help reset it.
To reset the App Store, follow the steps below:
1. Launch the App Store.
2. In the menu bar, select "Store".
3. Click on "Sign Out".
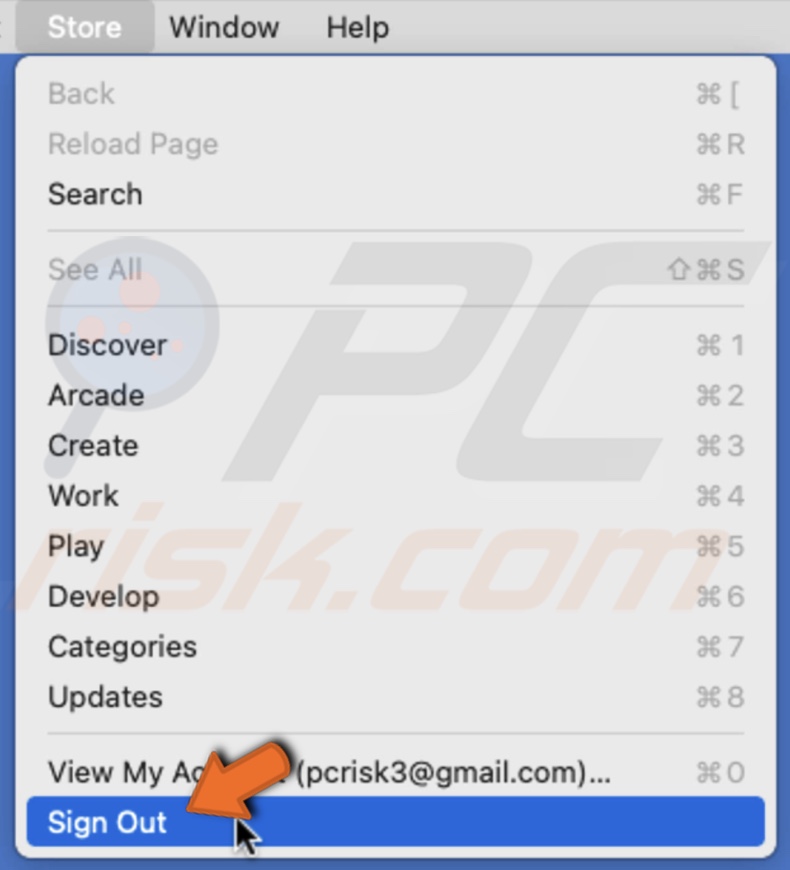
4. Then, quit the App Store by right-clicking on the App Store icon located in the Dock and clicking on "Quit". Or Clicking on the "App Store" menu from the menu bar and selecting "Quit App Store".
5. After that, open the App Store again and sign in.
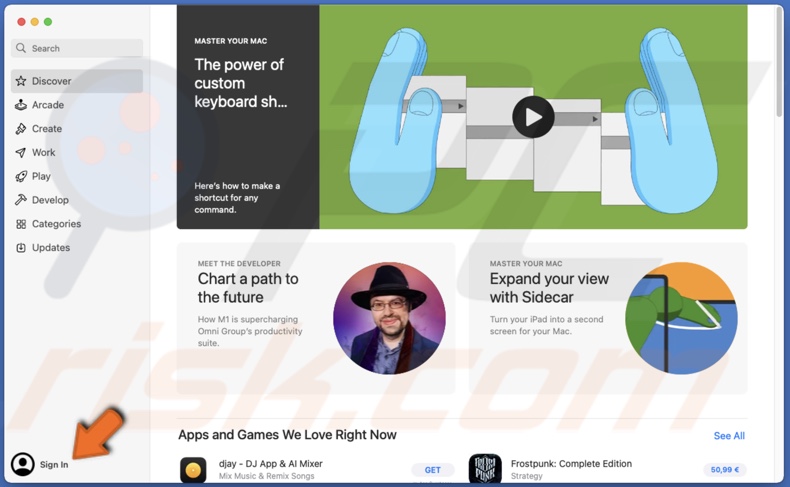
In most cases, signing out and back in helps to solve the issue. Try to purchase the app again.
Update Your Payment Method
The other reason why you're not able to purchase an app is due to an error related to your payment information. There are several reasons why the transaction didn't go through. Maybe your card got declined or expired, the billing information is entered incorrectly, there are not enough funds, or the billing information is not added.
Ensure you have enough money in your bank account and that it hasn't expired or been declined.
You can update your payment information directly in the App Store.
To update payment information, follow the steps below:
1. Open the App Store.
2. Click on your Apple ID located at the bottom left corner of the App Store window.
Or you can click on "Store" in the menu bar and then click on "View My Account".
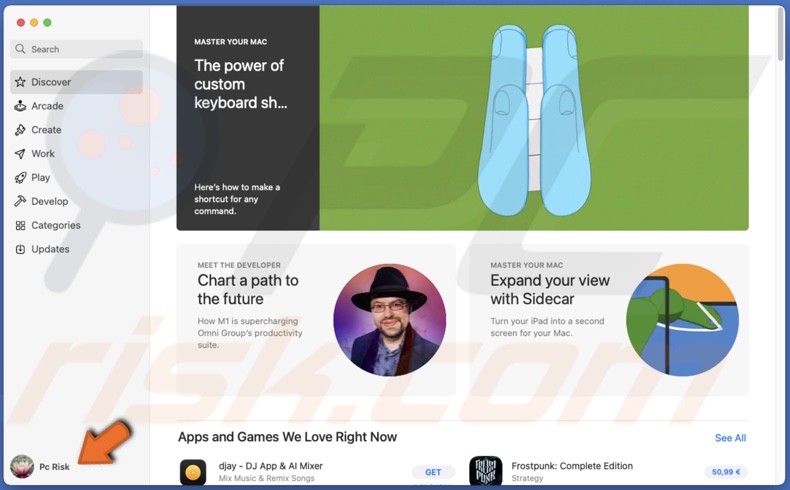
3. Then, click on "View Information" located in the top right corner of the App Store window.
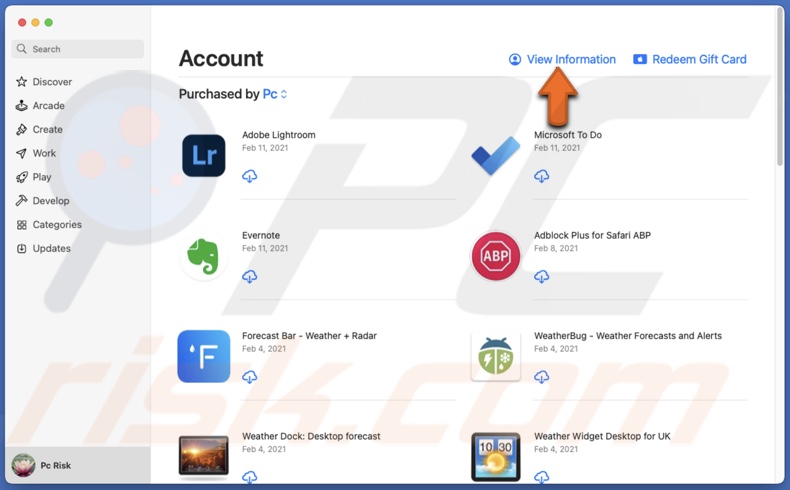
4. Next to "Payment Information", click on "Manage Payments".
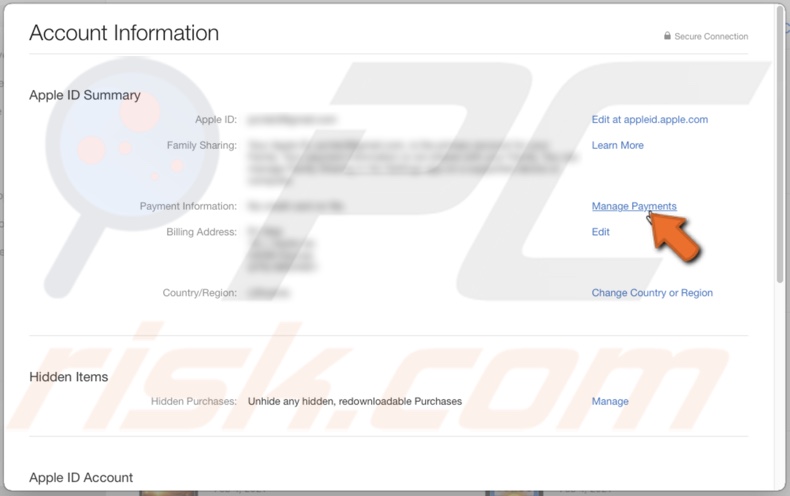
5. Select "Add Payment" if you didn't add it yet, select payment method, and enter the billing information. Then, click on "Done".
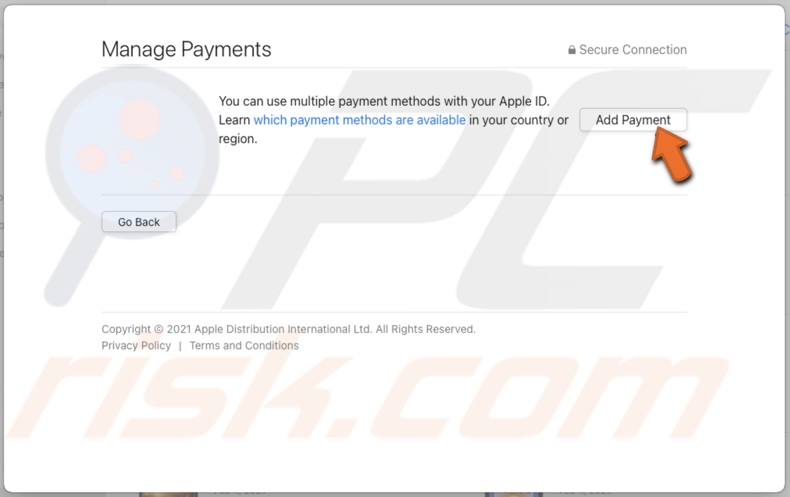
If the information is added but needs to be updated, click on "Edit" and update the payment method.
When you're done updating the payment information, try to purchase the app again.
Your Apple ID is Linked to Too Many Payment Methods
When you link your Apple ID with many payment methods, Apple sees this as a suspicious activity. The only solution to solve this issue is to contact Apple Support.
Disable Content and Privacy Restrictions
If you have enabled Content and Privacy Restriction for the App Store, you might have limited your purchases. Check if that's the case.
To disable App Store restrictions, follow the steps below:
1. Go to the Apple menu by clicking on the Apple logo.
2. Click on "System Preferences".
3. Then, go to "Screen Time".
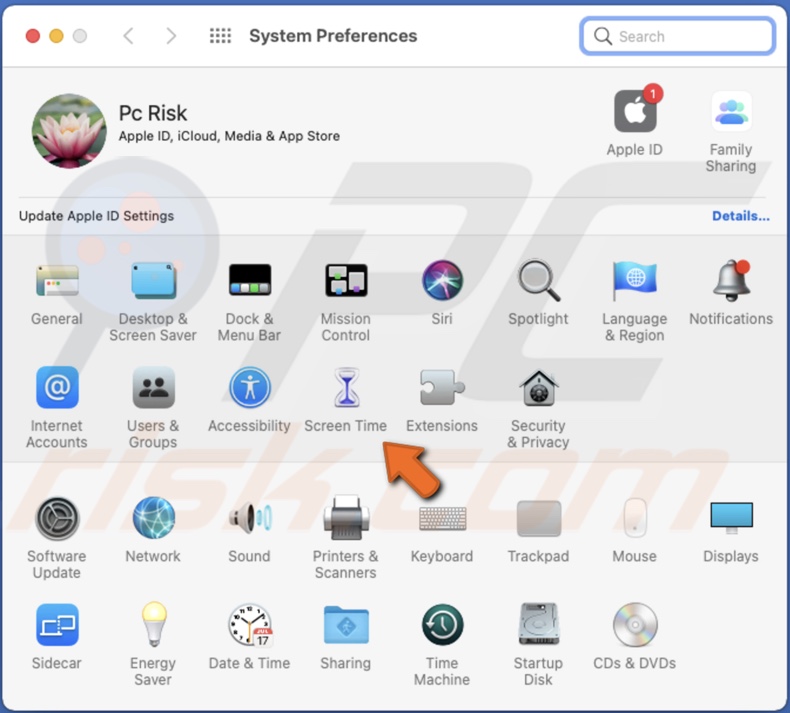
4. Go to "Content & Privacy".
5. If the screen time is enabled, you can click on "Turn Off" at the top right corner to disable Screen Time.
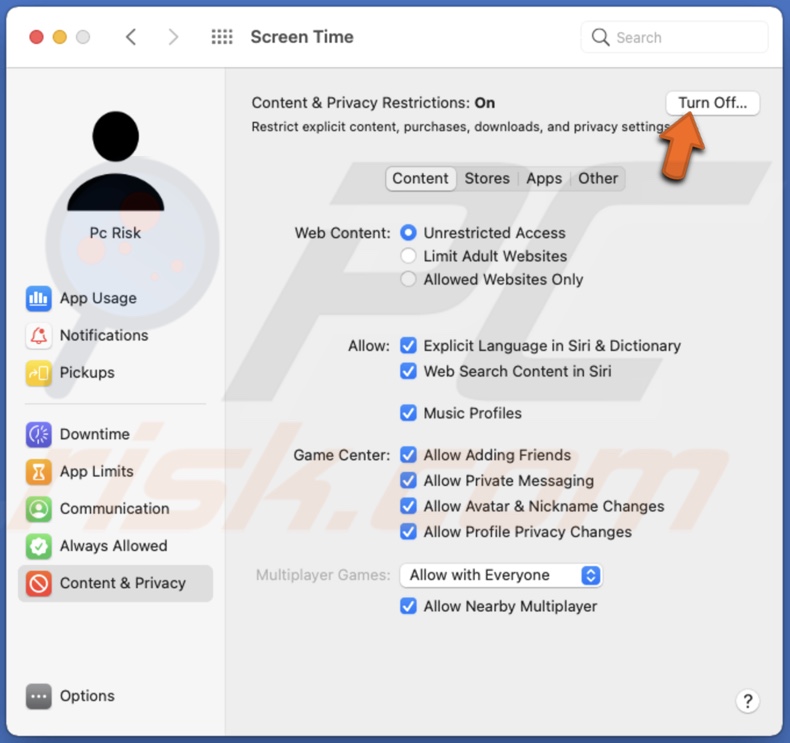
Or, if you want to keep Screen Time enabled, go to the "Store" tab and uncheck the box next to "In-app Purchases".
Now, try to buy the app again.
Delete The App Store Cache
Deleting the App Store cache is one of the methods that can help solve this issue.
To clear the App Store cache, follow the steps below:
1. Make sure you've quit the App Store.
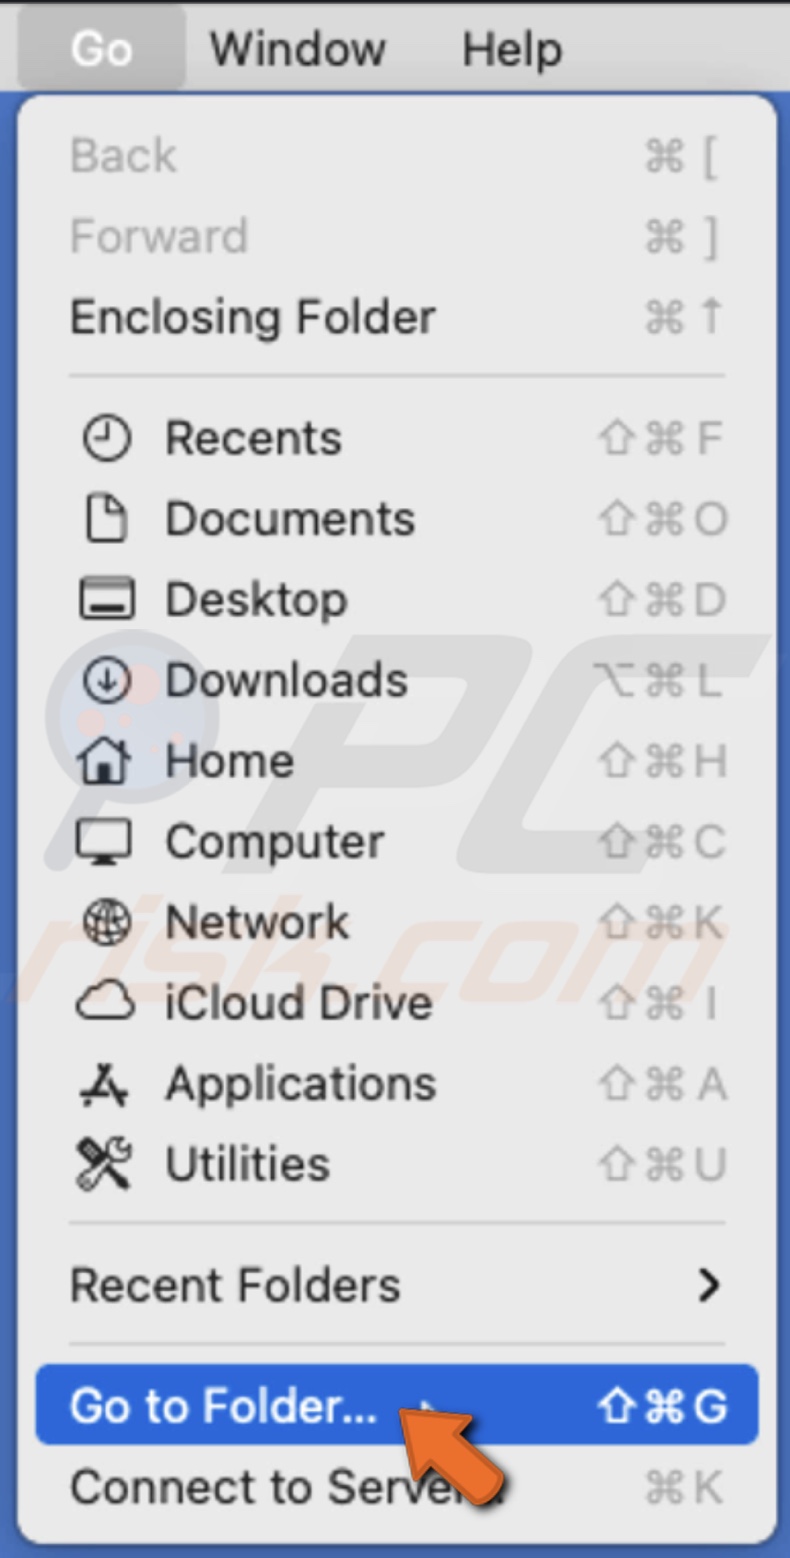
2. Then, launch Finder and in the menu bar, click on "Go".
3. Click on "Go to Folder".
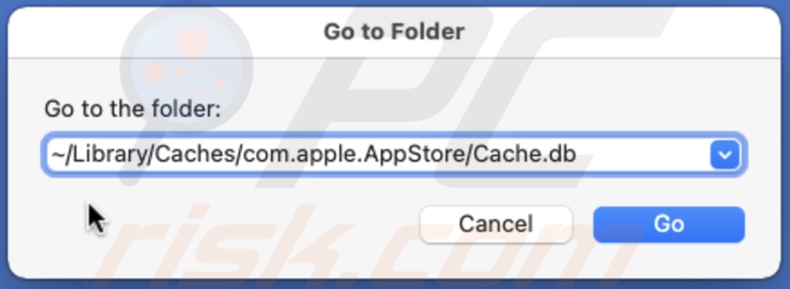
4. In the path bar, enter: ~/Library/Caches/com.apple.appstore/Cache.db
5. Then, when a folder opens, locate the file "Cache.db" and delete it.
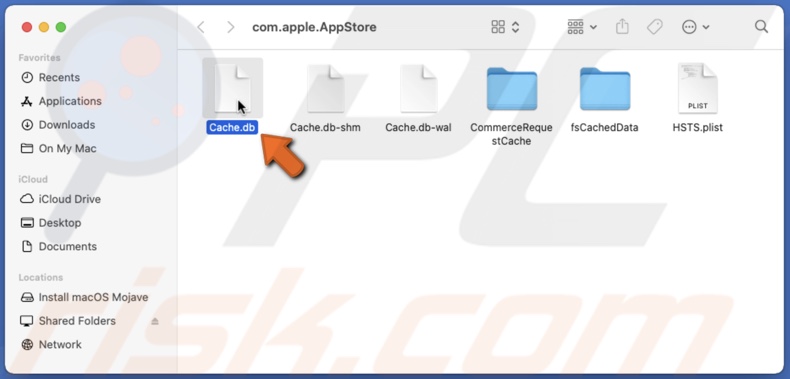
Hopefully, the problem is gone, and you can purchase the app.
Delete The App Store Temporary Files
Temporary files help avoid data corruption when using an app. But sometimes, they can conflict with a server and prevent you from purchasing other apps or updating already downloaded ones.
To clear the App Store temporary files, follow the steps below:
1. Make sure you've quit the App Store.
2. Open the Terminal app.
3. In the Terminal window, enter the line: open $TMPDIR/../C/com.apple.appstore/
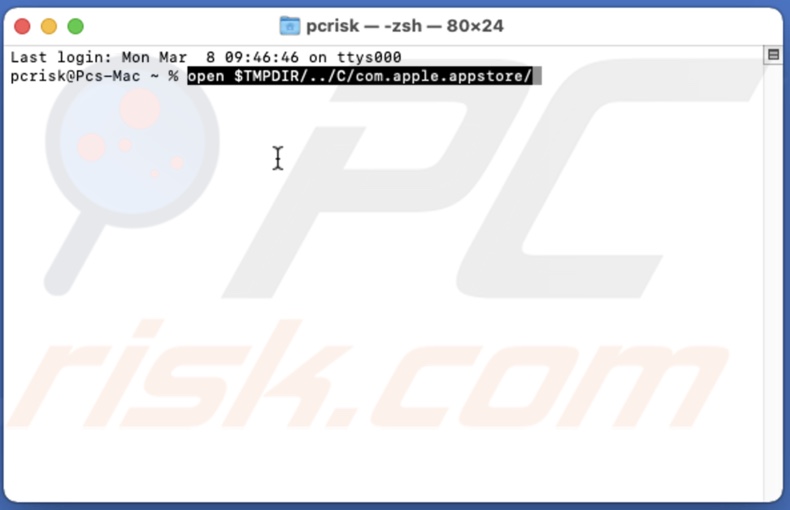
4. When the folder pops up, delete all pending and temporary files.
5. Then, restart your Mac.
Now, try to buy or upgrade an app and see if the problem is solved.
Update Device Software
If you're still experiencing issues, check if there are available software updates.
To check for updates, follow the steps below:
1. Click on the Apple logo to go to the Apple menu.
2. Click on "System Preferences".
3. Then, go to "Software Updates".
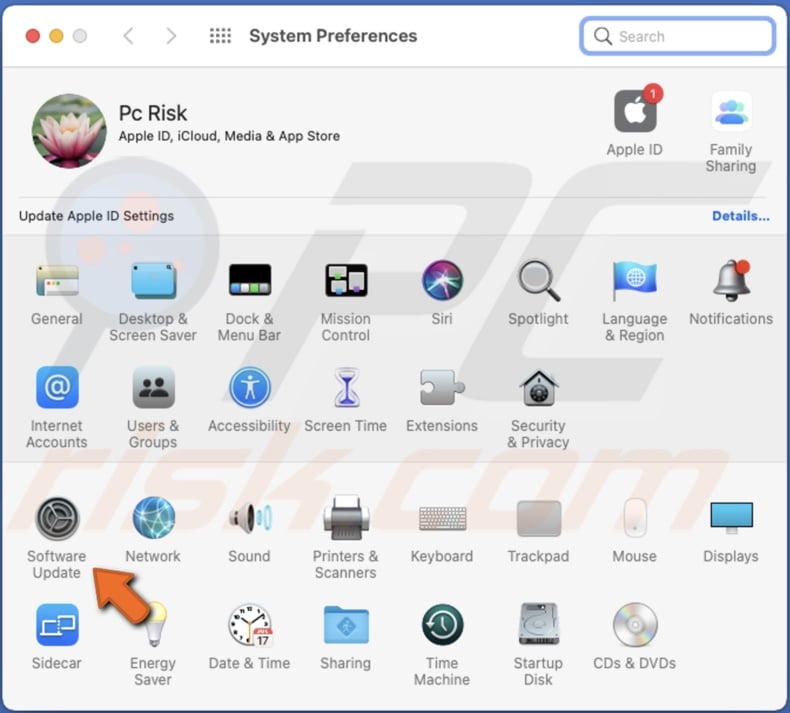
4. Wait for your Mac to look for updates. If you found any, update your Mac.

After the update, launch the App Store and try to purchase the item again.
Contact Apple Support
If your payment information is correct and none of the above methods helped, contact Apple support for more information on the issue and how to solve it.
We hope this information was helpful!
You can also check out the video above for a step-by-step tutorial.
Share:

Karolina Peistariene
Author of how-to guides for Mac users
Responsible for collecting, analyzing, and presenting problem-solving solution articles related to macOS issues. Years of macOS experience combined with solid research and analyzing skills help Karolina provide readers with working and helpful solutions as well as introduce various features Mac has to offer.
▼ Show Discussion