Schedule Emails on Your Apple Devices

(updated)
Get Free Scanner and check your computer for errors
Fix It NowTo fix found issues, you have to purchase the full version of Combo Cleaner. Free trial available. Combo Cleaner is owned and operated by Rcs Lt, the parent company of PCRisk.com read more.
How You Can Schedule Emails on Your iPhone, IPad, and Mac
Sending an email at the right time can make a big difference as timing is everything. Scheduling emails is beneficial both to you and the recipient. If you're sending an email to someone situated in another part of the world, time zones became important. If you're sending an email to a client, and it's the middle of the night for them, high chances are your email won't be at the top of the inbox for them when they open it.
Another reason why you need to schedule emails is timing. As mentioned before, timing is essential as the receiver might not see an email received on Friday evening or the weekend. They can even get lost in the inbox if their email is flooded with messages.
In this article, you'll find out how to schedule your emails in Gmail and Spark on your iPhone, iPad, and Mac. Also, how to schedule emails using the macOS built-in app.
Video on How You Can Schedule Emails on Your iPhone, IPad, and Mac
Table of Contents:
- Introduction
- How to Schedule Emails in Gmail on iPhone and iPad
- How to Schedule Emails Using Spark on iPhone and iPad
- How to Schedule Emails in Gmail on Mac
- How to Schedule Emails in Spark on Mac
- How to Schedule Emails Using Automator and Callendar apps on Mac
- Video on How You Can Schedule Emails on Your iPhone, IPad, and Mac
Download Computer Malware Repair Tool
It is recommended to run a free scan with Combo Cleaner - a tool to detect viruses and malware on your device. You will need to purchase the full version to remove infections. Free trial available. Combo Cleaner is owned and operated by Rcs Lt, the parent company of PCRisk.com read more.
How to Schedule Emails in Gmail on iPhone and iPad
Gmail is one of the most popular free email services out there. If you've never heard of it, it belongs to Google and has many features. When using Gmail, you also get access to Google Docs, Sheets, Calendar, and more. Gmail also offers the option to schedule your emails for later dates.
To schedule emails in Gmail on iPhone and iPad, follow the steps below:
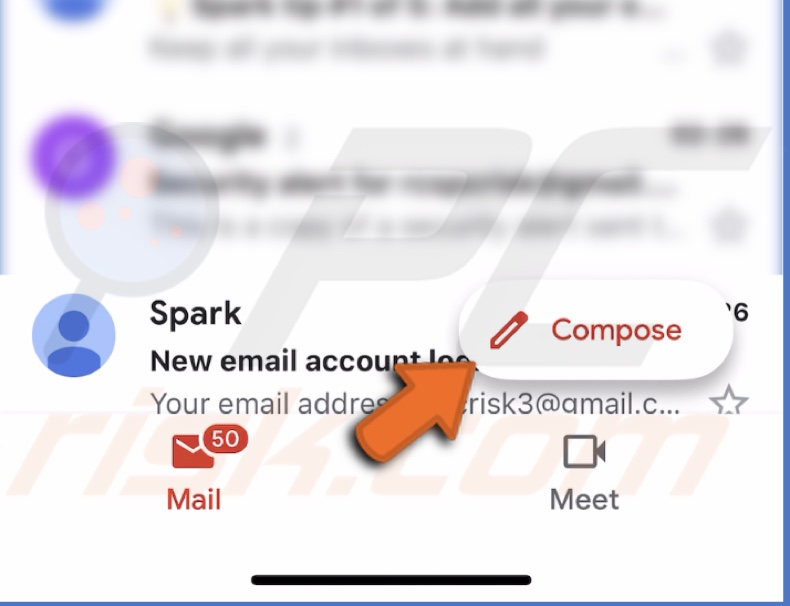
1. Launch the Gmail app.
2. In the Gmail window bottom right corner, tap on "Compose" and create your email or open an email you've already created.
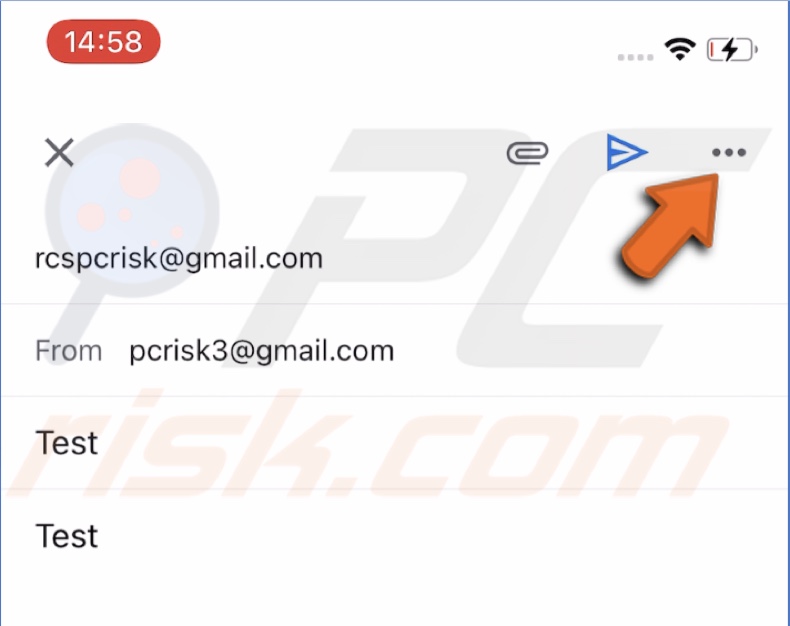
3. Then, in the top right corner, tap on the three dots.
4. When the menu pops up, tap on "Schedule send".
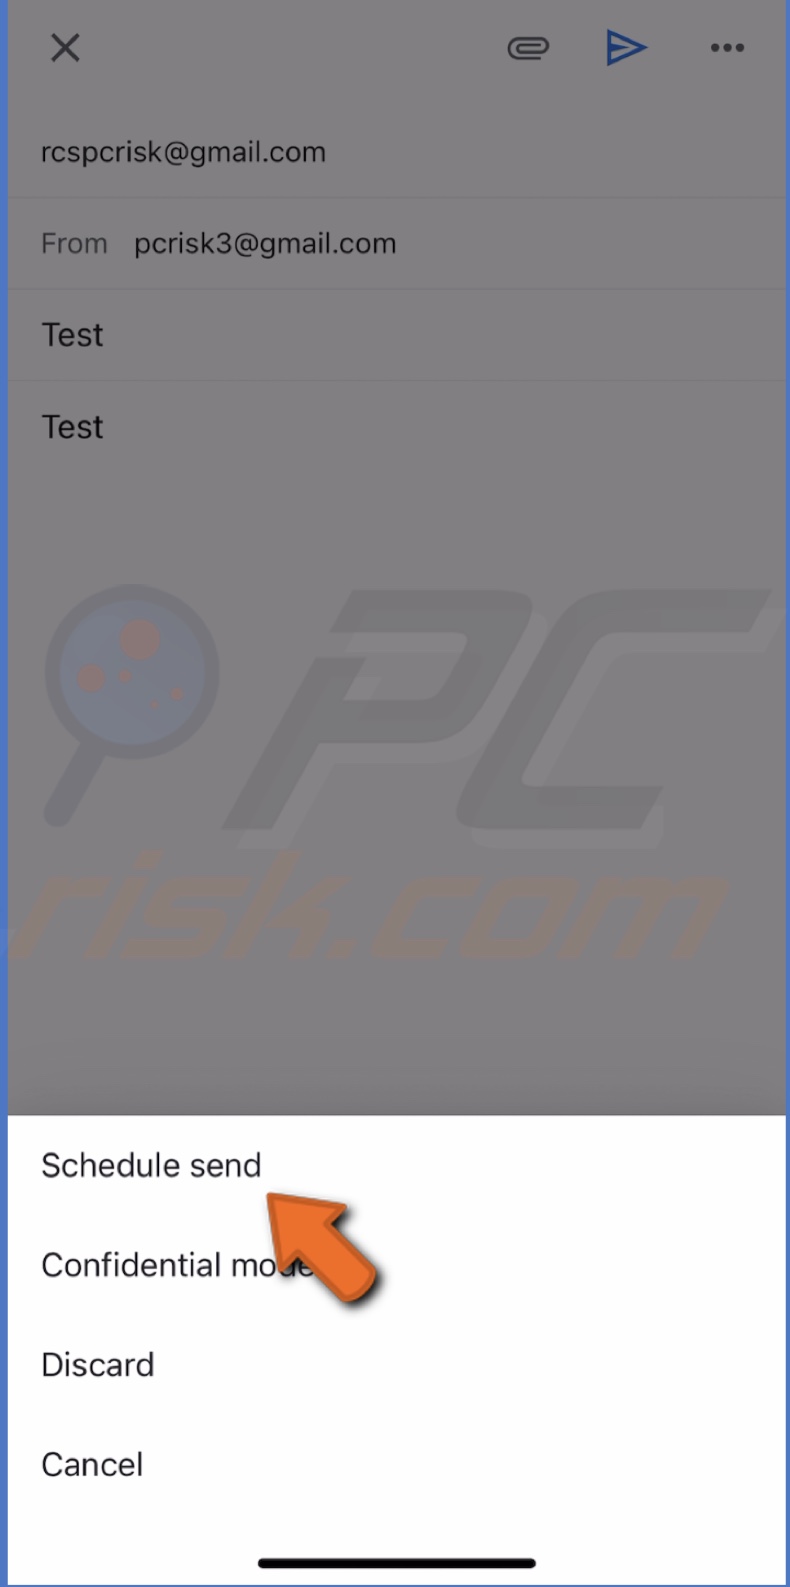
5. You can choose from "Tomorrow morning", "This afternoon", "Monday morning" or "Pick date & time".
6. If you picked "Pick date & time", select the day and time you want the email to be sent.
7. When you're finished, tap on "Save".
Your email will be sent as scheduled.
How to Schedule Emails Using Spark on iPhone and iPad
Spark is an excellent alternative to the native Apple Mail app. Spark is designed to make you as productive as possible. It has integration with other third-party apps like Dropbox, Google Drive, Evernote, and others. It also allows you to schedule your emails.
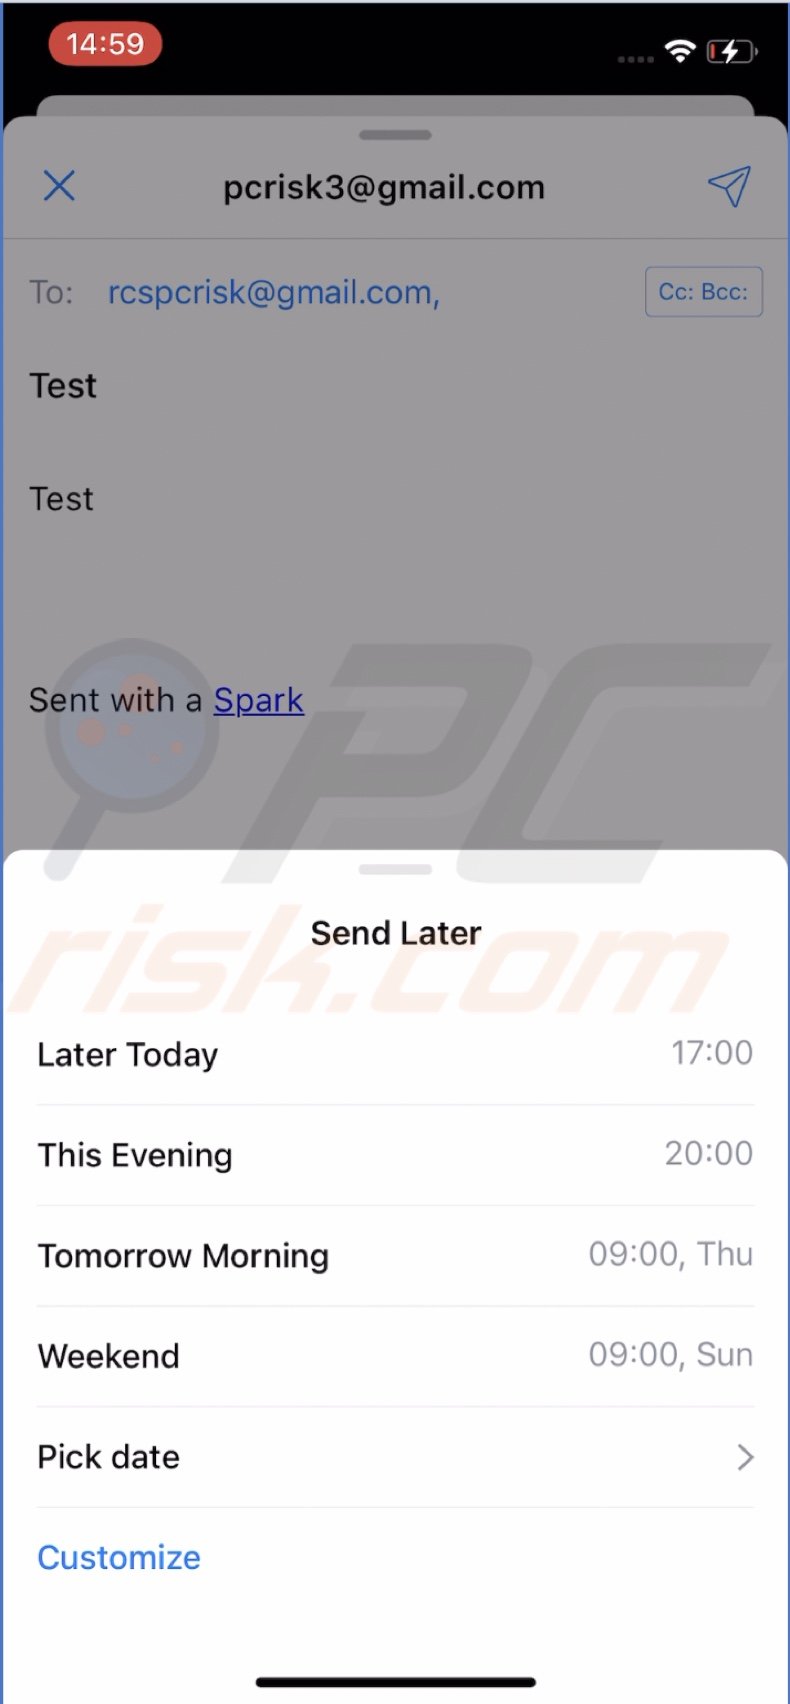
To schedule emails in Spark on iPhone and iPad, follow the steps below:
1. Open the Spark app.
2. In the Spark window bottom right corner, tap on the pencil icon and create your email or open an email you've already created.
3. Then, at the bottom menu, click on the schedule icon that looks like a paper plane with a clock next to it.
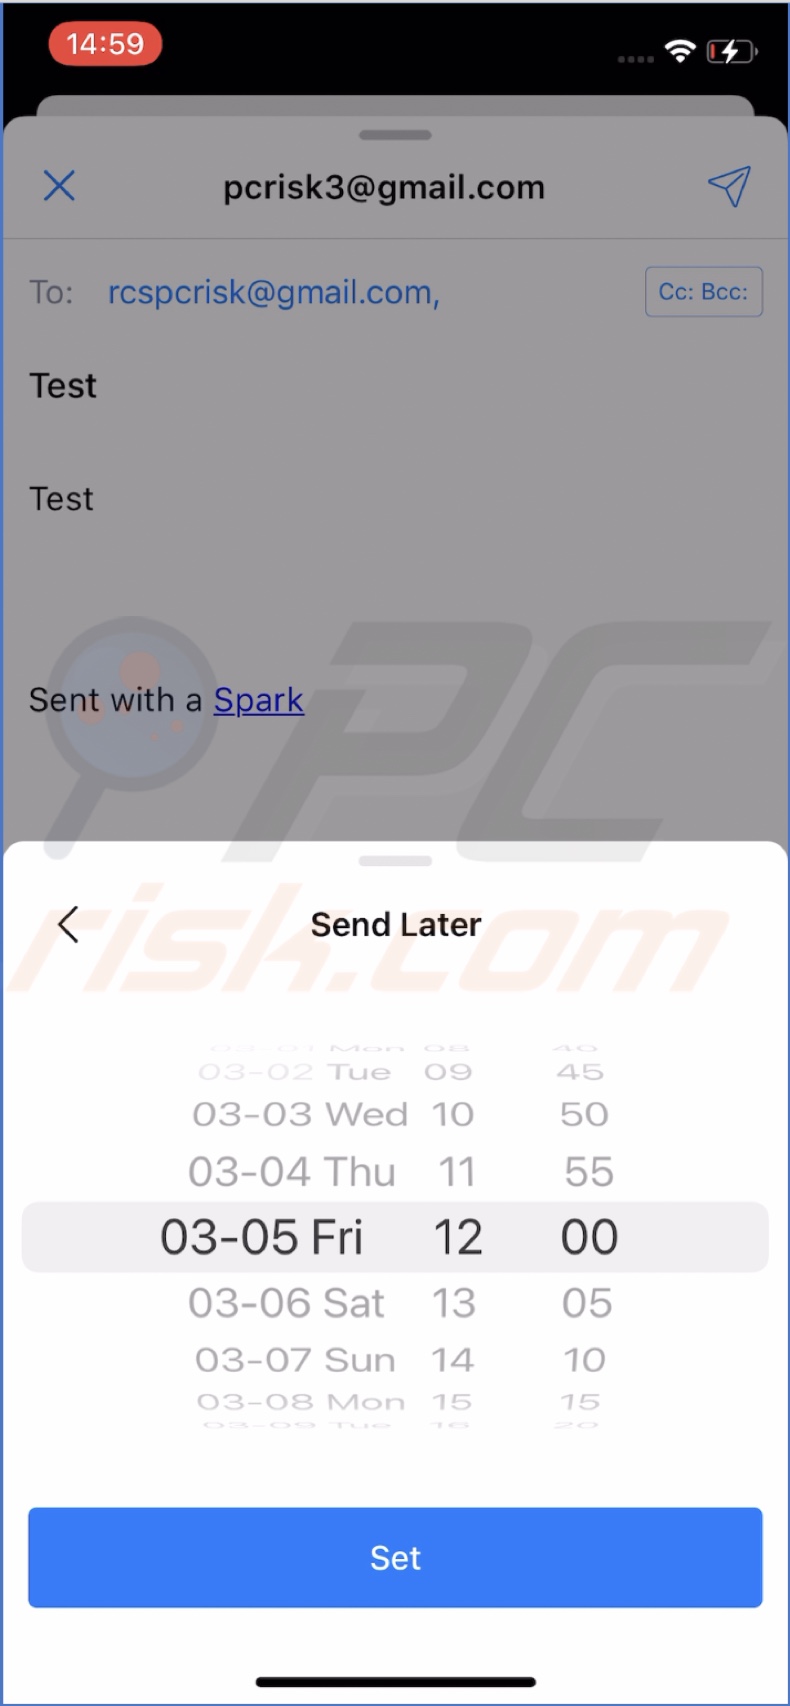
4. You can choose to schedule "Later Today", "This Evening", "Tomorrow Morning", "Weekend", or pick a custom date and time by clicking on "Pick date".
5. Select a date and time and click on "Set".
6. Then, click on the Send button.
Your email is scheduled and will be sent out on the day and time you picked.
How to Schedule Emails in Gmail on Mac
Scheduling emails on iOS and macOS in Gmail is a little bit different.
To schedule emails in Gmail on Mac, follow the steps below:
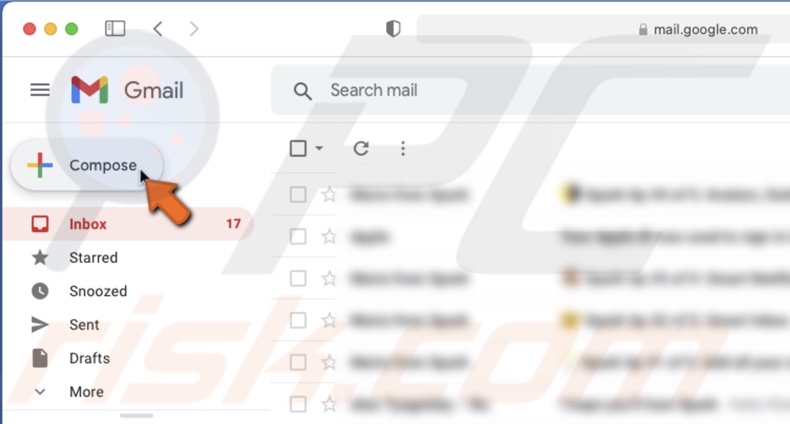
1. Go to the Gmail website and log in to your account.
2. Then, in the upper left corner, click on "Compose" and create your email or open an email you've already created.
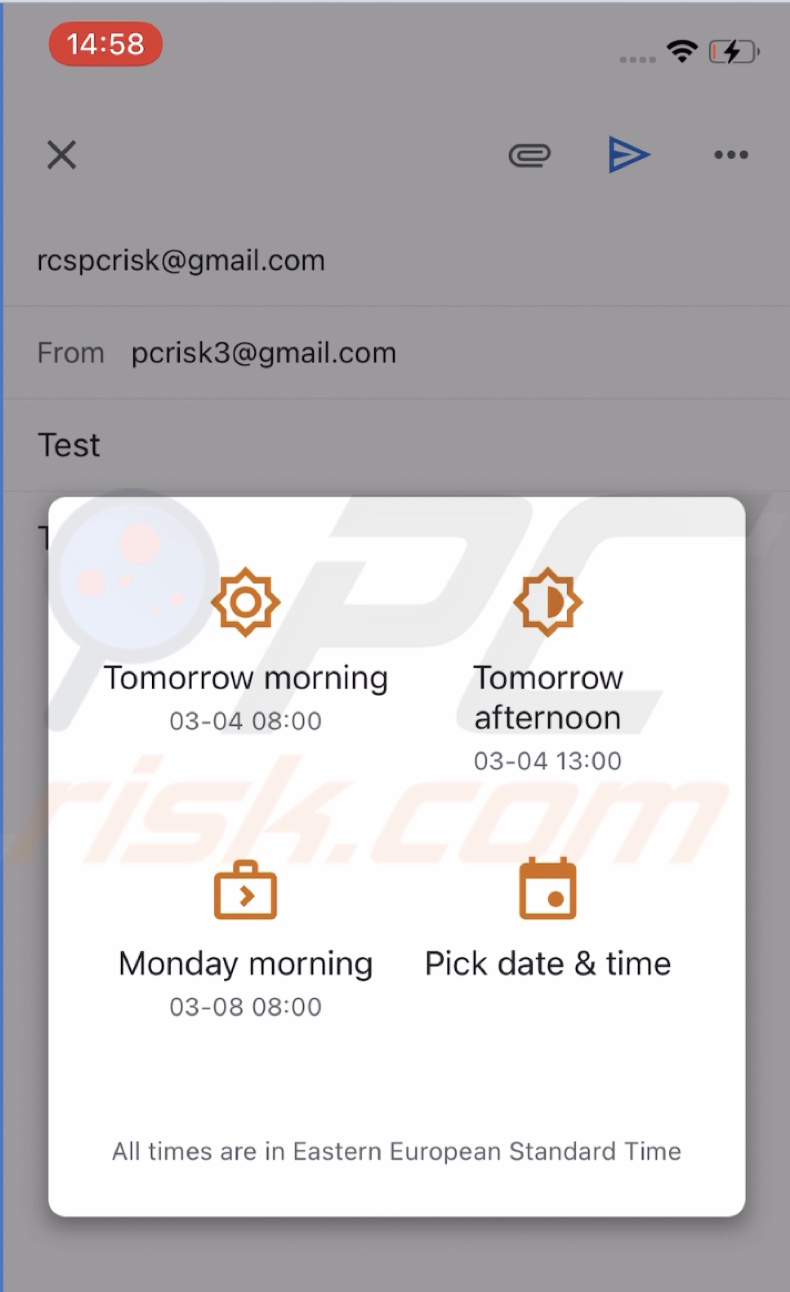
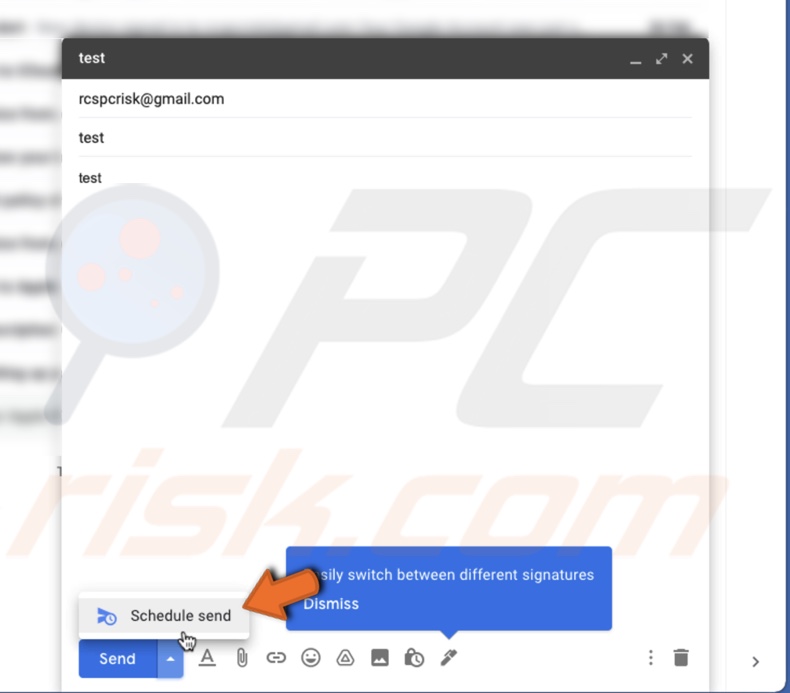
3. When you're ready, click on the arrow next to the "Send" button and then click on "Schedule send".
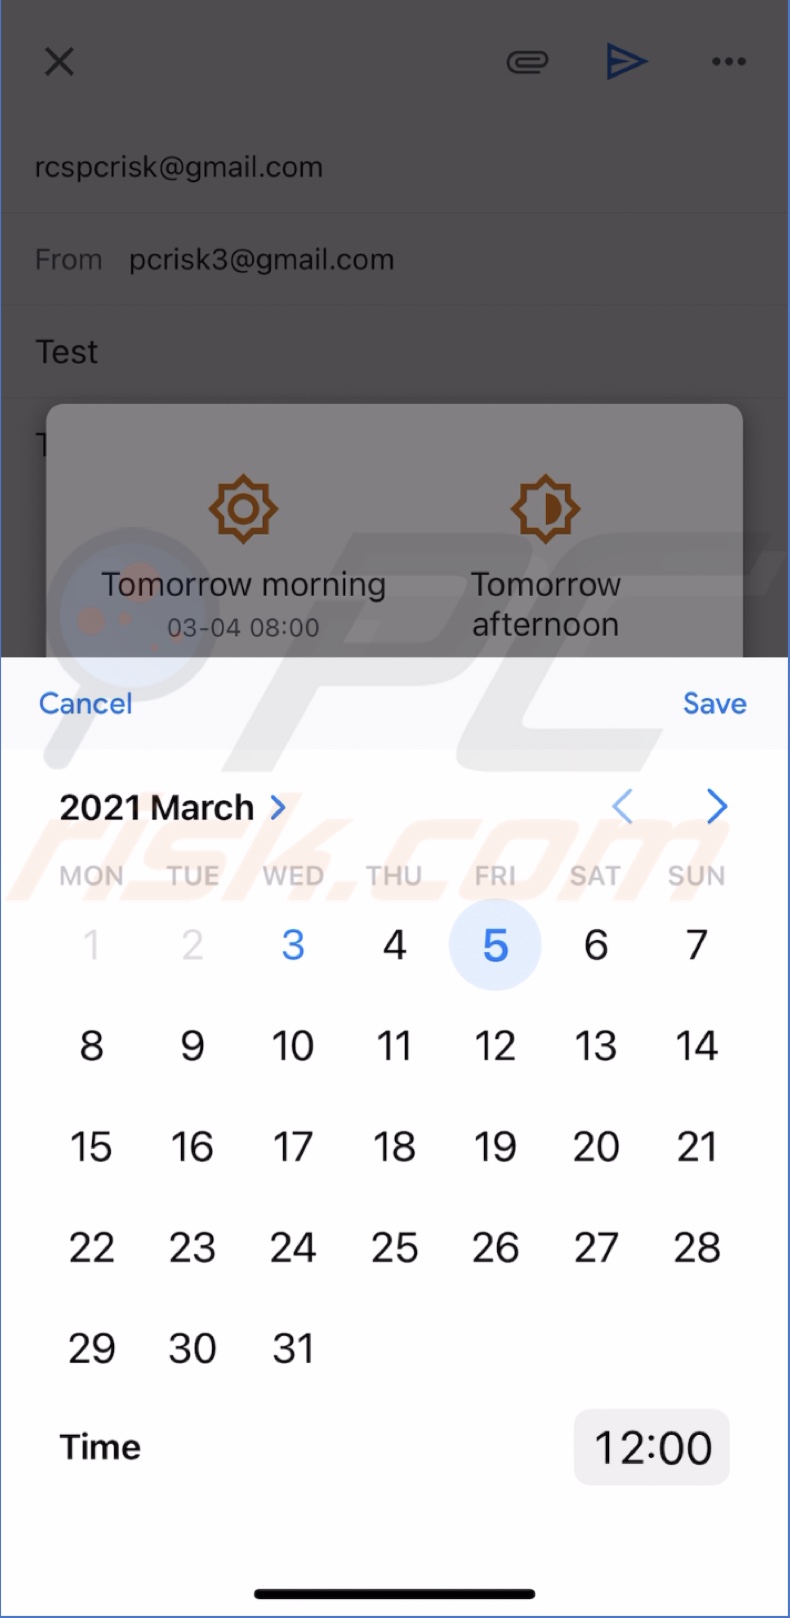
4. Choose to schedule for "Tomorrow morning", "Tomorrow afternoon", "Monday morning", or click on "Select date and time" to choose a date.
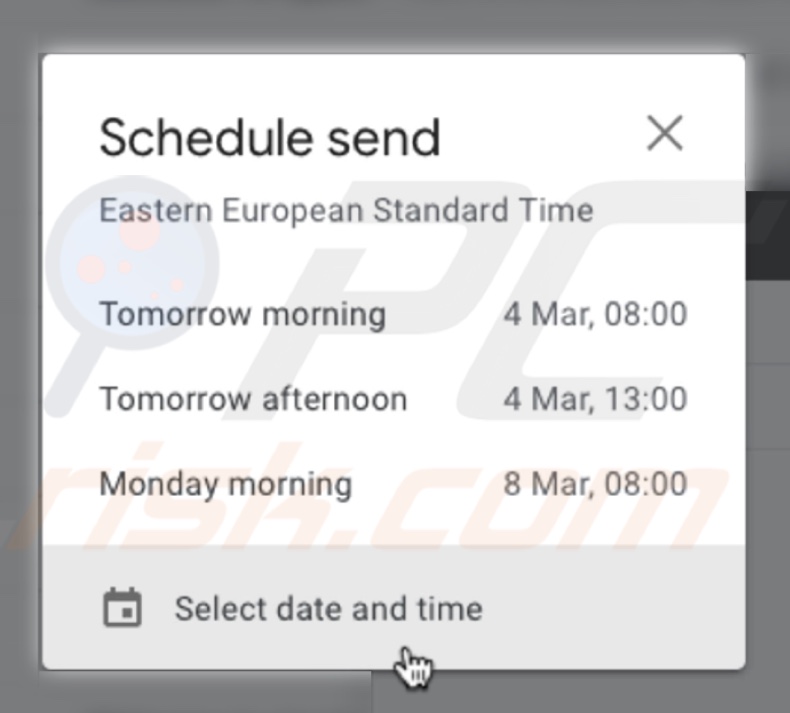
5. If you've chosen to "Select a date and time", pick a date, time and when you're done, click on "Schedule send".
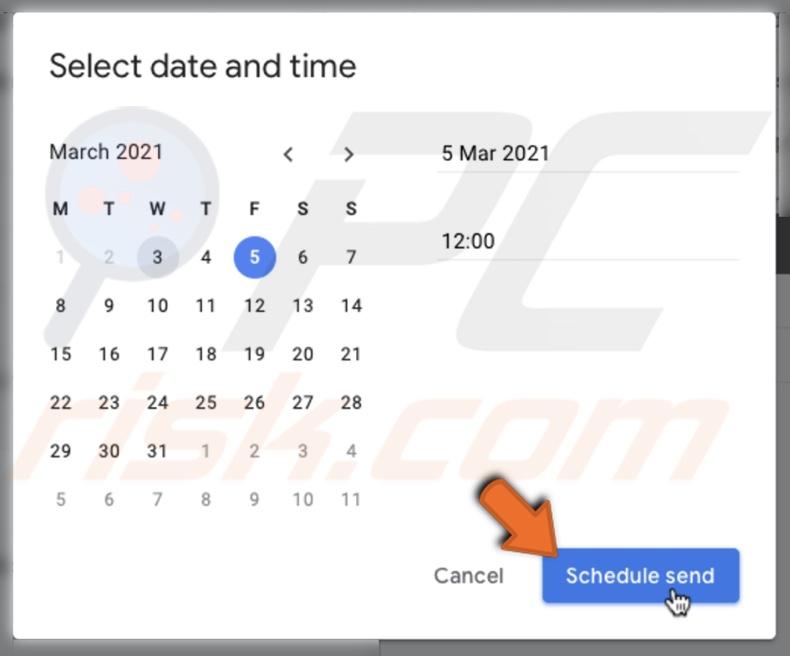
The email will be sent on the day and time you've chosen.
How to Schedule Emails in Spark on Mac
Scheduling emails in Spark on Mac is very similar to the process on your iOs device.
To schedule emails in Spark on Mac, follow the steps below:
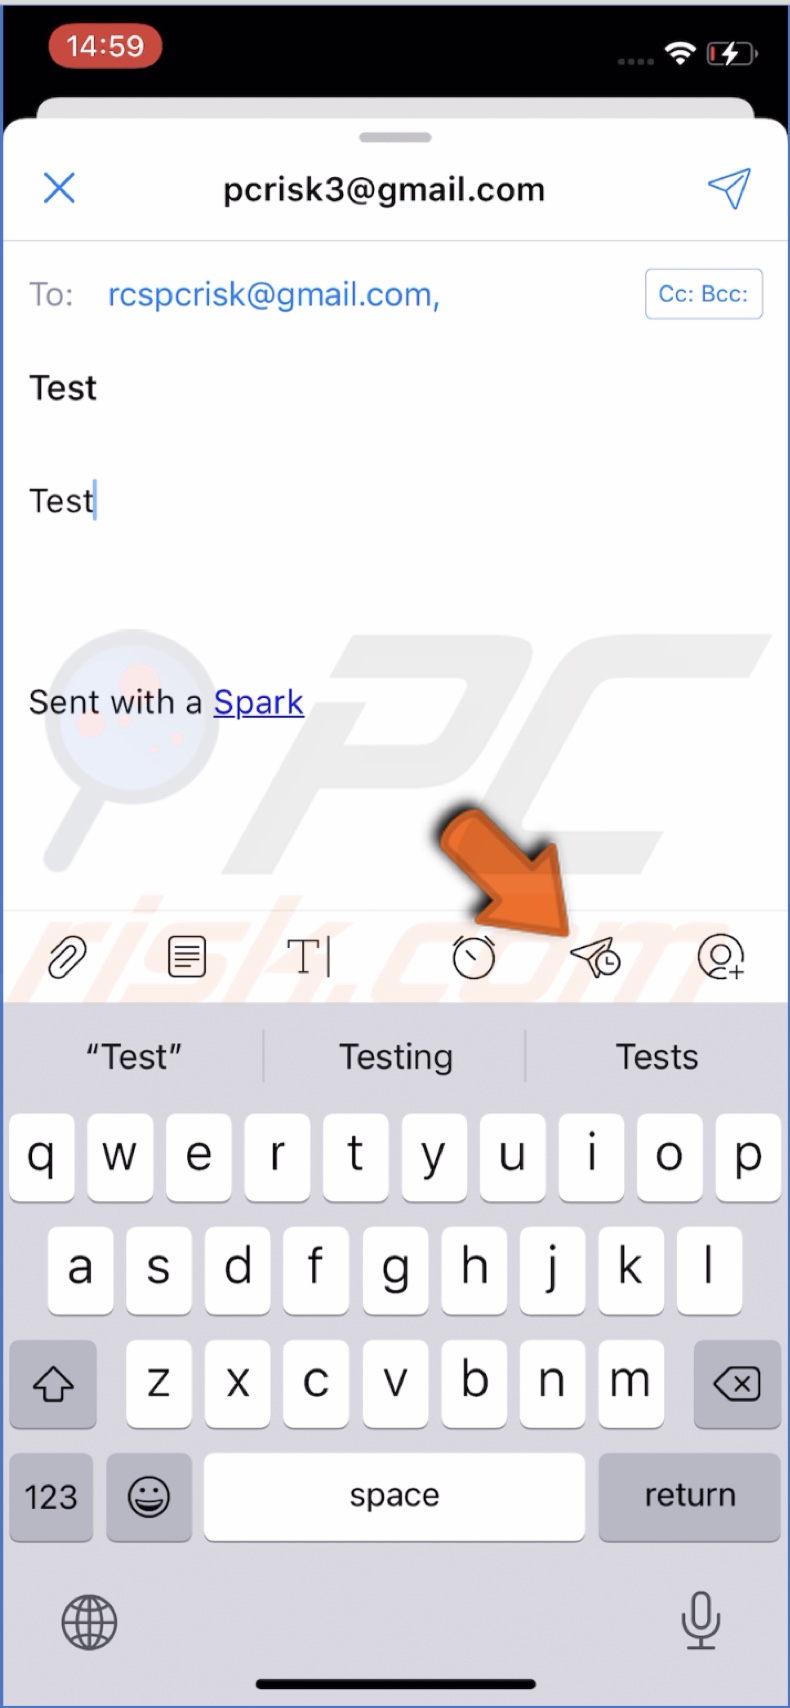
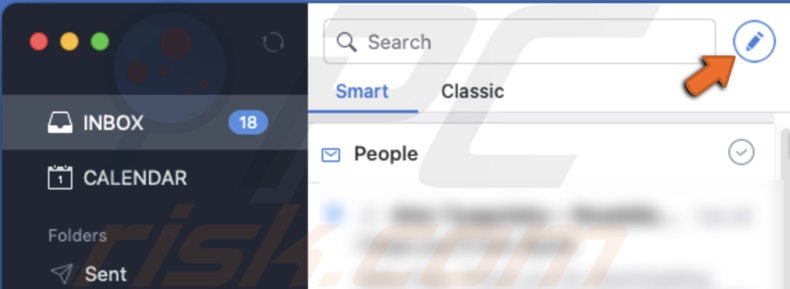
1. Open Spark.
2. Create an email by clicking on the pencil icon next to the search bar or open an email you've already created.
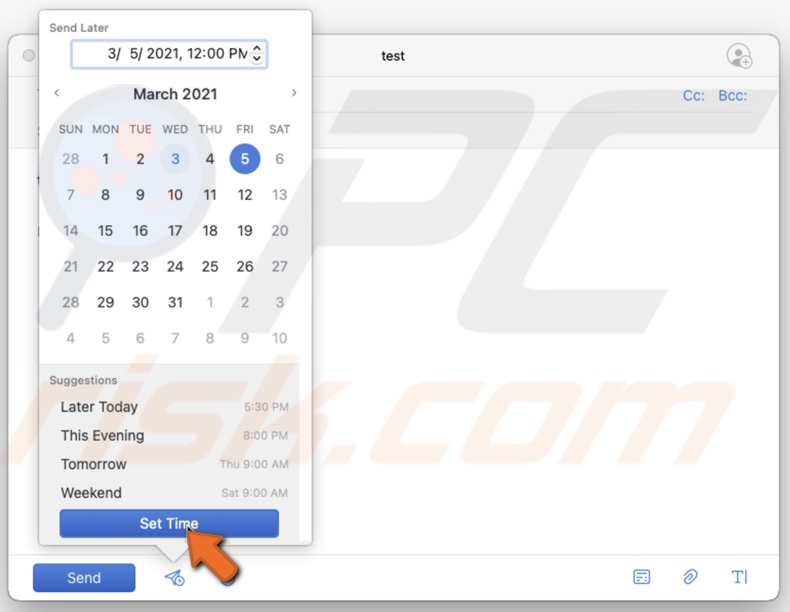
3. Then, click on the schedule button, located next to the "Send" button. It should look like a paper plane with a clock next to it.
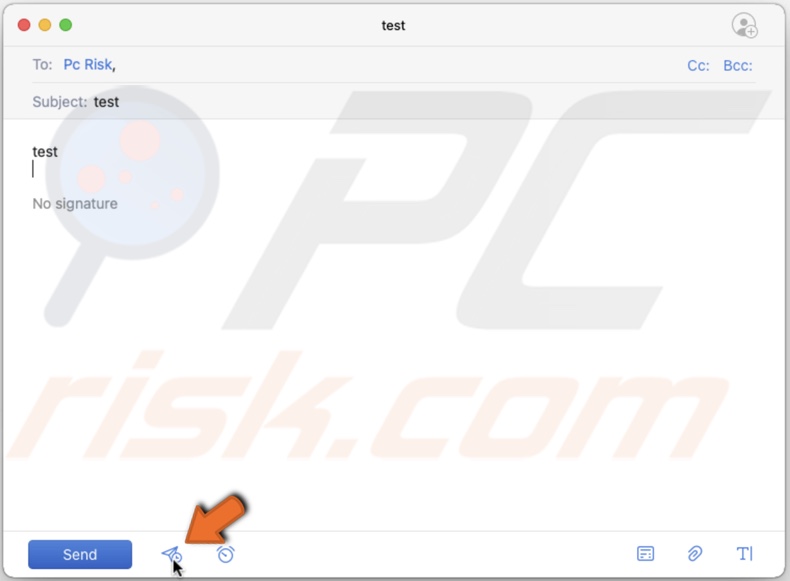
4. You can pick a custom date and time or choose from "Later Today", "This Evening", "Tomorrow Morning", and "Weekend".
5. When you're done, click on "Set Time" and then on "Schedule".
Now you've scheduled your email for a later time.
How to Schedule Emails Using Automator and Calendar apps on Mac
Automator is an app integrated with your Mac's operating system. It helps you automate certain tasks with a simple interface that's easy to navigate and understand. One of the things it has to offer is email scheduling. To schedule emails with Automator, you also need to use the Callendar app to choose a date and time.
First, you need to set up email scheduling in the Automator app.
To set up email scheduling in Automator, follow the steps below:
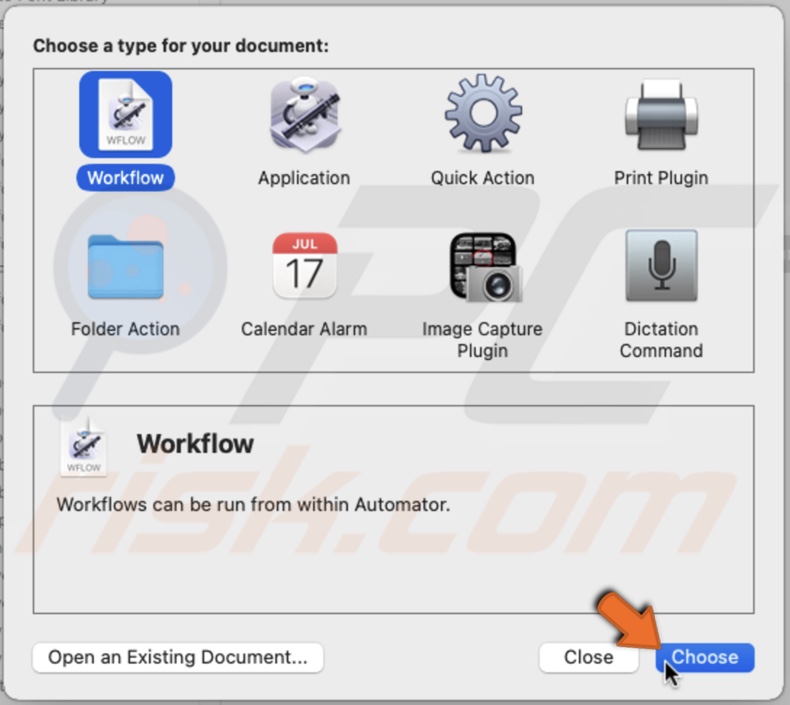
1. Open the Automator app.
2. Click on "New Document". Select "Workflow" and then click on "Choose".
3. Then, in the left sidebar, under "Library", select "Mail".
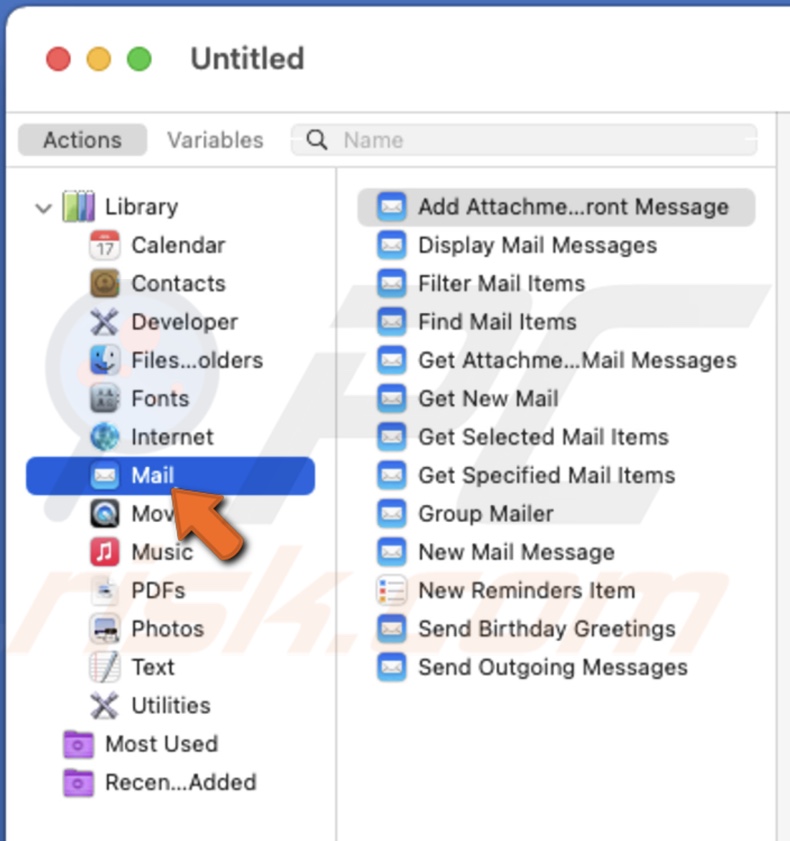
4. In the second sidebar, locate "New Mail Message" and drag the action to the empty box next to the sidebar.
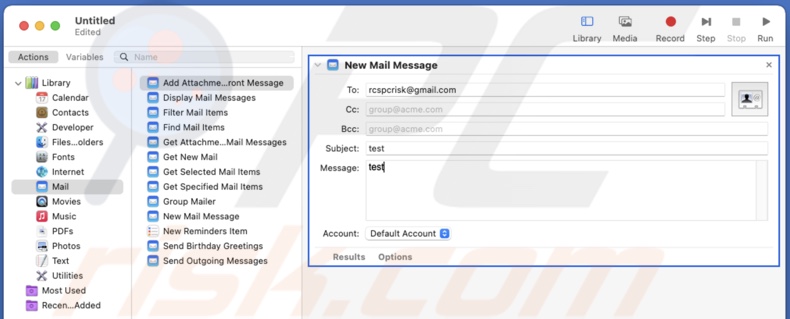
5. Create an email, and when you're finished, from the actions sidebar, drag "Send Outgoing Messages" under the composed email.

6. In the menu bar, click on "File" and then on "Save".
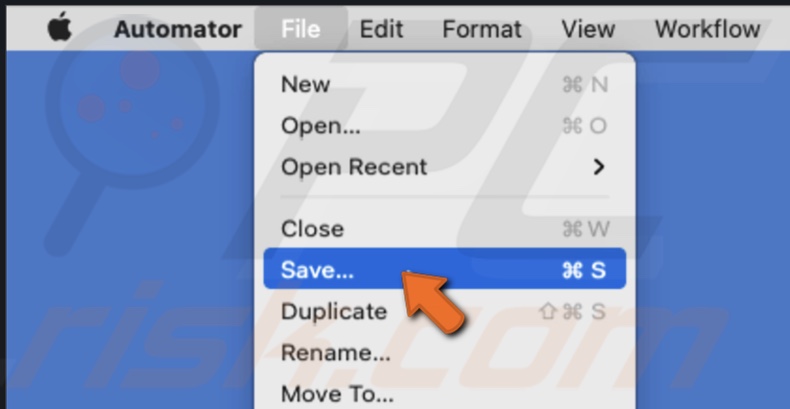
7. Name the file. Next to "File Format", choose "Application".
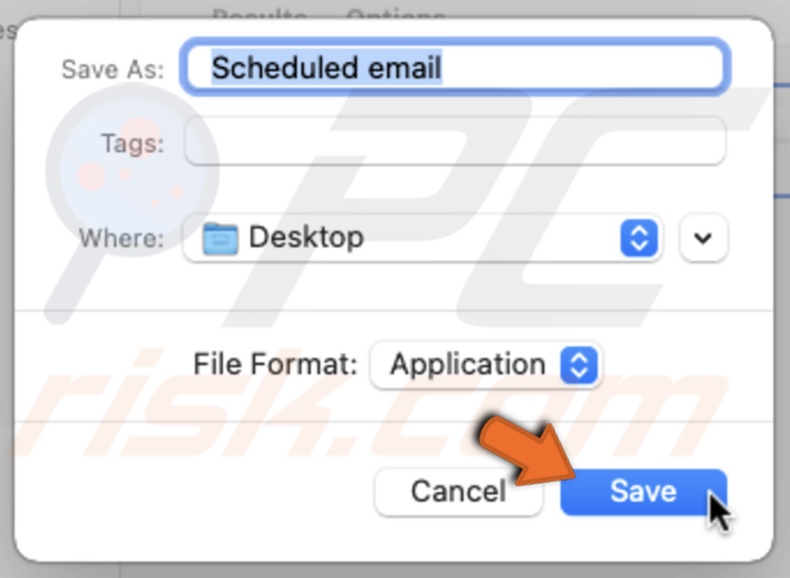
8. When you're done, click on "Save".
9. Then, click on the Send button.
Now that you're done setting up Automator, you can schedule your email using the Callendar app.
To schedule emails using the Calendar app, follow the steps below:
1. Launch the Calendar app.
2. Choose a date you want to send the email and double-click on it.
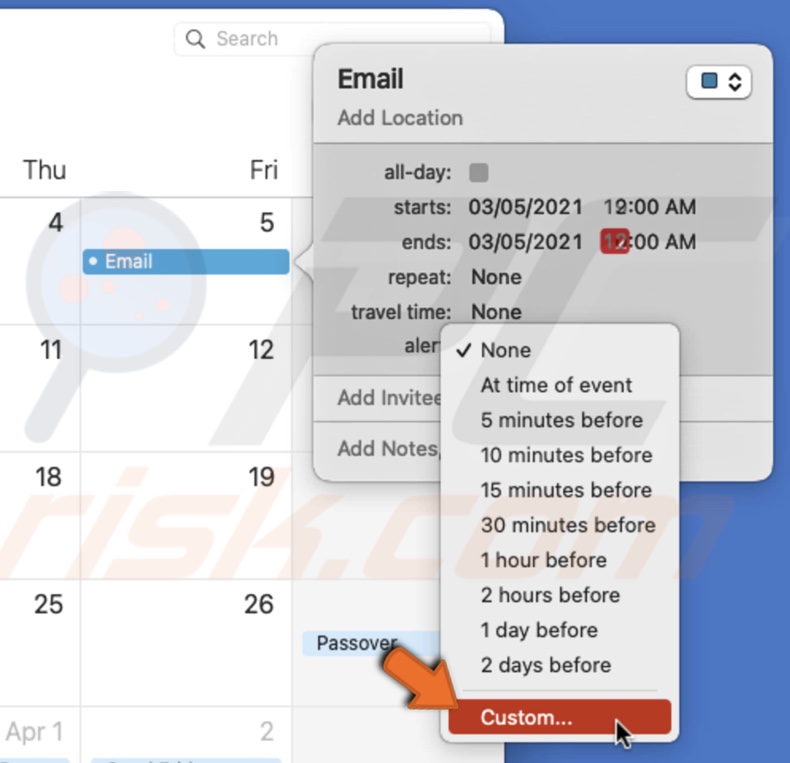
3. Enter the event's name and set the time you want the email to be sent out.
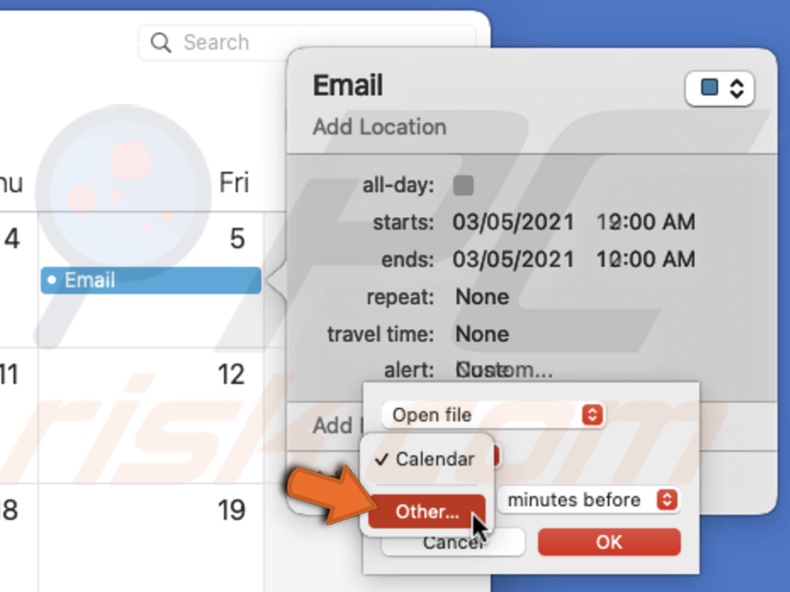
4. Then, next to "Alert", choose "Custom".
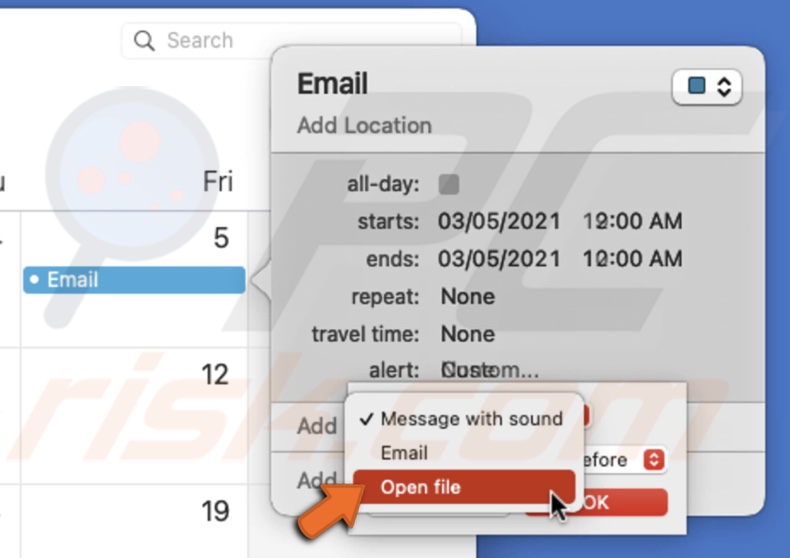
5. Click on "Message with sound" and choose "Open file".
6. Then, click on "Calendar" and choose "Other".
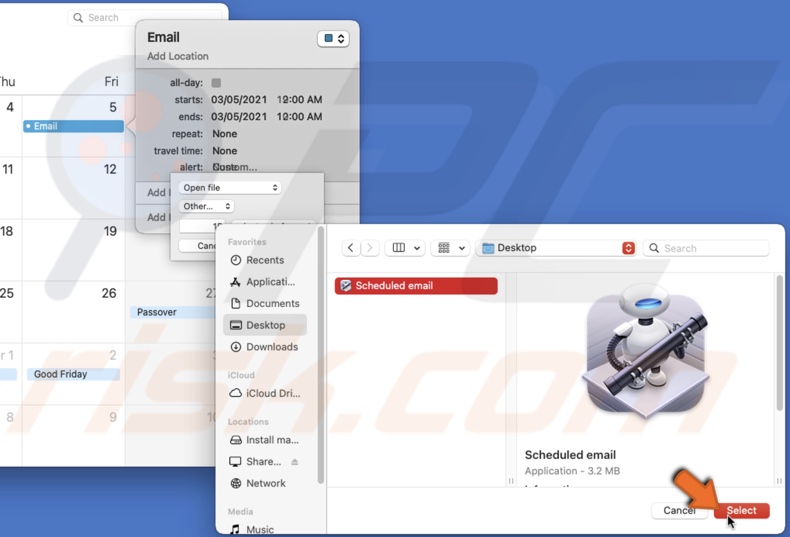
7. In the pop-up window, locate and select the Automator file you've created. Then, click on "Select".
8. When the file is added, expand the time drop-down menu, select "At time of event", and click on "OK".
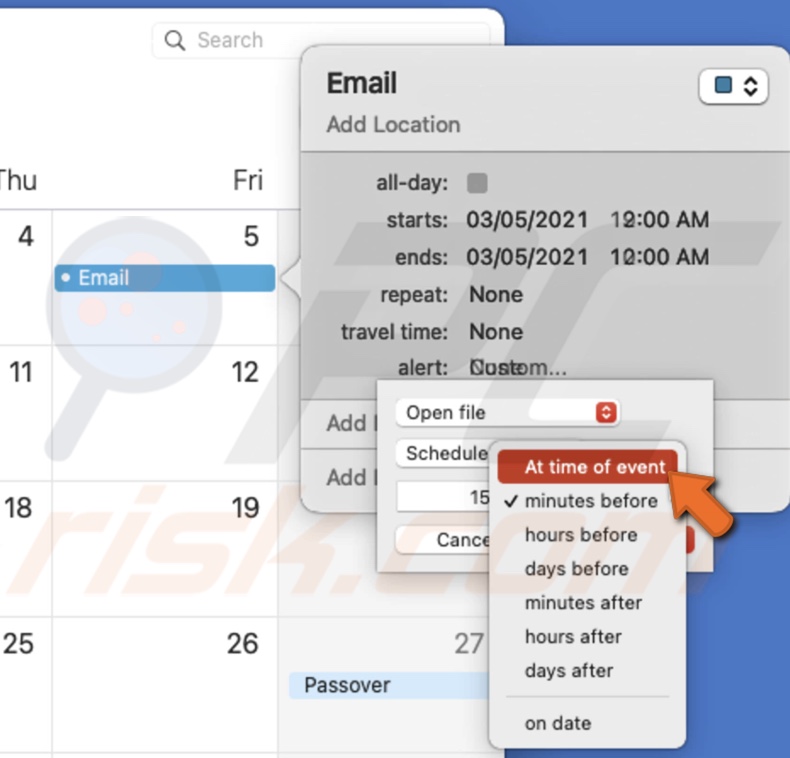
That's it! You've scheduled your email. Although it might have been a long process, you didn't need to use any third-party apps.
We hope this article was helpful!
You can also check the video above for a step-by-step tutorial.
Share:

Karolina Peistariene
Author of how-to guides for Mac users
Responsible for collecting, analyzing, and presenting problem-solving solution articles related to macOS issues. Years of macOS experience combined with solid research and analyzing skills help Karolina provide readers with working and helpful solutions as well as introduce various features Mac has to offer.
▼ Show Discussion