How to Flush DNS Cache on macOS?

(updated)
Get Free Scanner and check your computer for errors
Fix It NowTo fix found issues, you have to purchase the full version of Combo Cleaner. Free trial available. Combo Cleaner is owned and operated by Rcs Lt, the parent company of PCRisk.com read more.
How to Clear DNS Cache on Your Mac And On Popular Browsers?
When you want to visit a website, you usually enter the domain name into the browser's address, and your browser loads it. But web browsers use IP addresses to connect with websites. Thanks to the Domain Name System, or in short, DNS, you do not need to memorize complex IP addresses.
DNS is a naming system that turns a domain name, for example, pcrisk.com, into an IP address (a unique label consisting of multiple characters).
Unfortunately, with your browser's storing DNS cache, you might sometimes not be able to access some websites that you already visited. This is because a website might migrate to a new domain, which means its DNS address changes. That is why flushing the DNS cache can help with such issues.
To find out how you can flush your DNS cache on your Mac and in popular bowsers, read down below.
Video on How to Clear DNS Cache on Your Mac And On Popular Browsers?
Table of Contents:
- Introduction
- How to Clear DNS Cache Using Terminal
- How to Clear Browser DNS Cache Using Combo Cleaner
- How to Clear Browser DNS Cache
- How to Clear Safari Browser DNS Cache
- How to Clear Google Chrome Browser DNS Cache
- How to Clear Firefox Browser DNS Cache
- Video on How to Clear DNS Cache on Your Mac And On Popular Browsers?
Download Computer Malware Repair Tool
It is recommended to run a free scan with Combo Cleaner - a tool to detect viruses and malware on your device. You will need to purchase the full version to remove infections. Free trial available. Combo Cleaner is owned and operated by Rcs Lt, the parent company of PCRisk.com read more.
How to Clear DNS Cache Using Terminal
As mentioned above, regularly flushing the DNS cache can help you if you are having trouble accessing a website as well as increase your browsing security, and more. Below you will find out how to clear the DNS cache by using a simple Terminal command. This command is the same for macOS Catalina, Mojave, High Siera, Sierra, and El Capitan.
To flush DNS cache using Terminal, follow the steps below:
1. Open Terminal by going to Launchpad and clicking on the application, or you can open it by going in the upper menu and clicking on "Go", then on "Utilities", and in the "Utilities" window click on the Terminal app. You can also open it by opening Finder and going into the "Applications" folder where you will find the app or by typing "Terminal" in the Spotlight search bar.
2. When the Terminal window pops up, enter the command line: sudo killall -HUP mDNSResponder
3. Then, you will be asked to enter your admin password. The password characters will not be shown in the Terminal window.
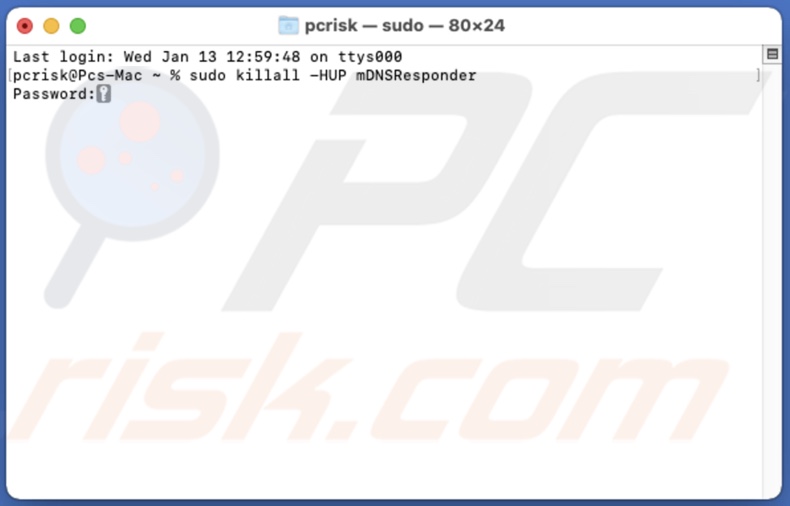
Now you have cleared the DNS cache. It might take some time for the cache to be deleted completely. When the process is done, you should not have trouble accessing websites and loading pages.
For older operating systems, the command lines are different. Not many users have older operating systems, but if you are one of them, then you will find your operating system and the command line for Terminal below.
If your Mac is running on Yosemite
1. Open Terminal, and in the Terminal window, enter the command line: sudo discoveryutil udnsflushcaches
2. Enter your admin password. The password characters will not be shown in the Terminal window.
If your Mac is running on Lion, Mountain Lion, or Maverick
1. Open Terminal, and in the Terminal window, enter the command line: sudo killall -HUP mDNSResponder
2. Enter your admin password. The password characters will not be shown in the Terminal window.
If your Mac is running on Snow Leopard
1. Open Terminal, and in the Terminal window, enter the command line: sudo dscacheutil -flushcache
2. Enter your admin password. The password characters will not be shown in the Terminal window.
If your Mac is running on Leopard
1. Open Terminal, and in the Terminal window, enter the command line: sudo lookupd -flushcache
2. Enter your admin password. The password characters will not be shown in the Terminal window.
How to Clear Browser DNS Cache Using Combo Cleaner
Combo Cleaner is a great way to clear browser DNS cache. It is fats, and you can flush multiple browser cache at once with one a few clicks with your mouse.
To clear browser DNS cache using Comco Cleaner, follow the steps below:
1. Open Combo Cleaner from the Launchpad, Finder, or Spotlight.
2. Then, go to "Privacy Scanner" and click on "Start Scan".
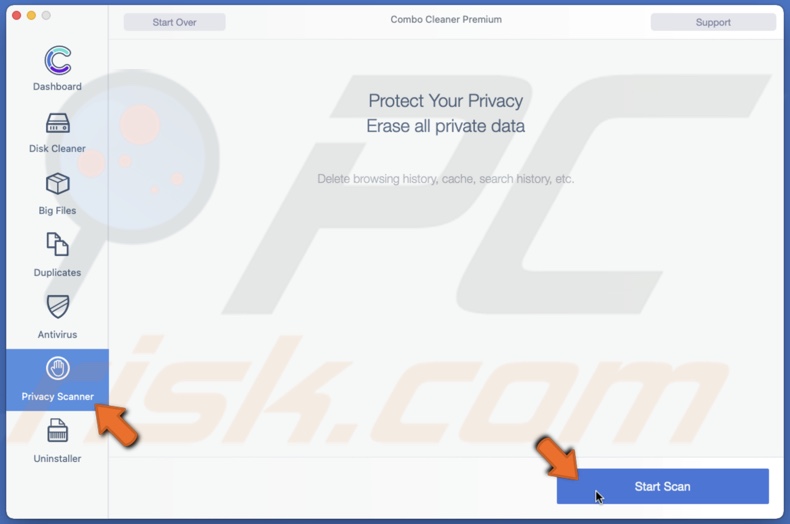
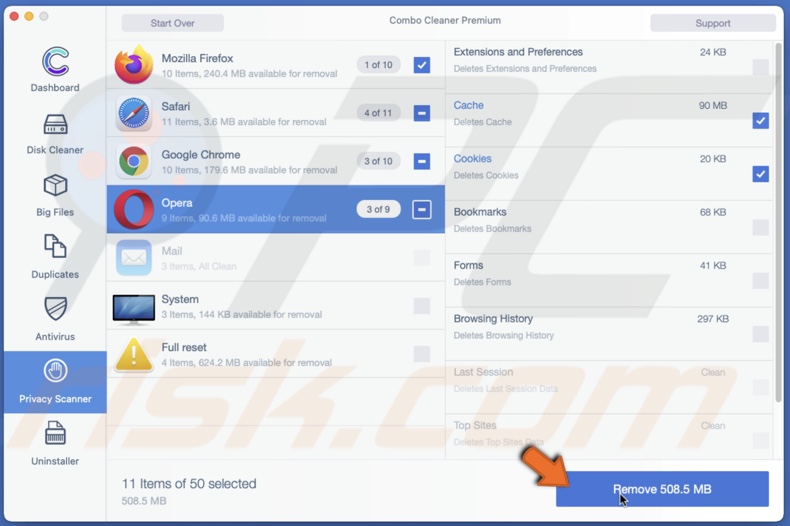
3. On the left side, choose which browser cache you want to flush.
4. On the right side, check the box next to "Cache".
5. Then, click on "Remove".
How to Clear Browser DNS Cache
If you have cleared the DNS cache on your Mac and are still experiencing problems while browsing, you might need to clear your browser's DNS cache.
How to Clear Safari Browser DNS Cache
To flush the Safari browser DNS cache, follow the steps below:
1. Open Safari by going to Launchpad and clicking on the application, or you can open it by opening Finder and going into the "Applications" folder where you will find the app or by typing "Safari" in the Spotlight search bar.
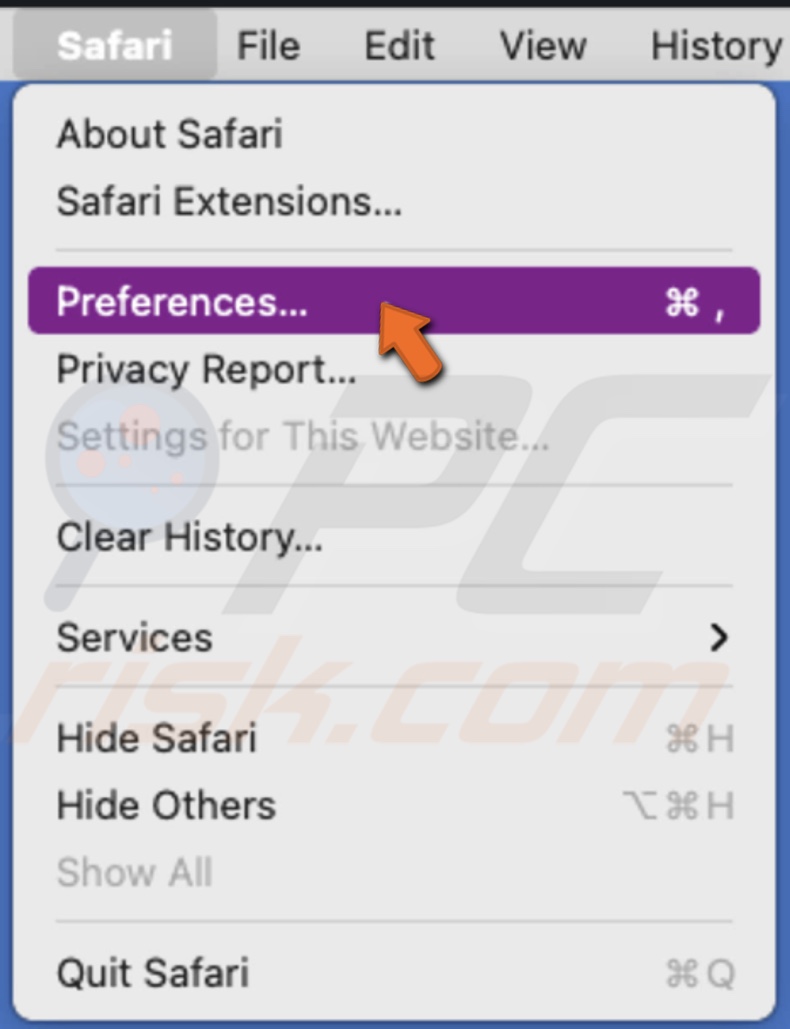
2. When the Safari browser launches, in the upper menu, click on "Safari".
3. Then, go to "Preferences".
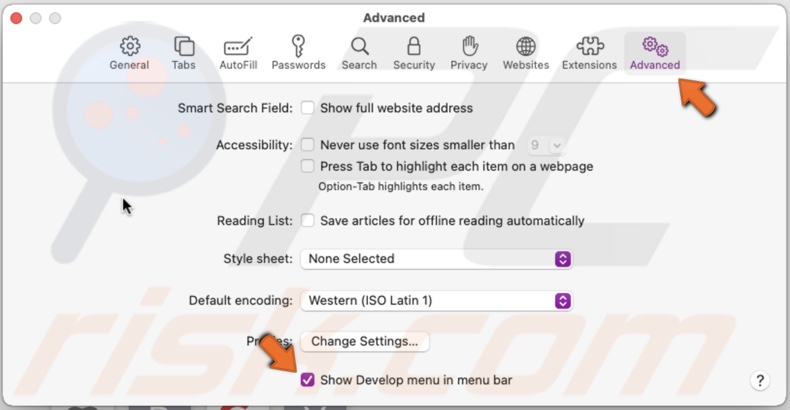
4. When the "Preferences" window appears, go to the "Advanced" tab.
5. In the "Advanced" tab, check the box next to "Show Develop menu in menu bar".
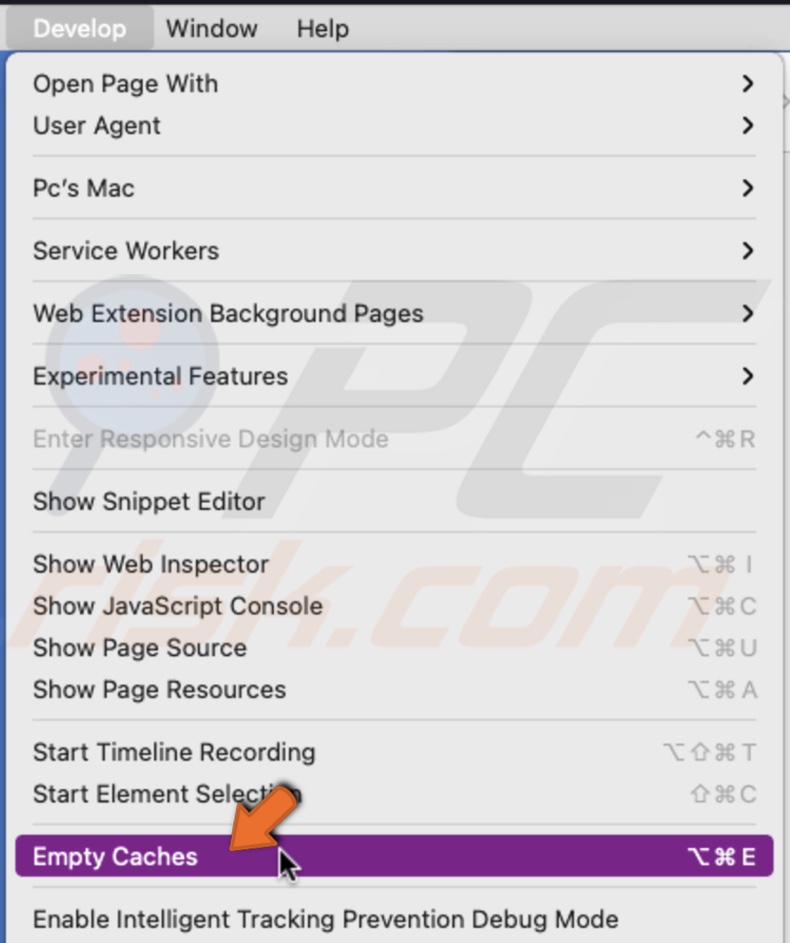
6. Then, exit Safari preferences, and in the upper menu, click on "Develop".
7. When the secondary menu pops up, click on "Empty Cache".
8. If the problem remains, you might need to restart the Safari browser.
You should have the Safari browser DNS cache cleared.
How to Clear Google Chrome Browser DNS Cache
To flush the Google Chrome browser DNS cache, follow the steps below:
1. Open Google Chrome by going to Launchpad and clicking on the application, or you can open it by opening Finder and going into the "Applications" folder where you will find the app or by typing "Google Chrome" in the Spotlight search bar.
2. When Google Chrome browser launches, in the address bar, enter the address: chrome://net-internals/#dns
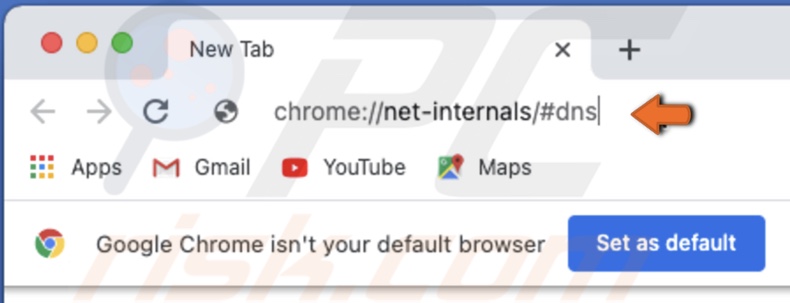
3. Then, when the address loads, click on "Clear host cache" next to "Host resolver cache".
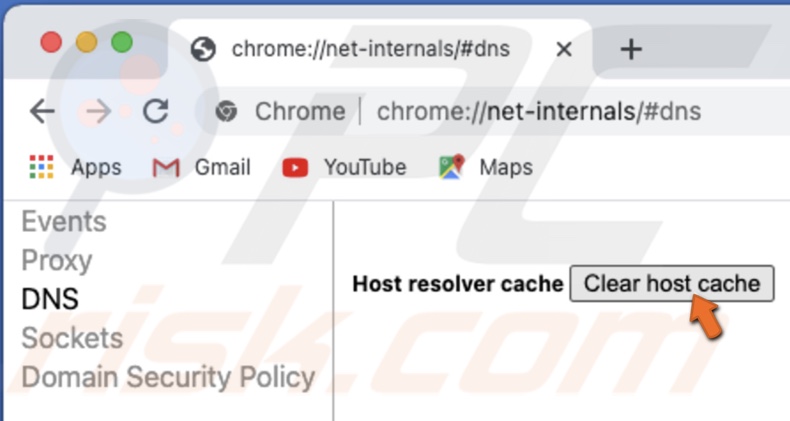
Now you have cleared Chrome's DNS cache.
How to Clear Firefox Browser DNS Cache
To flush the Firefox browser DNS cache, follow the steps below:
1. Open Firefox browser by going to Launchpad and clicking on the application, or you can open it by opening Finder and going into the "Applications" folder where you will find the app or by typing "Firefox" in the Spotlight search bar.
2. When Firefox browser launches, in the address bar, enter the address: about:networking#dns
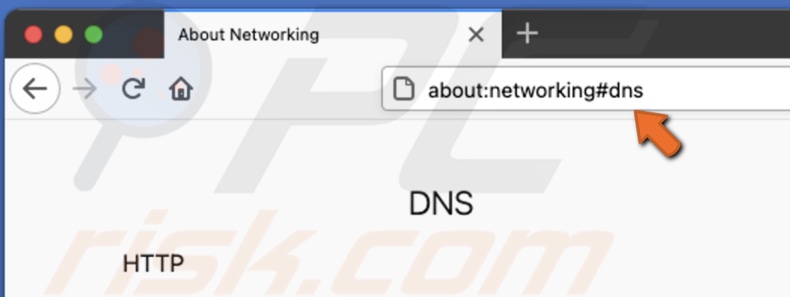
3. Then, when the address loads, click on the "Clear DNS cache" button.
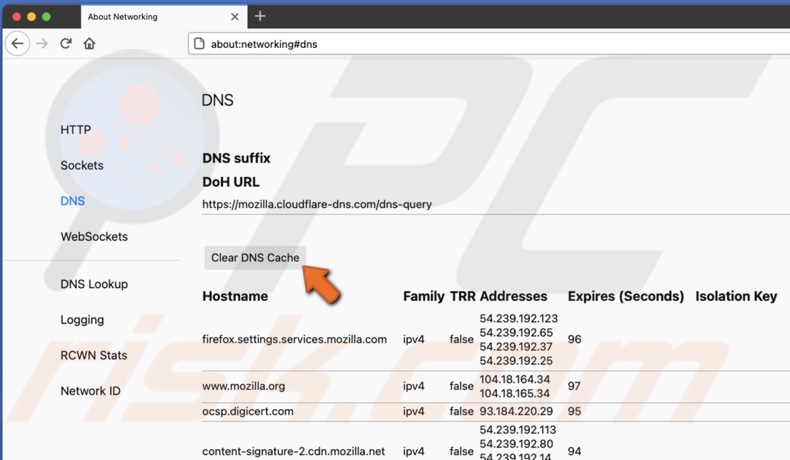
Firefox browser's DNS cache should be flushed.
We hope this article was helpful!
For a step-by-step tutorial, check out the video above.
Share:

Karolina Peistariene
Author of how-to guides for Mac users
Responsible for collecting, analyzing, and presenting problem-solving solution articles related to macOS issues. Years of macOS experience combined with solid research and analyzing skills help Karolina provide readers with working and helpful solutions as well as introduce various features Mac has to offer.
▼ Show Discussion