Turn Off Safari Private Browsing on Mac

(updated)
Get Free Scanner and check your computer for errors
Fix It NowTo fix found issues, you have to purchase the full version of Combo Cleaner. Free trial available. Combo Cleaner is owned and operated by Rcs Lt, the parent company of PCRisk.com read more.
How to Disable Safari Private Browsing on Your Mac
We spend a lot of time online on various social media platforms and websites which collect our data like our activity on the internet, interest, and even private information that we give out, not thinking too much about it. Our information collected by websites creates a detailed picture of our online activity, and it can be used for specific ad targeting.
When you use a private browser, it will block or delete any cookies that a website will try to upload to your Mac. Incognito mode will not save any site data and information entered in forms. It also lets you simultaneously log into multiple accounts on the same website.
Also, you can easily disable private browsing by using the Screen Time feature or creating a Guest user with restrictions.
In this article, you will find out how to turn off the incognito mode feature on your Mac using Screen Time and by setting up the Guest user with restrictions.
Video on How to Disable Safari Private Browsing on Your Mac
Table of Contents:
- Introduction
- Method 1. Disable Safari Private Browsing Using Screen Time
- Method 2. Disable Safari Private Browsing Using Guest User
- Method 3. Disable Safari Private Browsing for Family Members
- Method 4. Stop Syncing Private Browsing Restrictions With Your Other Devices
- Method 5. Create a Screen Time Passcode
- Video on How to Disable Safari Private Browsing on Your Mac
Download Computer Malware Repair Tool
It is recommended to run a free scan with Combo Cleaner - a tool to detect viruses and malware on your device. You will need to purchase the full version to remove infections. Free trial available. Combo Cleaner is owned and operated by Rcs Lt, the parent company of PCRisk.com read more.
Disable Safari Private Browsing Using Screen Time
As mentioned above, Screen Time allows you to manage your content screen time and block it if needed. Using Screen Time, you can block unwanted content as well as disable private browsing.
To turn off incognito mode using Screen Time, follow the steps below:
1. Click on the Apple logo that you will find in the upper menu.
2. When the secondary menu pops up, click on "System Preferences".
3. In the "System Preferences" window, click on "Screen Time".

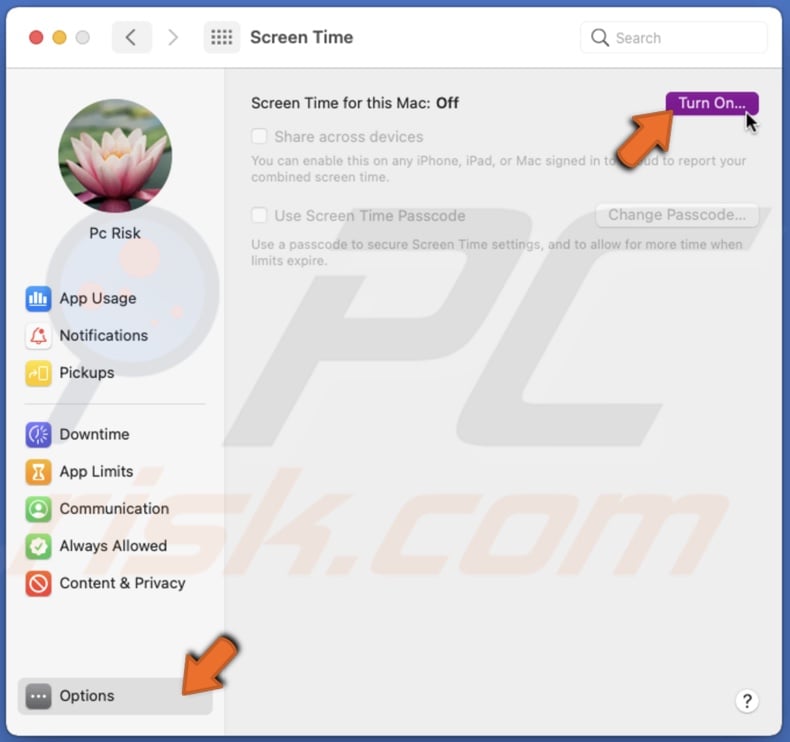
4. When the "Screen Time" window appears, at the bottom left corner, click on "Options".
5. Next to "Screen Time for this Mac: Off", click on the "Turn On" button.
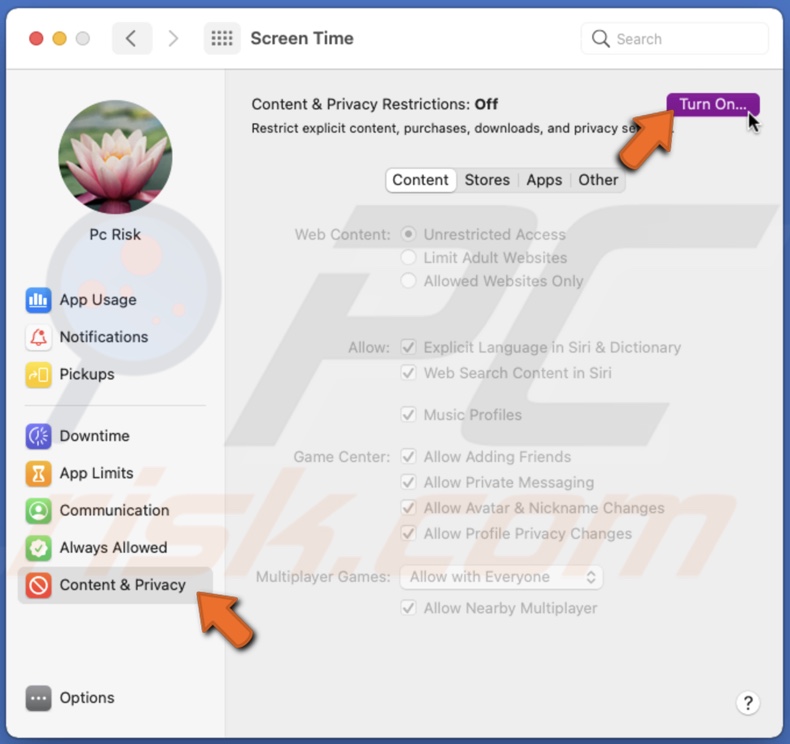
6. Then, in the left sidebar, locate the "Content & Privacy" section and click on it.
7. Next to "Content & Privacy Restrictions: Off", click on the "Turn On" button.
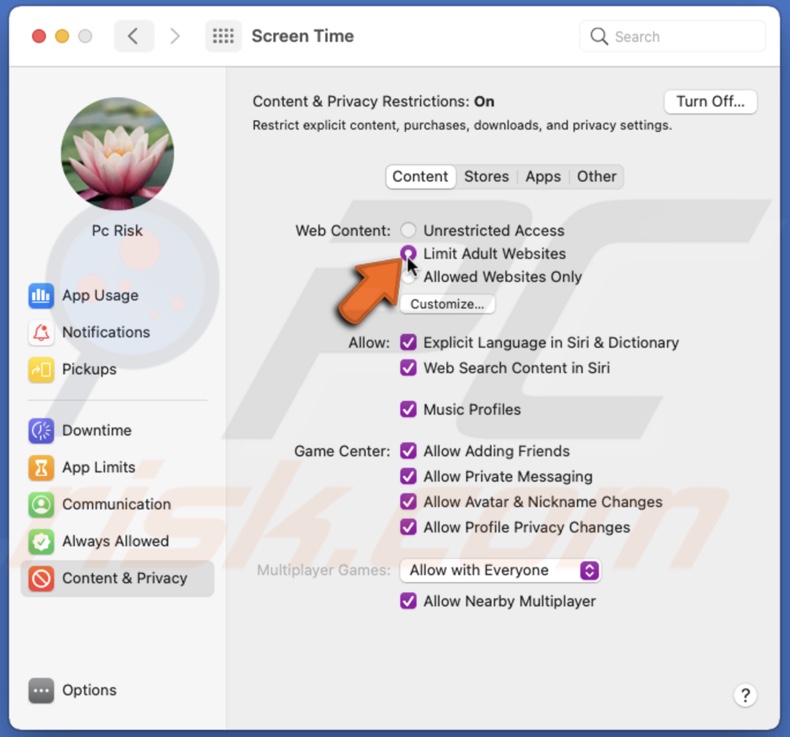
8. When the "Content & Privacy Restrictions" are turned on, next to "Web Content", check the circle "Limit Adult Websites".
9. Close the "System Preferences" window and open the Safari browser from Launchpad, Finder, or Spotlight.
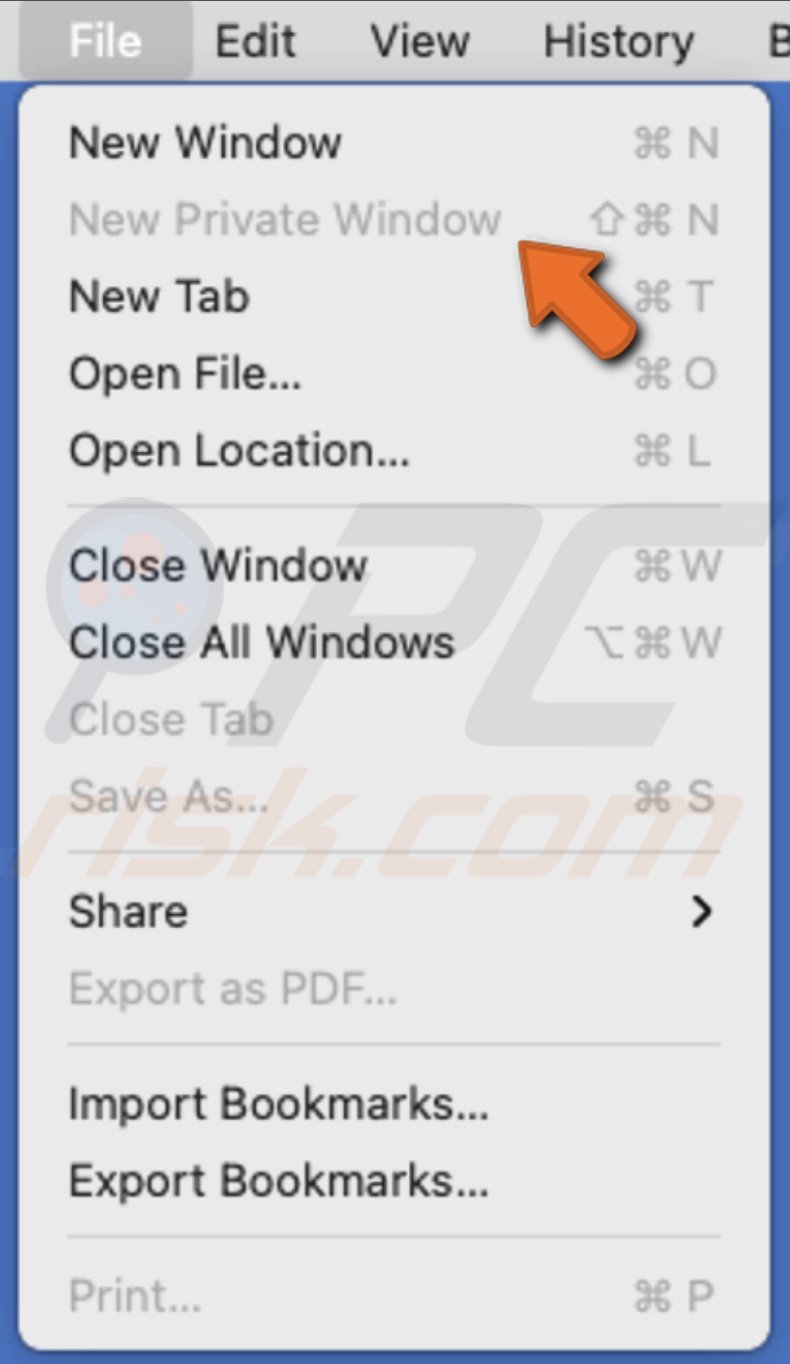
10. In the upper menu, click on "File". In the secondary menu, the option to open "New Private Window" should be grayed out.
This method also disables keyboard shortcuts that open the incognito browser as well as turns off the option to "Clear History".
To enable private browsing back again, follow the steps below:
1. Click on the Apple logo that you will find in the upper menu.
2. When the secondary menu pops up, click on "System Preferences".
3. In the "System Preferences", locate and click on "Screen Time".
4. When the "Screen Time" window appears, at the bottom left corner, click on "Options".
5. Next to "Screen Time for this Mac: On", click on the "Turn Off" button.
6. Then, in the left sidebar, locate the "Content & Privacy" section and click on it.
7. When the "Content & Privacy Restrictions" are turned on, next to "Web Content", check the circle "Unrestricted Access". You can also click on the "Turn Off" button next to "Content & Privacy Restrictions: On".
Disable Safari Private Browsing Using Guest User
By setting up a user account, you can control what the person using it is able to access and view. You can easily set up a guest user account with private browsing restrictions.
To set up a guest user with disabled private browsing, follow the steps below:
1. Click on the Apple logo that you will find in the upper menu.
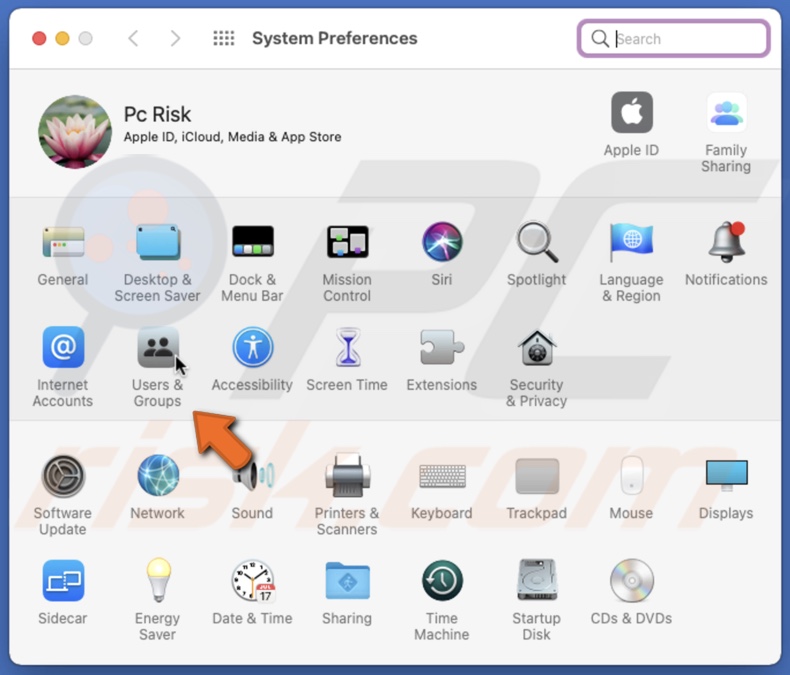
2. When the secondary menu appears, click on "System Preferences".
3. Then, locate and click on "Users & Groups".
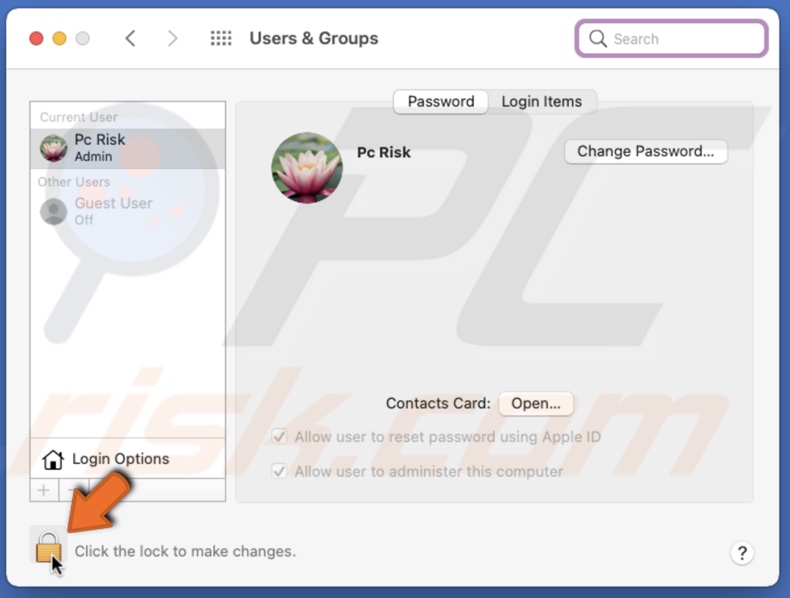
4. In the "Users & Groups" window, click on the lock at the bottom left corner and enter your user password to unlock the settings.
5. Then, click on the "Guest User" located in the left sidebar.
6. On the right side, check the box next to "Allow guests to log in to this computer" to enable the user.
7. Then, check the box next to "Limit Adult Websites".

Now you have created a guest user with a disabled private browser.
To enable private browsing for guest users, just click on the guest user and uncheck the box next to "Limit Adult Websites."
Disable Safari Private Browsing for Family Members
If you have a Family Sharing feature set up, you can remotely manage Screen Time on other members' Mac.
To disable private browsing for a family member remotely, follow the steps below:
1. Click on the Apple logo that you will find in the upper menu.
2. When the secondary menu appears, click on "System Preferences".
3. Then, locate and click on "Screen Time".
4. When the "Screen Time" window appears, go to the "Content & Privacy" section.
5. Form the top left sidebar, under your user image in click on the dropdown menu and select a family member.
6. Then, click on the "Turn On" button next to "Content & Privacy Restrictions: Off", and check the circle next to "Limit Adult Websites".
The private browsing feature will be turned off for all devices connected to that Apple ID.
Stop Syncing Private Browsing Restrictions With Your Other Devices
Suppose you use one Apple ID with your other Apple devices like iPhone or iPad. In that case, the restrictions that you enable on private browsing will automatically be synced with all your devices.
To disable private browsing restrictions sync with other devices, follow the steps below:
1. Click on the Apple logo that you will find in the upper menu.
2. When the secondary menu appears, click on "System Preferences".
3. In the "System Preferences", locate and click on "Screen Time".
4. When the "Screen Time" window appears, at the bottom left corner, click on "Options".
5. Then, uncheck the box next to "Share across devices".
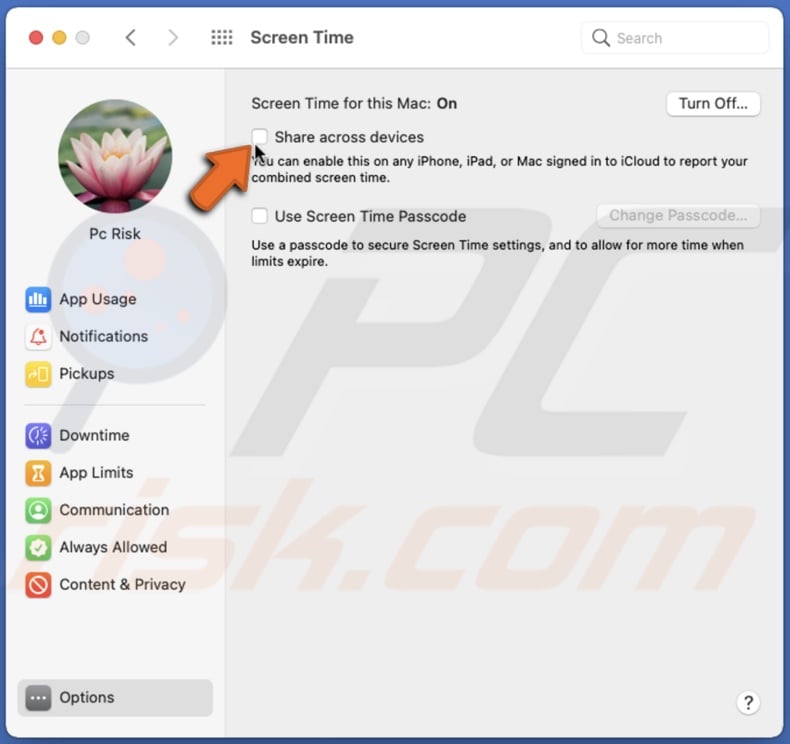
Now, private browsing restrictions are enabled only on your Mac.
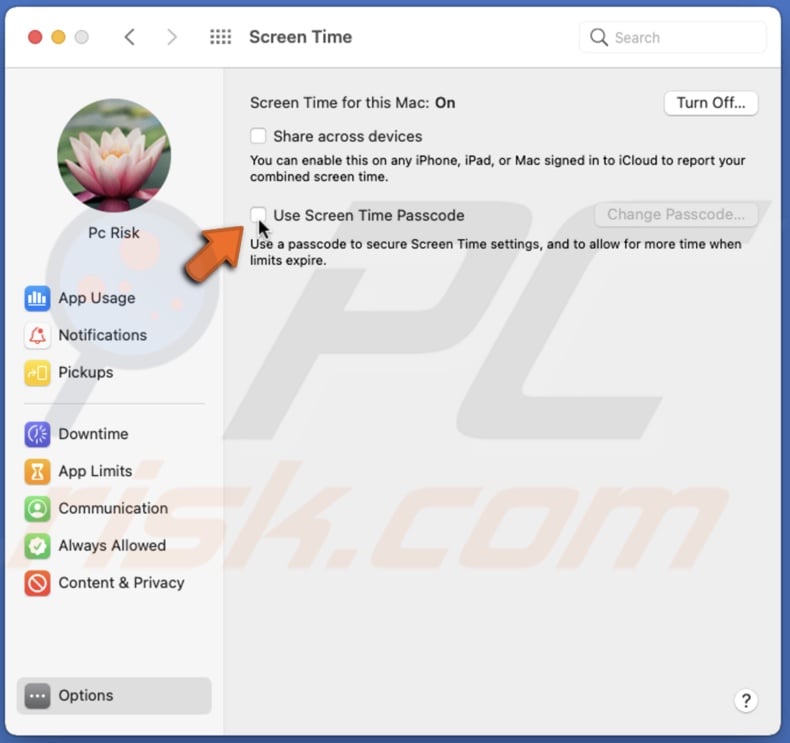
Create a Screen Time Passcode
To prevent other users from changing the private browsing settings in Screen Time, you can create a passcode so only you can manage the settings.
To create a Screen Time passcode, follow the steps below:
1. Click on the Apple logo that you will find in the upper menu.
2. When the secondary menu pops up, click on "System Preferences".
3. In the "System Preferences", locate and click on "Screen Time".
4. When the "Screen Time" window appears, at the bottom left corner, click on "Options".
5. Then, check the box next to "Use Screen Time Passcode".
6. You will need to enter 4 digit passcode and enter your Apple ID credential in case if you forget the passcode.
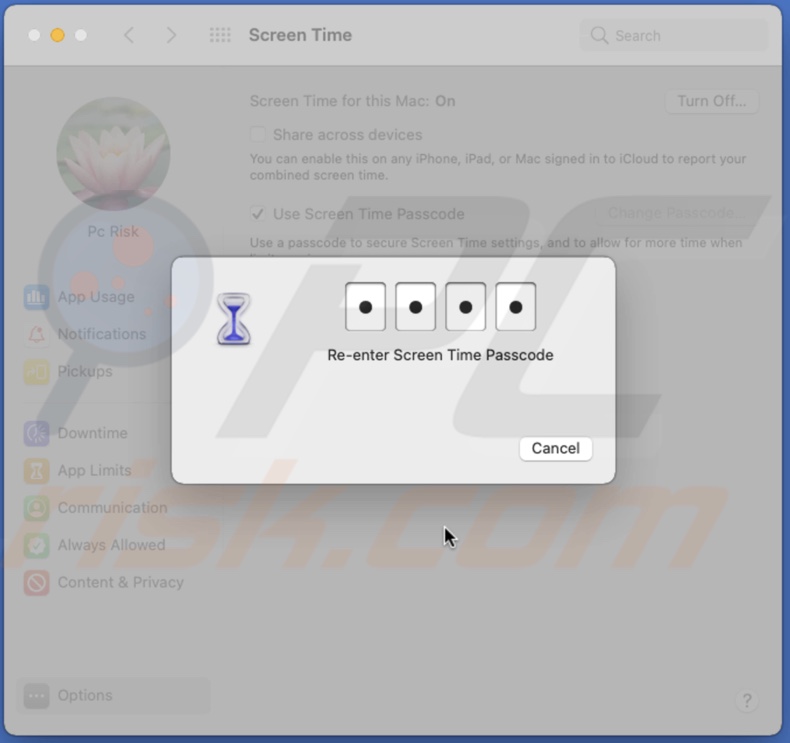
Now only users that know the passcode will be able to change Screen Time settings.
If you have Family Sharing, you can set up passcodes the same way for every family member.
We hope this article was helpful!
Check out the video above for a step-by-step explanation of each method.
Share:

Karolina Peistariene
Author of how-to guides for Mac users
Responsible for collecting, analyzing, and presenting problem-solving solution articles related to macOS issues. Years of macOS experience combined with solid research and analyzing skills help Karolina provide readers with working and helpful solutions as well as introduce various features Mac has to offer.
▼ Show Discussion