How to Manage iCloud on iOS and macOS?

(updated)
Get Free Scanner and check your computer for errors
Fix It NowTo fix found issues, you have to purchase the full version of Combo Cleaner. Free trial available. Combo Cleaner is owned and operated by Rcs Lt, the parent company of PCRisk.com read more.
How to Manage Your iCloud Account on iOS and macOS?
iCloud is a storage service launched by Apple in 2011. It safely stores your music files, images, videos, documents, and more on an internet server. That way, you do not have to store content o your Mac's hard drive and can access your content from any internet-connected device.
Also, iCloud automatically keeps apps up to date across all your devices. With iCloud, you can sync your information and access it anytime on any of your devices, such as an iPhone, iPad, Apple TV, Mac, and even PC running on the Windows operating system. It comes with 5 GB of free storage, and you can add more any time you need it.
iCloud makes your life easier and less stressful. You do not need to worry about losing your pictures, documents, and other important content if something were to happen to your device, and you can conveniently share your content with others.
Below you will find detailed, step-by-step explanations on how you can use and manage your iCloud account.
Video on How to Manage Your iCloud Account on Mac?
Table of Contents:
- Introduction
- How to Sign In And Sign Out of iCloud
- How to Change iCloud The Storage Plan
- How to Add iCloud Drive to Desktop, Dock, And Finder Sidebar
- How to Share iCloud Folders
- How to Change The Name Displayed on Emails Sent From iCloud
- How to Forward Emails to Another Email Address Automatically in iCloud
- How to Manually Select Apps That Will Be Backed Up to iCloud
- How to Delete Content From iCloud
- Video on How to Manage Your iCloud Account on Mac?
Download Computer Malware Repair Tool
It is recommended to run a free scan with Combo Cleaner - a tool to detect viruses and malware on your device. You will need to purchase the full version to remove infections. Free trial available. Combo Cleaner is owned and operated by Rcs Lt, the parent company of PCRisk.com read more.
How to Sign In And Sign Out of iCloud
You might be a new iCloud user and do not know how to sign in to iCloud with your device. In this case, follow the steps below:
Sign in on iOS:
1. Go to "Settings".
2. Tap on your account.
3. Enter your Apple ID credentials.
Sign out on iOS:
1. Go to "Settings".
2. Tap on your account.
3. At the bottom, tap on "Sign Out".
4. Enter your Apple ID password and click on "Turn Off".
5. Choose the data you want to keep after signing out.
6. At the top right corner, tap on "Sign Out".
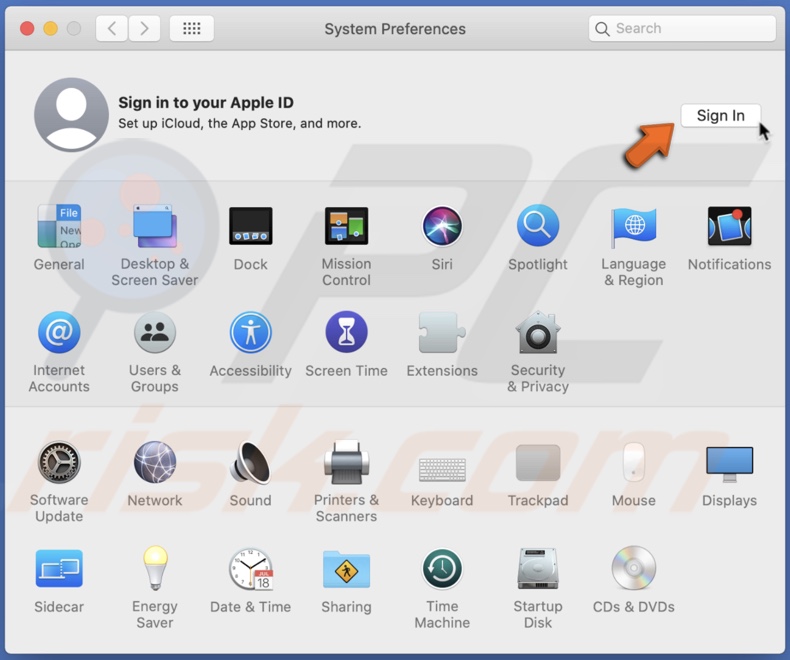
Sign in on Mac:
1. Click on the Apple logo in the upper menu.
2. Go to "System Preferences".
3. Click on the "Sign In" button.
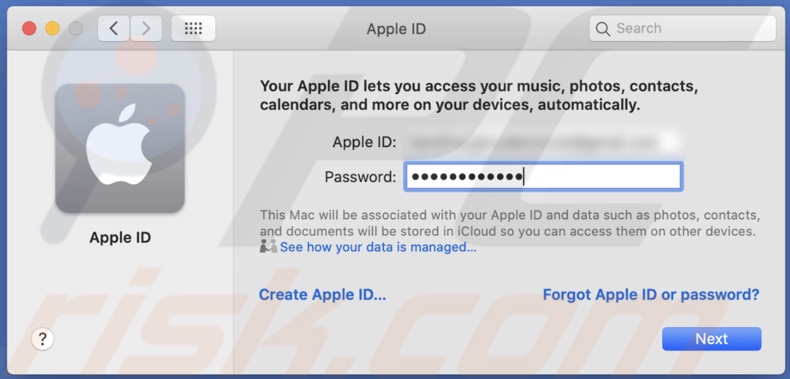
4. Enter your Apple ID credentials.
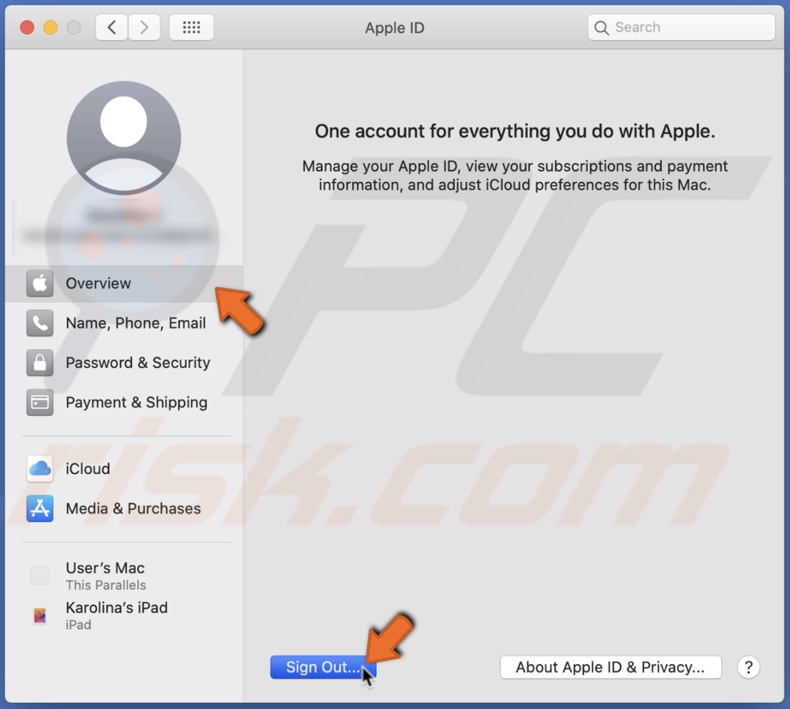
Sign out on Mac:
1. Click on the Apple logo in the upper menu.
2. Go to "System Preferences".
3. Go to your Apple ID.
4. Go to "Overview".
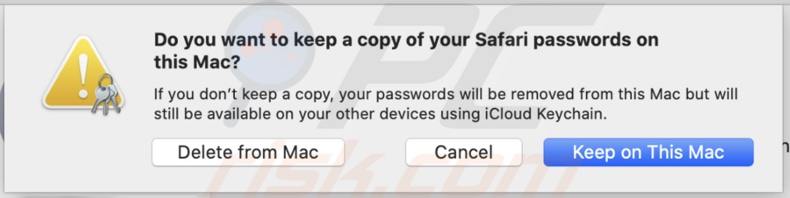
5. At the bottom, find and click on "Sign Out".
6. Then, click on "Keep a Copy" and choose if you want to keep a copy of Safari browser passwords on Mac.
How to Change iCloud Storage Plan
As mentioned above, when you sign up for an iCloud account, you instantly get 5 Gb of free storage space. If you want to have more storage, you need to upgrade your iCloud plan to premium. iCloud offers three premium storage plans with 50 Gb, 200 GB, and 2 TB.
To upgrade the storage plan on iOS:
1. Go to "Settings".
2. Tap on your account.
3. Then go to "iCloud".
4. Tap on "Manage Storage".
5. And then tap on "Change Storage Plan".
6. Choose a plan, and in the top right corner, tap on "Buy". After you buy the premium plan, a confirmation will appear with a notice that your plan has been upgraded.
To downgrade the storage plan on iOS:
1. Go to "Settings".
2. Tap on your account.
3. Then go to "iCloud".
4. Tap on "Manage Storage".
5. And then tap on "Change Storage Plan".
6. Tap on "Downgrade Options".
7. Choose a downgrade and tap on "Done" at the top right corner.
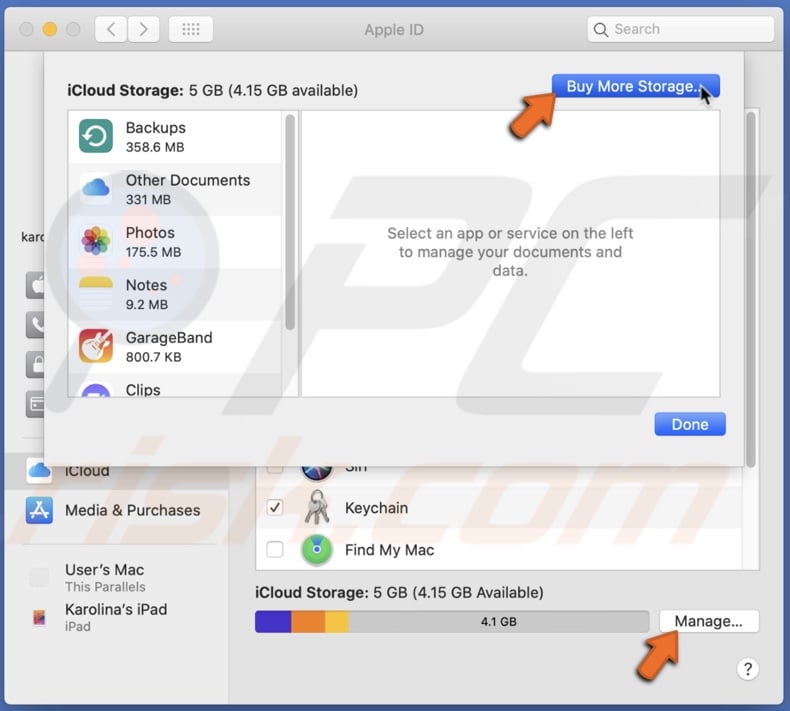
To upgrade the storage plan on Mac:
1. Click on the Apple logo in the upper menu.
2. Go to "System Preferences".
3. Find and go to the Apple ID.
4. Then click on "iCloud".
5. Next to "iCloud Storage", click on the 'Manage" button.
6. Then click on "Buy More Storage".
7. Select a plan and click on "Next".
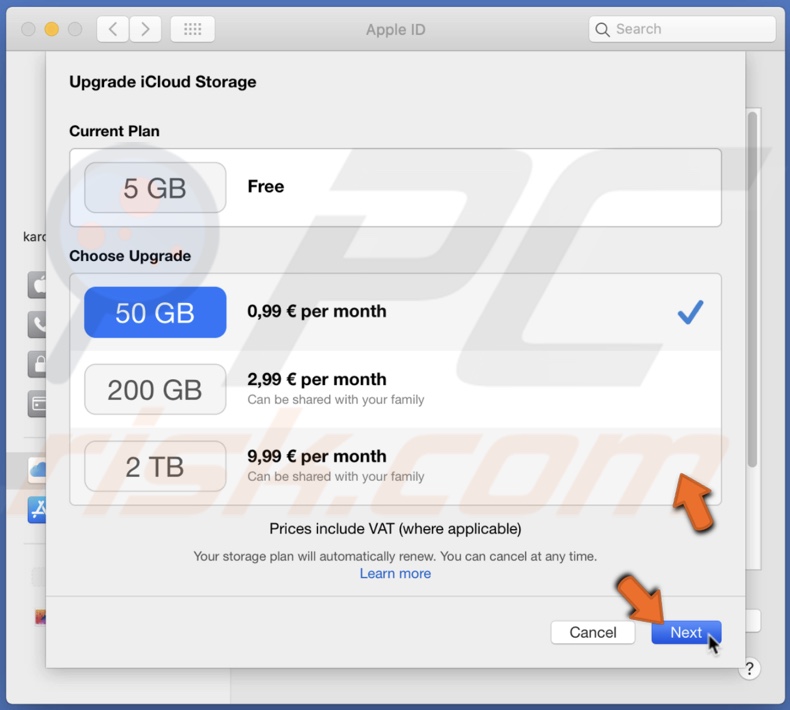
8. Enter your Apple ID password and click on "Buy".
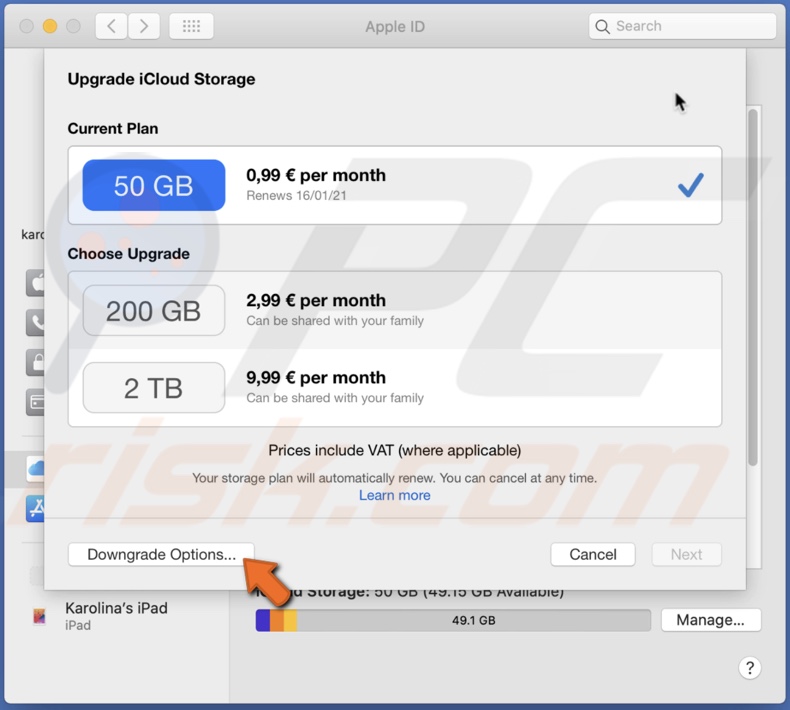
To downgrade the storage plan on Mac:
1. Click on the Apple logo in the upper menu.
2. Go to "System Preferences".
3. Finc and go to "Apple ID".
4. Then click on "iCloud".
5. Next to "iCloud Storage", click on the 'Manage" button.
6. Then click on "Change Storage Plan".
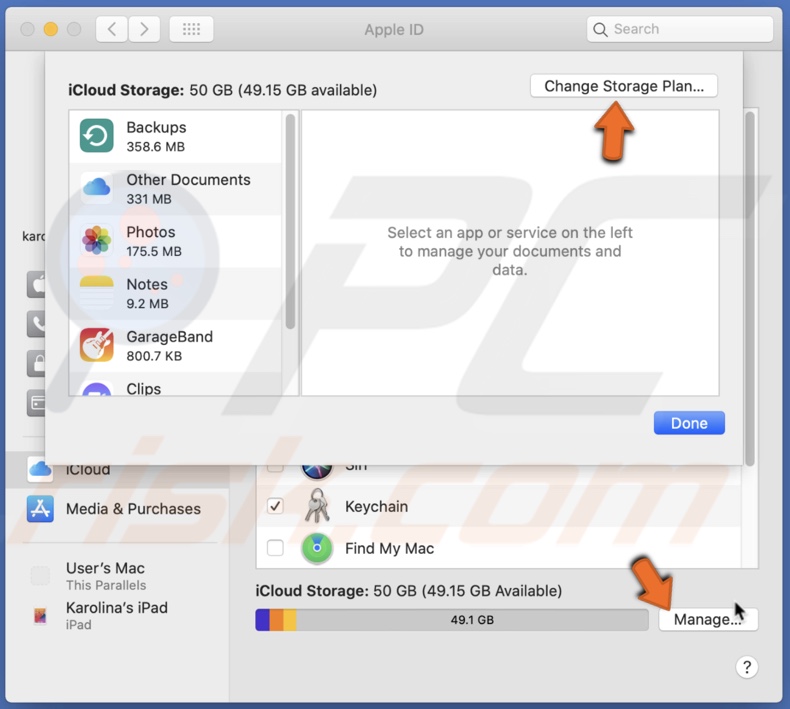
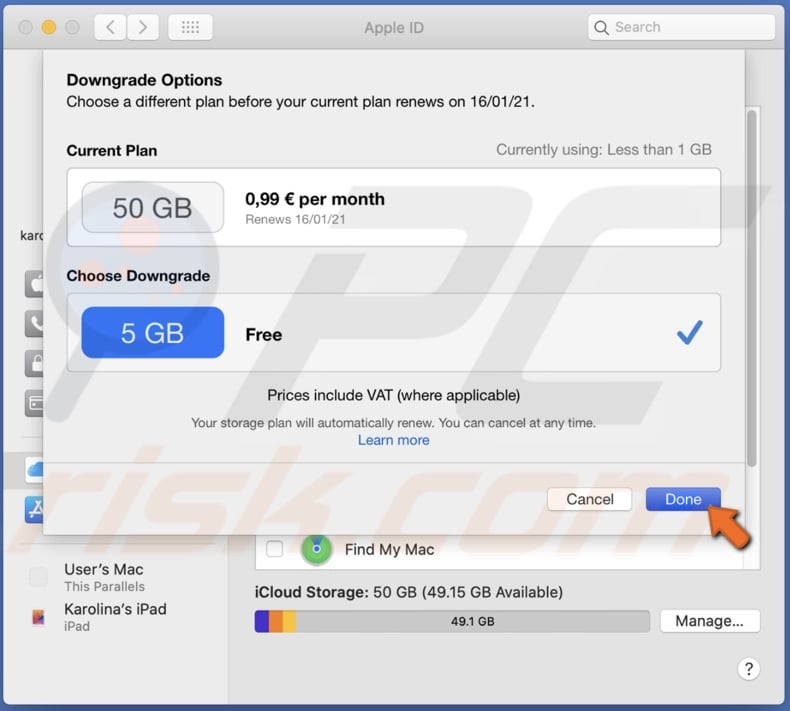
7. At the bottom left corner, click on the "Downgrade Options".
8. Select a downgrade and click on "Done".
How to Add iCloud Drive to Desktop, Dock, And Finder Sidebar
For quicker access to iCloud Drive, you can add it to the Finder sidebar, Desktop, or Dock.
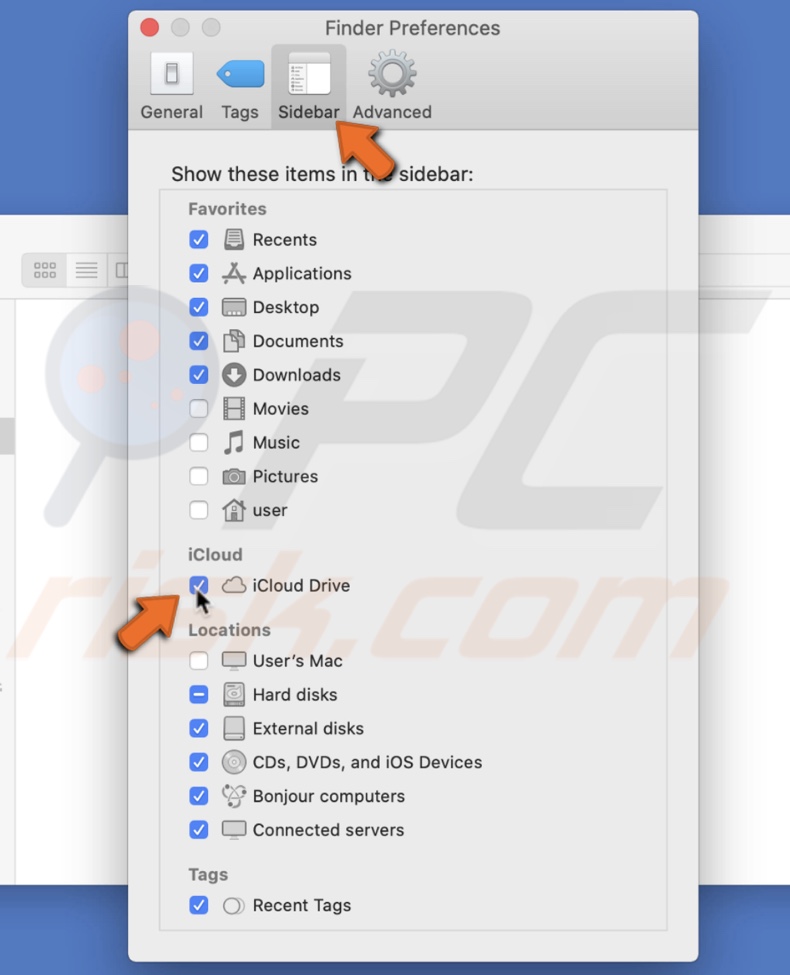
Add to Finder sidebar:
1. Open Finder.
2. In the upper menu, click on "Finder".
3. Go to Finder Preferences.
4. Then, click on the "Sidebar" tab.
5. Check the box next to iCloud Drive.
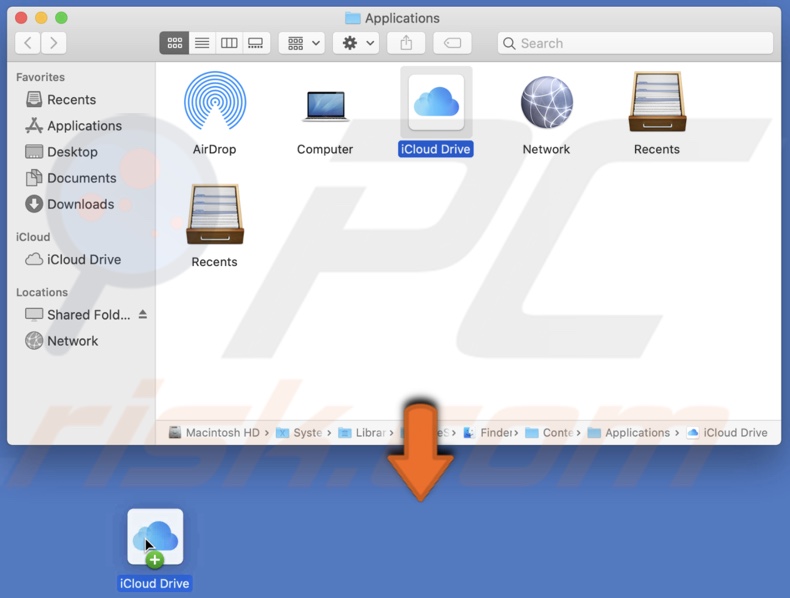
Add to Desktop:
1. Launch Finder.
2. In the upper menu, click on "Go".
3. Then, click on "Go to Folder".
4. In the pop-up window enter the line: /System/Library/CoreServices/Finder.app/Contents/Applications/
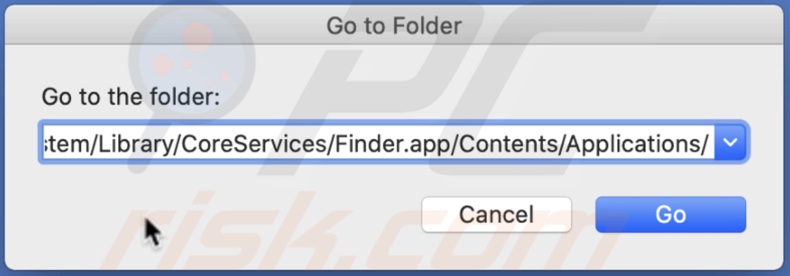
5. In the Applications folder select iCloud Drive and drag it to the Desktop.
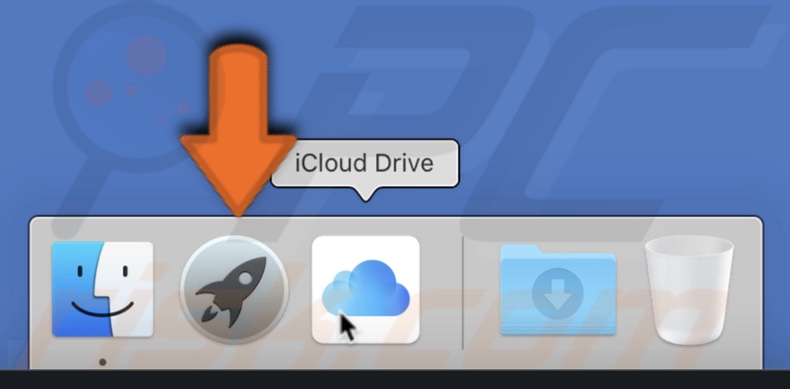
Add to Dock:
1. Launch Finder.
2. In the upper menu, click on "Go".
3. Then, click on "Go to Folder".
4. In the pop-up window enter the line: /System/Library/CoreServices/Finder.app/Contents/Applications/
5. In the Applications folder select iCloud Drive and drag it to Dock's left side. Release it when the Dock expands to make room for the application.
You can easily share your folders stored in iCloud with others. Follow the steps below to find out how.
Share iCloud folders on iOS:
1. Open the Files app.
2. From the list of sources, select "iCloud Drive".
3. Tap on the folder and hold it until a pop-up menu appears.
4. Tap on "Share".
5. Select how you would like to send the share link, pick a contact, and fill out their information.
Edit permission of Shared iCloud folders on iOS:
1. Open the Files app.
2. From the list of sources, select "iCloud Drive".
3. Tap on the folder and hold it until a pop-up menu appears.
4. Tap on "Share".
5. Scroll down and tap on "Add People".
6. Then, tap on "Share Options".
7. Under "Who can access" select who can access this folder. Choose between "Only people you invite" or "Anyone with the link".
8. Under "Permissions" select what they can do with the folder. Choose between "Can make changes" or "View only".
9. Then, select how you would like to send the share link, tap on "Share", pick a contact, and fill out their information.
Share iCloud folders on Mac:
1. Open Finder.
2. Click on "iCloud Drive" in the left sidebar.
3. Chose a folder and click on the "Share" icon.
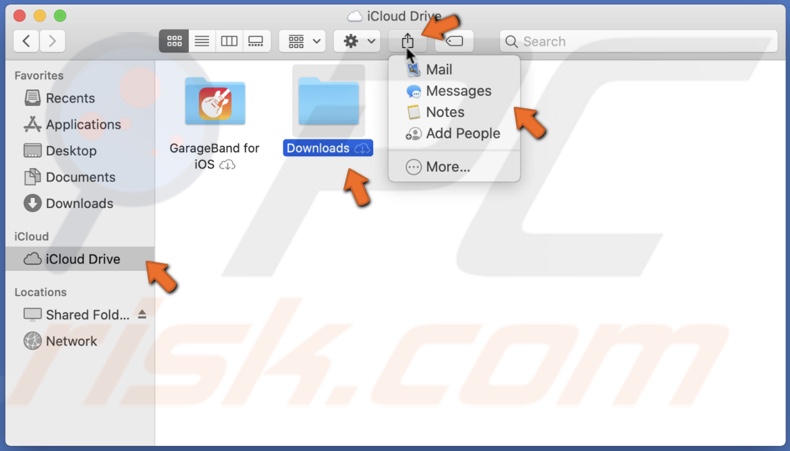
4. Select how you would like to send the share link, pick a contact, and fill out their information.
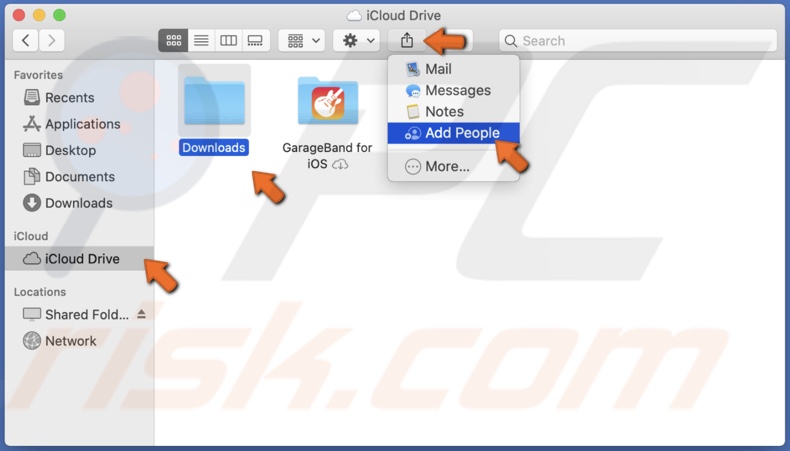
Edit permission before Sharing iCloud folders on Mac:
1. Open Finder.
2. Click on "iCloud Drive" in the left sidebar.
3. Chose a folder and click on the "Share" icon.
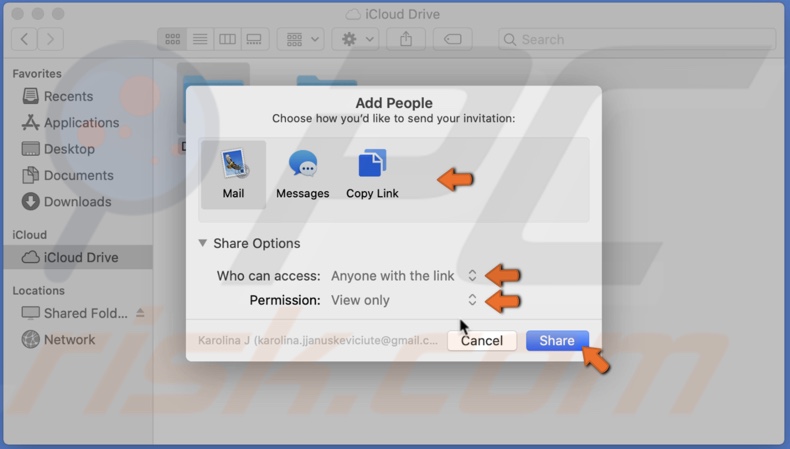
4. In the pop-up menu click on "Add People".
5. Expand the "Share Options" option.
6. Next to "Who can access" select who can access this folder. Choose between "Only people you invite" or "Anyone with the link".
7. Next to "Permissions" select what they can do with the folder. Choose between "Can make changes" or "View only".
8. Then, select how you would like to send the share link, tap on "Share", pick a contact, and fill out their information.
How to Change The Name Displayed on Emails Sent From iCloud
If you need to change your displayed email name, you can do that by following the steps below.
Change the email display name on iOS:
1. Open "Settings".
2. Go to "Passwords & Accounts".
3. Select an email account that you want to edit.
4. Tap on the email address and edit it.
5. Click on "Done" in the top right corner.
Change the email display name on Mac:
1. Open the Mail app from Finder, Launchpad, or Spotlight.
2. In the upper menu bar, click on "Mail".
3. Go to "Preferences".
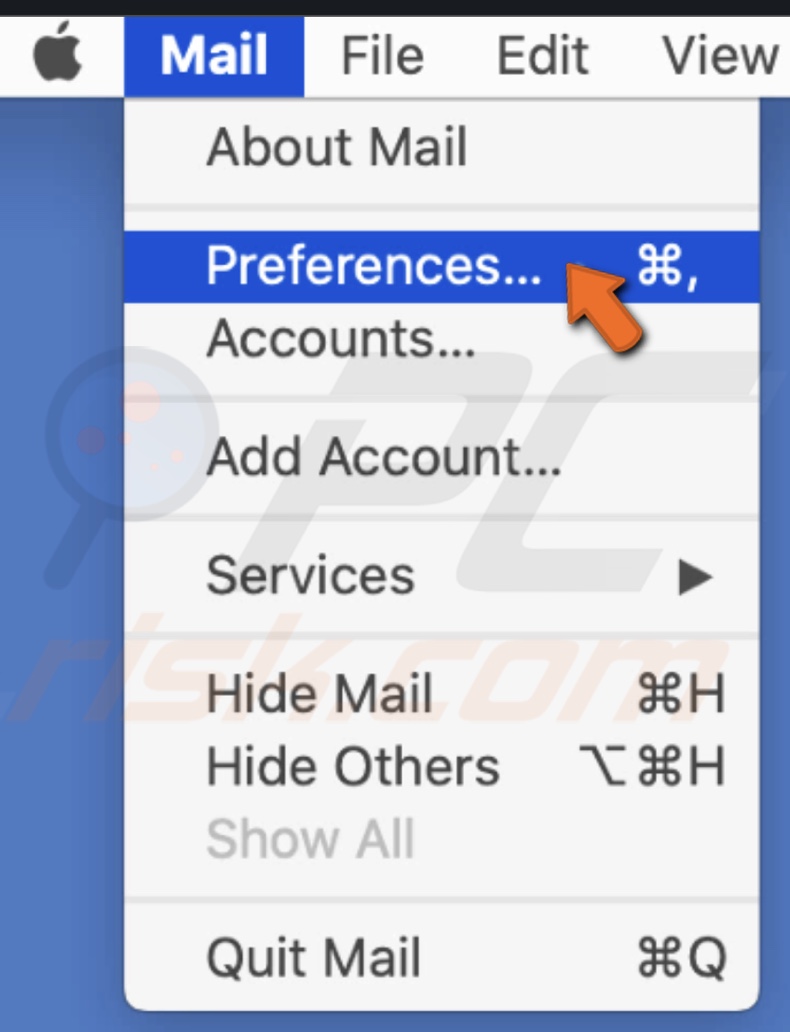
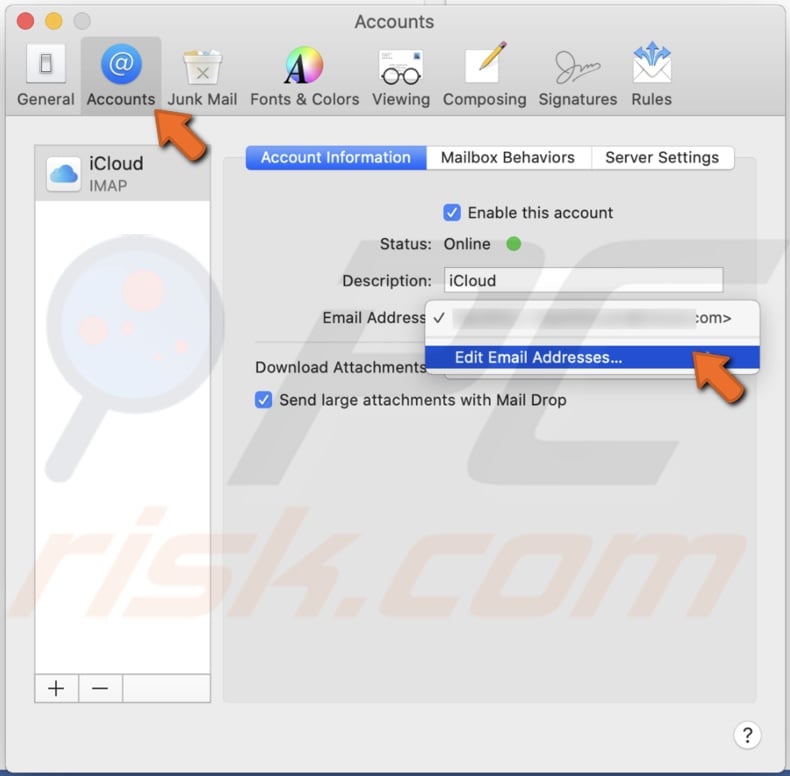
4. Then go to the "Accounts" tab.
5. Click on the drop-down next to "Email Addresses".
6. Then, select "Edit Email Addresses".
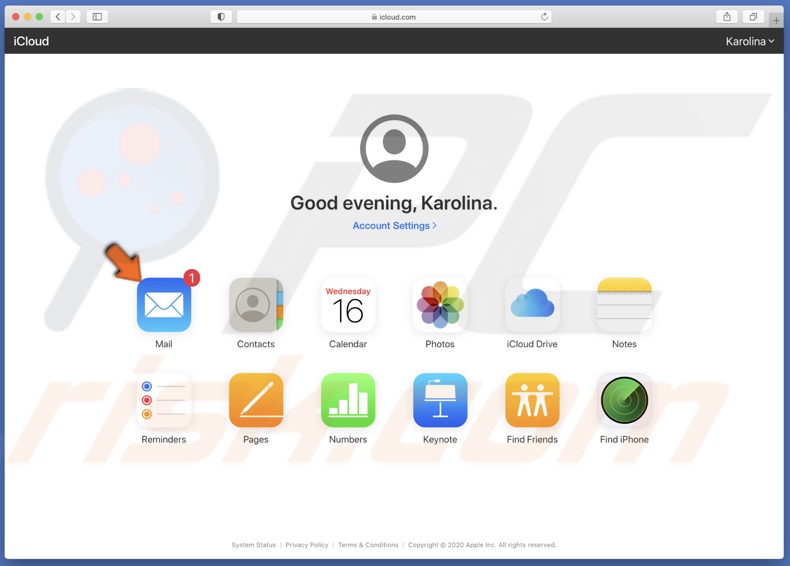
7. iCloud.com will open in a browser.
8. Login in to iCloud with your Apple ID.
9. Go to the Mail app.
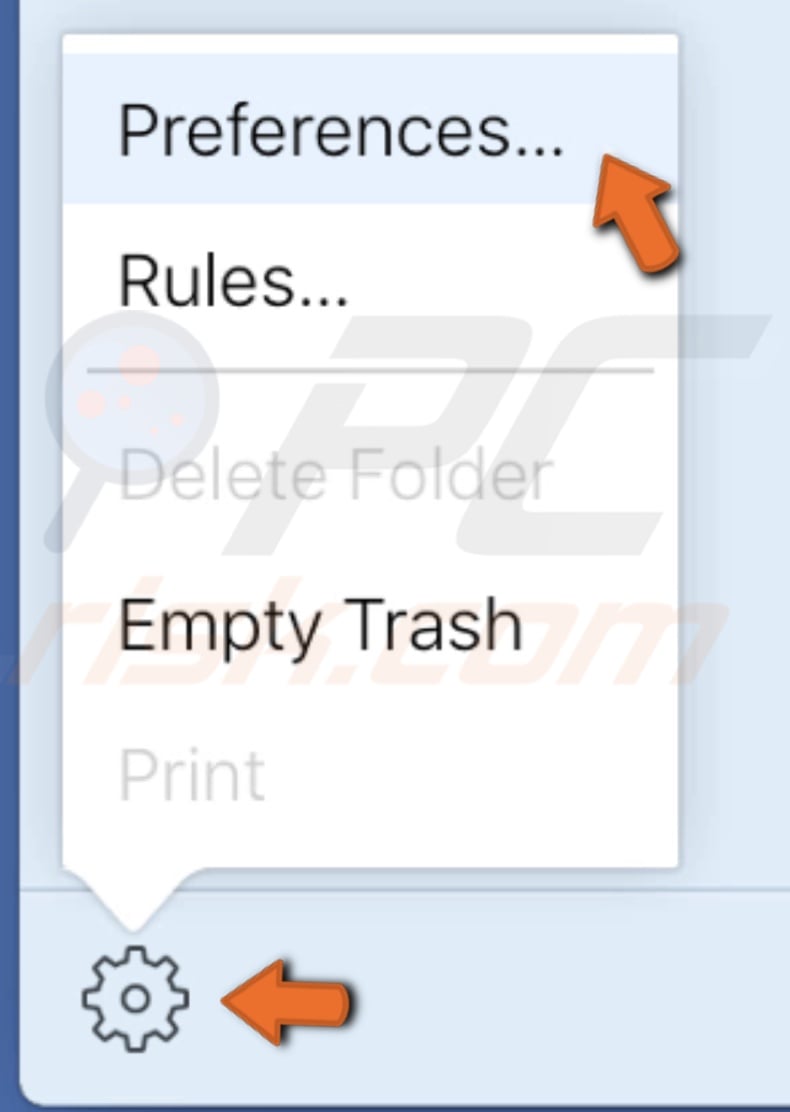
10. When the Mail app opens, click on the gear icon at the bottom left corner and click on "Preferences".
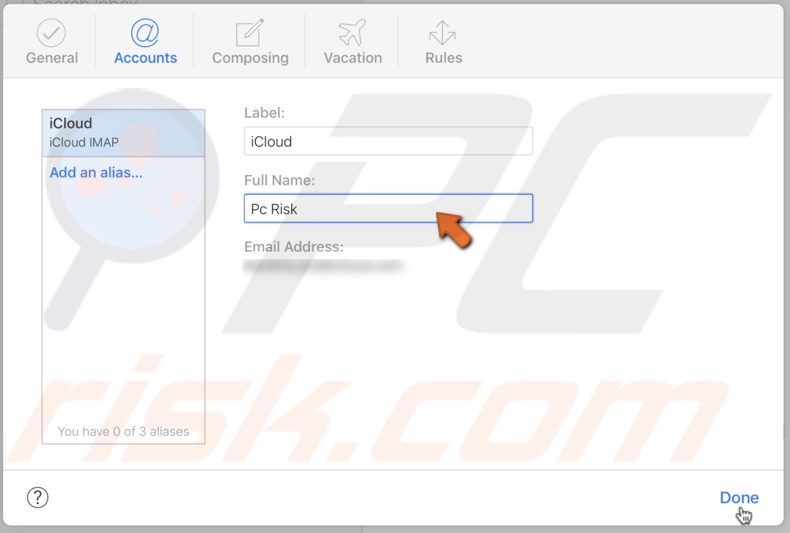
11. Go to the "Accounts" tab.
12. Edit the name and click on "Done".
How to Forward Emails to Another Email Address Automatically in iCloud
If you want to forward emails to a different email address, follow the steps below.
Forward all emails:
1. Go to iCloud.com.
2. Sing into your iCloud account by entering your Apple ID credentials.
3. Go to the Mail app.
4. At the bottom left corner, click on the gear icon and click on "Preferences".
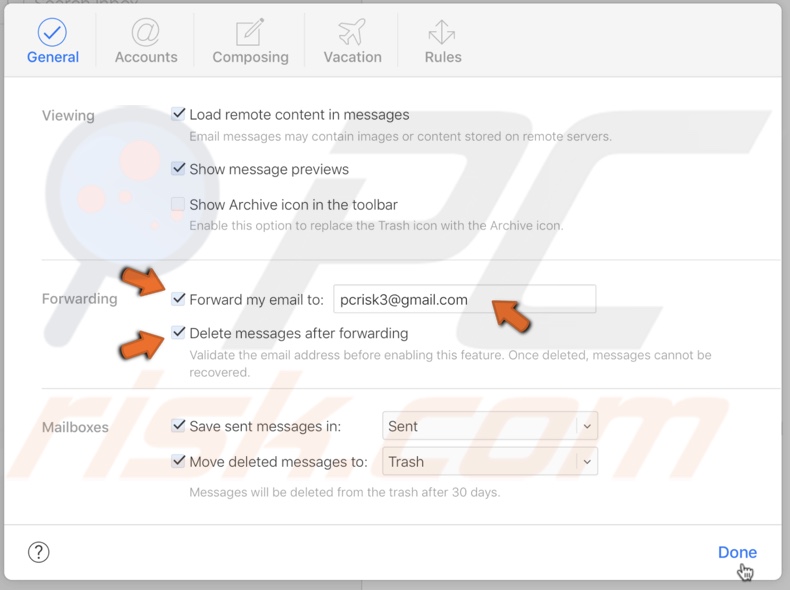
5. Check the box next to "Forward my emails to".
6. In the text field, enter the other email address.
7. Then, click on "Done".
If you do not want to keep forwarded emails in your email address, check the box next to " Delete messages after forwarding".
Forward specific emails:
1. Go to iCloud.com.
2. Sing into your iCloud account by entering your Apple ID credentials.
3. Go to the Mail app.
4. At the bottom left corner, click on the gear icon and click on "Rules".

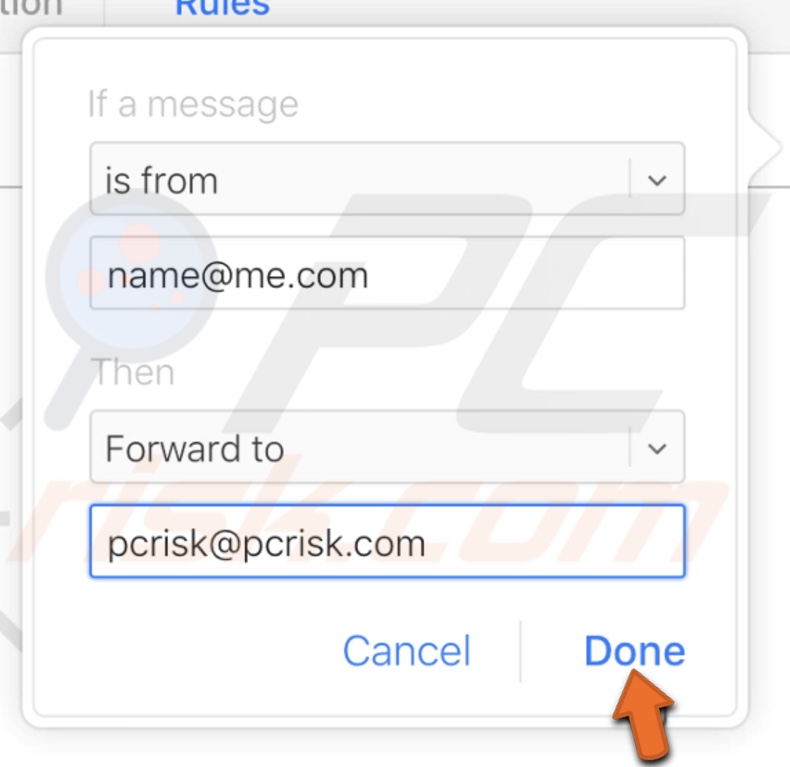
5. In the top right corner, click on "Add a Rule".
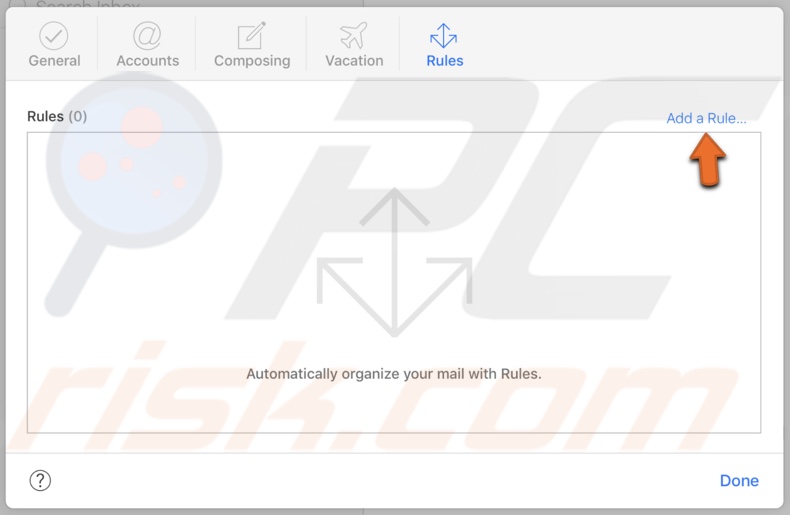
6. Under "if a message", select a condition from the drop-down menu.
7. Then, enter the sender's email address.
8. Under "Then", click on the drop-down menu and select "Forward to".
9. Enter the forwarding email.
10. Click on "Done" and then on "Done" again.
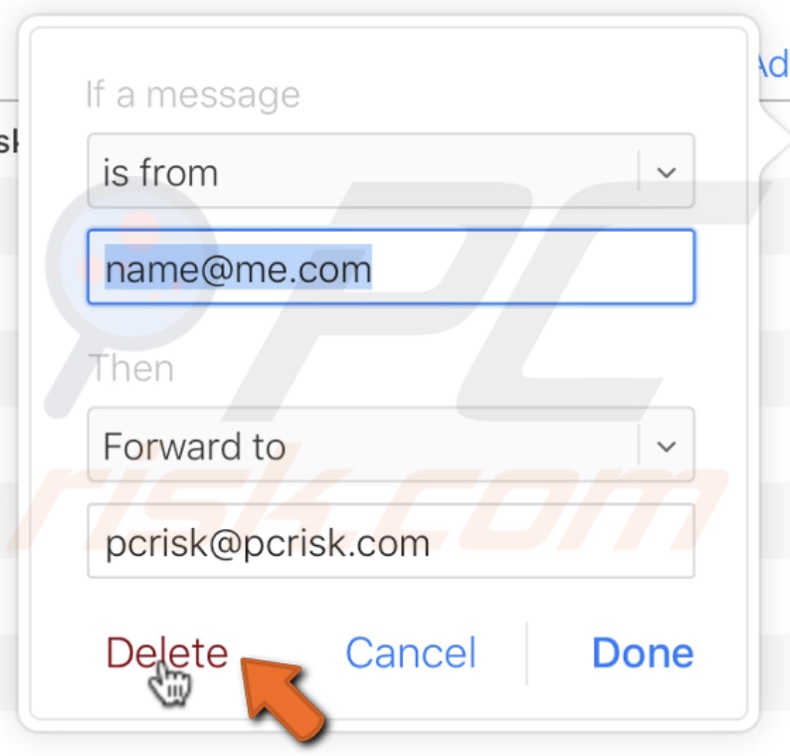
You can remove the rule by clicking on the (i) icon and selecting "Delete".
![]()
How to Manually Select Apps That Will Be Backed Up to iCloud
If you selected to use iCloud for backing up your device, most applications would automatically be set to back up. If you want to save storage and handpick what apps you want to back up with iCloud, you can do that following the steps below.
For iOS:
1. Go to "Settings".
2. Go to your account.
3. Go to "iCloud".
4. Tap on "Manage Storage".
5. Go to "Backups".
6. Select your device's backup and toggle off apps that you do not want to be backed up.
7. When you disable an app's backup, click on "Turn Off & Delete".
For Mac:
Unfortunately, you can not choose apps for backup on Mac for your device. You can only delete the backup.
1. Click on the Apple logo in the upper menu.
2. Go to "System Preferences".
3. Find and go to the Apple ID.
4. Then click on "iCloud".
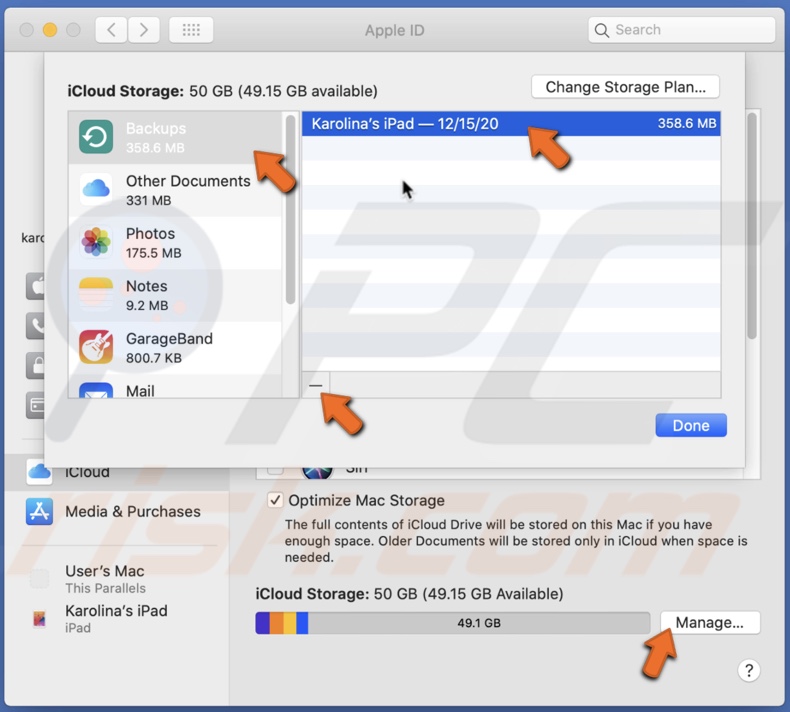
5. Click on the "Manage" button.
6. Scroll down and select "Backups".
7. Select your device's backup.
8. Click on the (-) icon to remove the backup.
How to Delete Content From iCloud
If you want to clear out your iCloud storage, you can easily remove applications from your iOS or macOS device.
For iOS:
1. Go to "Settings".
2. Go to your account.
3. Go to "iCloud".
4. Tap on "Manage Storage".
5. Tap on the app you want to delete.
6. Then, tap on "Delete Data" or "Delete Documents & Data".
For Mac:
1. Click on the Apple logo in the upper menu.
2. Go to "System Preferences".
3. Find and go to the Apple ID.
4. Then click on "iCloud".
5. Click on the "Manage" button.
6. Select an app from the left sidebar and click on "Delete All Files".
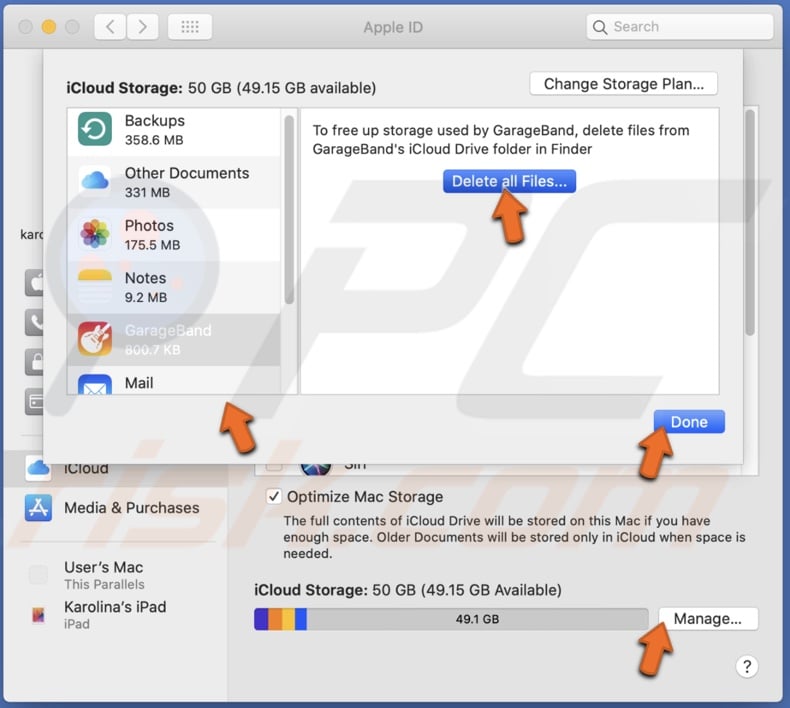
7. Then click on "Delete".
We hope this article was helpful! Check out the video below for a step-by-step tutorial.
Share:

Karolina Peistariene
Author of how-to guides for Mac users
Responsible for collecting, analyzing, and presenting problem-solving solution articles related to macOS issues. Years of macOS experience combined with solid research and analyzing skills help Karolina provide readers with working and helpful solutions as well as introduce various features Mac has to offer.
▼ Show Discussion