Fix AirDrop Not Working on Mac

(updated)
Get Free Scanner and check your computer for errors
Fix It NowTo fix found issues, you have to purchase the full version of Combo Cleaner. Free trial available. Combo Cleaner is owned and operated by Rcs Lt, the parent company of PCRisk.com read more.
Fix AirDrop Not Working On Mac With These 7 Easy Steps
AirDrop feature is a handy way to send files, especially if they are big in size. The process is fast, secure, and the files preserve the original quality. If you often use AirDrop, for example, to send files to your coworkers, it can become quite a headache if AirDrop suddenly stops doing its purpose.
There can be various reasons why AirDrop might not work on your Mac. The most common is that AirDrop might not be discoverable on other devices, and both Bluetooth and Wi-Fi are not switched on.
The receiving device might also be in sleep mode or turned off. Make sure both devices are 'awake' and turned on. The receiving device can also be in 'Airplane' or 'Do Not Disturb' mode, so do not forget to disable these features before using AirDrop.
It is also possible that AirDrop can stop working if the device has problems with Bluetooth or your Mac's Firewall prevents using it. There are more reasons why Airdrop might not work. Bellow, you will find troubleshooting steps with further detailed and exact steps to approach this problem.
Video on Fix AirDrop Not Working On Mac With These 7 Easy Steps
Table of Contents:
- Introduction
- Method 1. Check Settings If You Are Discoverable
- Method 2. Disable "Do Not Disturb"
- Method 3. Reset Bluetooth Connection
- Method 4. File Sharing to an Older Mac
- Method 5. Disable "Block All Incoming Connections"
- Method 6. Disconnect VPN
- Method 7. Update macOS
- Video on Fix AirDrop Not Working On Mac With These 7 Easy Steps
Download Computer Malware Repair Tool
It is recommended to run a free scan with Combo Cleaner - a tool to detect viruses and malware on your device. You will need to purchase the full version to remove infections. Free trial available. Combo Cleaner is owned and operated by Rcs Lt, the parent company of PCRisk.com read more.
Check Settings If You Are Discoverable
As mentioned above, you can control who sees your device. To make sure you are discoverable, you should go to discovery settings within Finder.
1. Open Finder.
2. In the Finder window sidebar, find and click on "AirDrop".
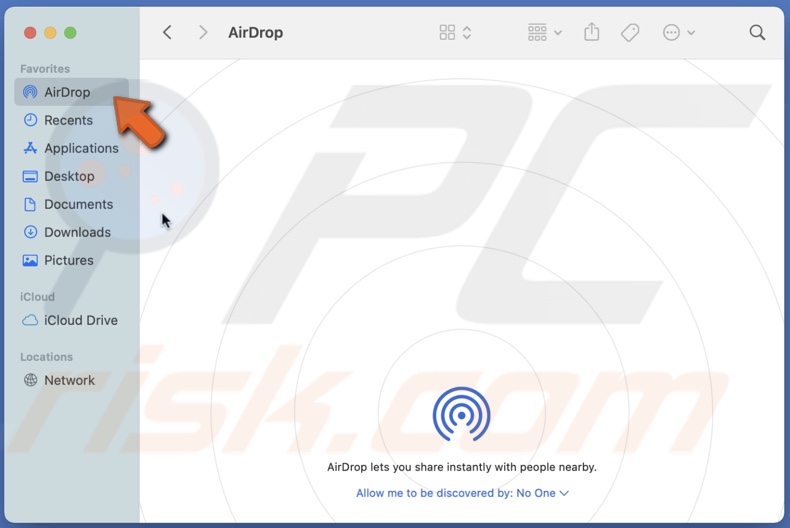
3. When you see the AirDrop window appear, at the bottom, next to "Allow me to be discoverable by," click on the drop-down menu and choose "Everyone".

If this does not solve your visibility issue, proceed to the next step.
Disable "Do Not Disturb"
This mode interferes with AirDrop and prevents sending and receiving files from other devices. It makes your Mac invisible to other nearby devices. Try to disable it and see if it helps.
1. In the upper menu, click on the Apple logo.
2. Go to "System Preferences".
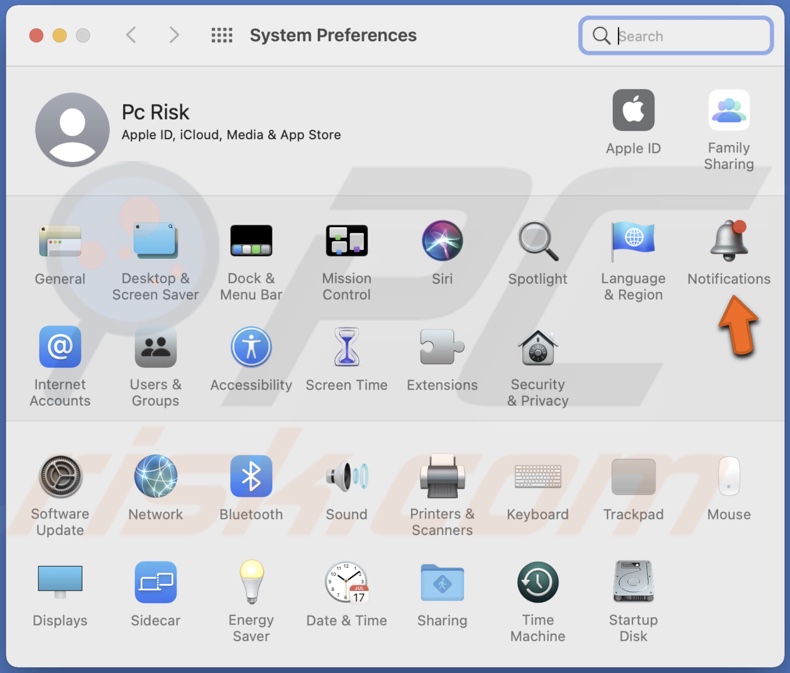
3. In the "System Preferences" window, find and click on "Notifications".
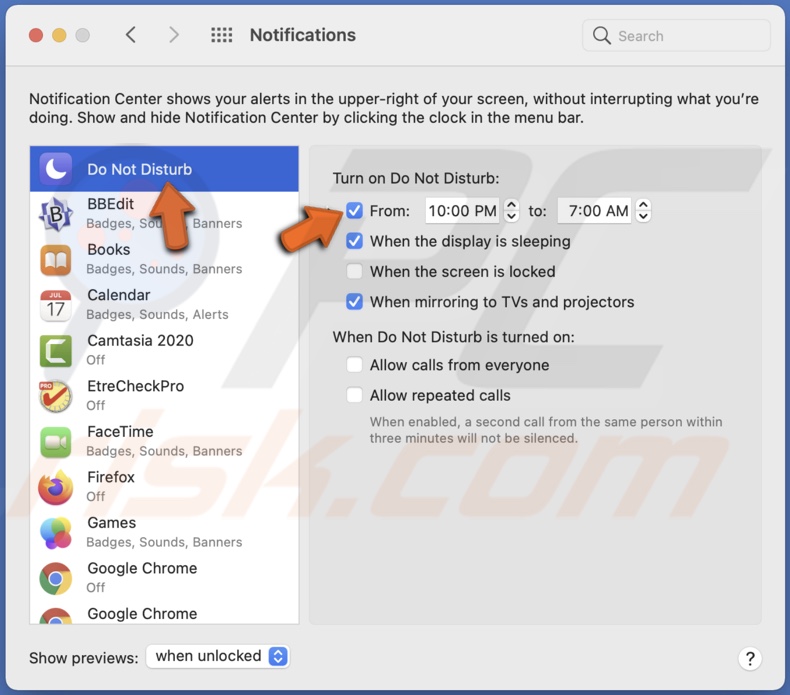
4. Select "Do Not Disturb".
5. Uncheck the box next to "From".
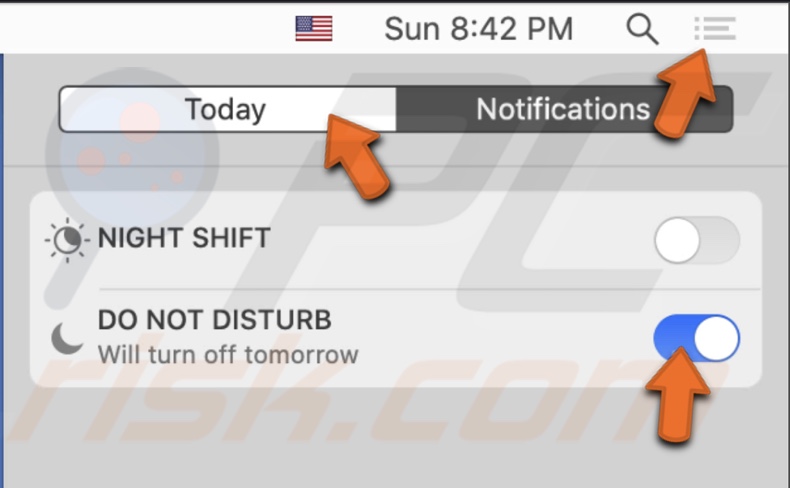
6. Then go to the "Notification Center" in the top-right corner of your screen.
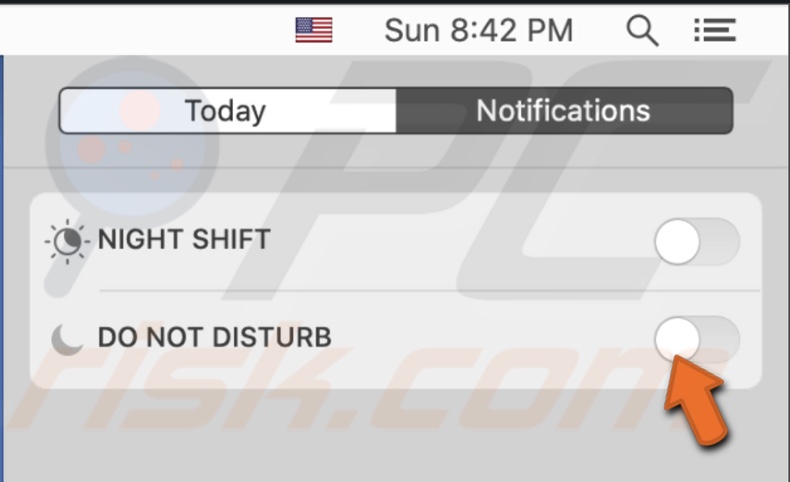
7. Go to the "Today" tab.
8. Disable "Do Not Disturb".
Reset Bluetooth Connection
Deleting the file where Bluetooth stores known Bluetooth connections will force your Mac to create new connections, and it may fix other pairing problems.
1. In the upper menu, click on the Apple logo.
2. Go to "System Preferences".
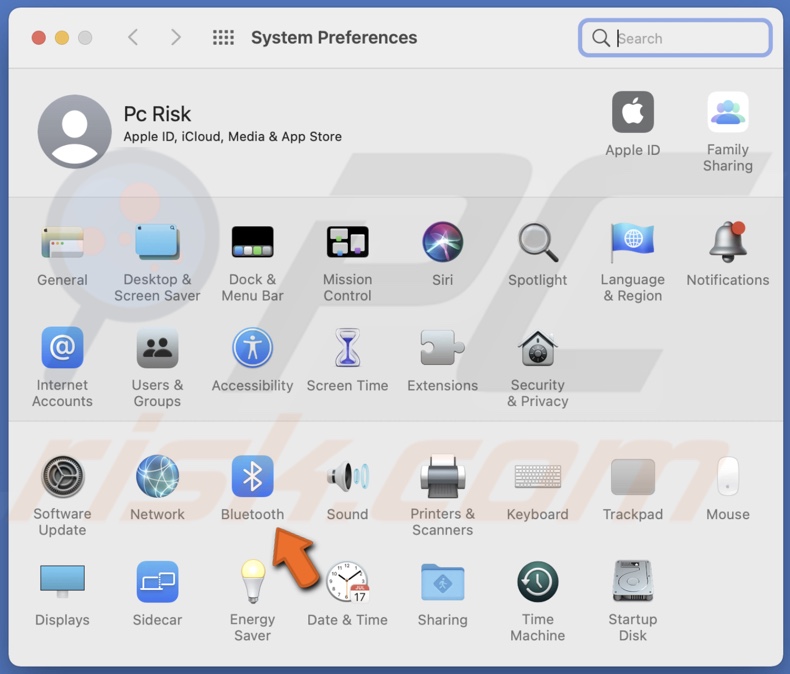
3. In the "System Preferences" window, find and click on "Bluetooth".
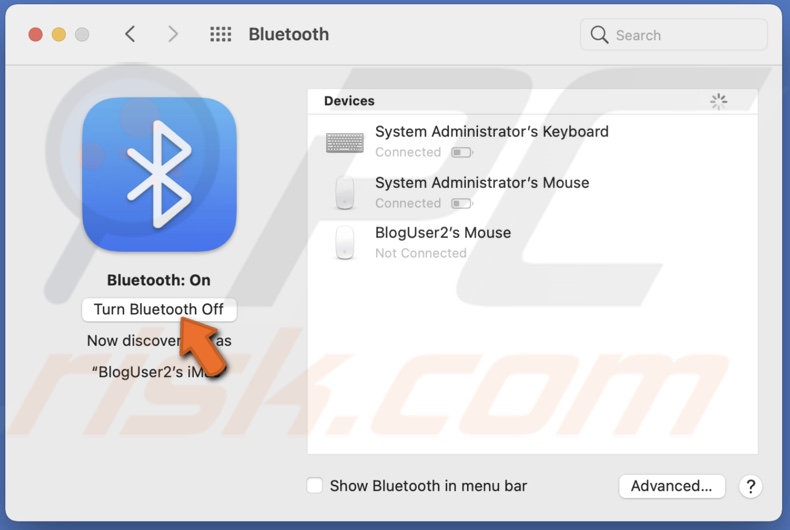
4. Click on "Turn Bluetooth Off".
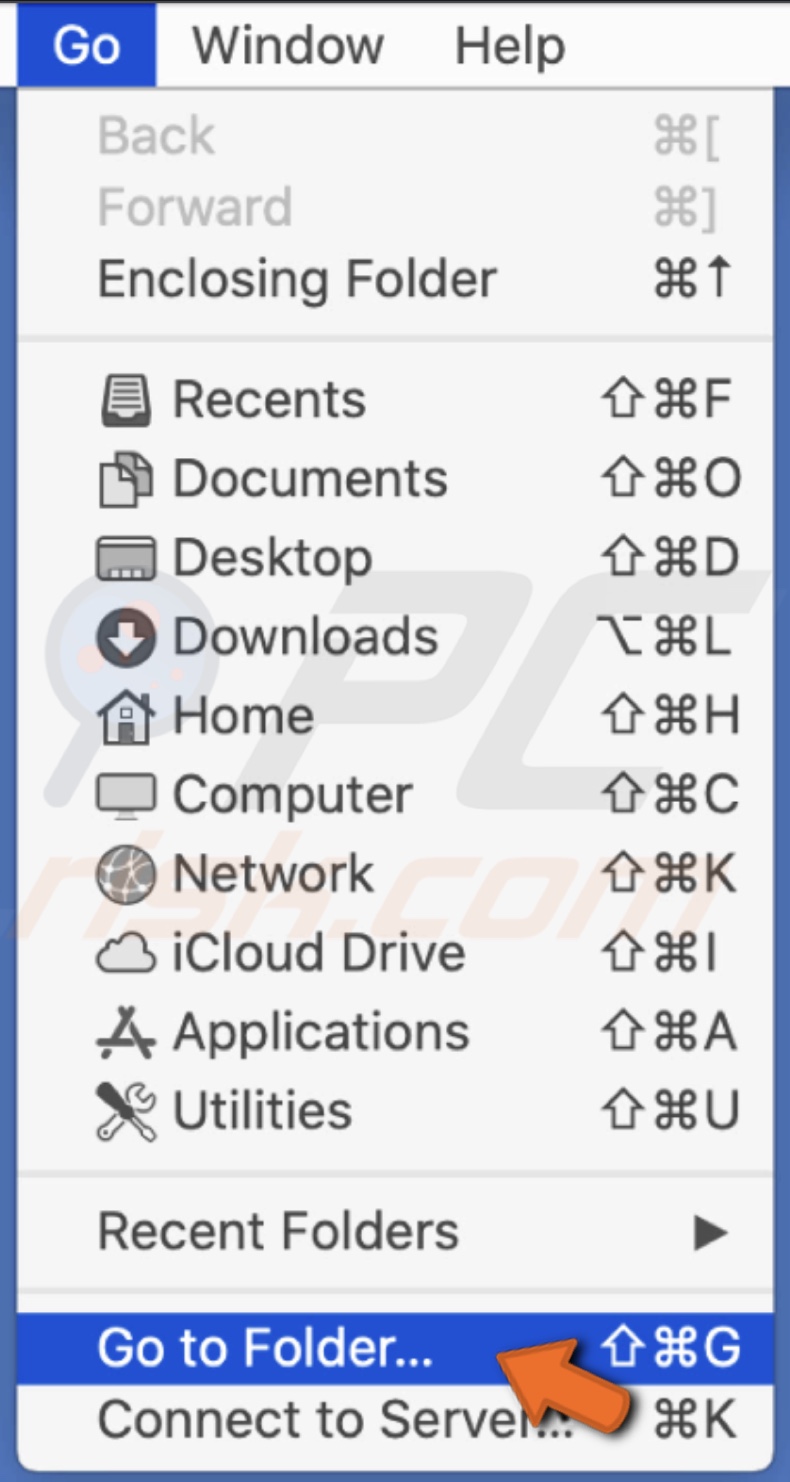
5. Then launch Finder and in the upper menu, click on "Go".
6. Then click on "Go To Folder".
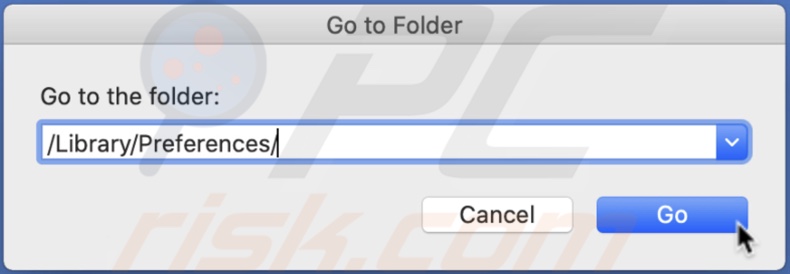
7. Enter the line: /Library/Preferences/
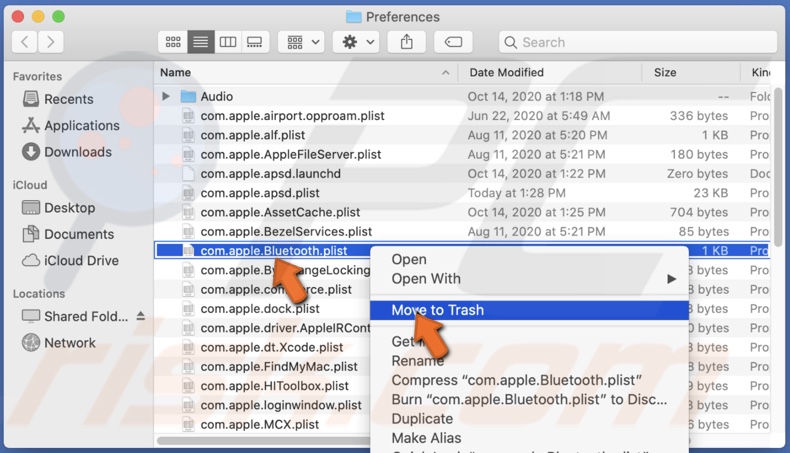
8. Locate and delete the file: com.apple.Bluetooth.plist
9. Now, turn on the Bluetooth again and check if AirDrop is working.
You can also try to launch Bluetooth from "System Preferences". Wen the Bluetooth preference window shows up, do nothing and wait. Then bring up the Share menu, and your Mac should appear as an AirDrop destination.
File Sharing to an Older Mac
Suppose you are trying to send a file to an older Mac. In that case, you need to tell AirDrop to specifically search for an older Mac as they use an older version of AirDrop that is not compatible with the newer operating systems.
1. Open AirDrop in the older Mac and make sure it is ready to receive files.
2. On the newer Mac, open Finder.
3. In the Finder window sidebar, find and click on "AirDrop".

4. Then, at the bottom of the window, click on "Don't See Who You're Looking For?" and select "Search for an Older Mac".
If your Mac does not have the "Search For An Older Mac" feature do this:
1. In the upper menu, click on the Apple logo.
2. Go to "System Preferences".
3. In the "System Preferences" window, find and click on "Sharing".
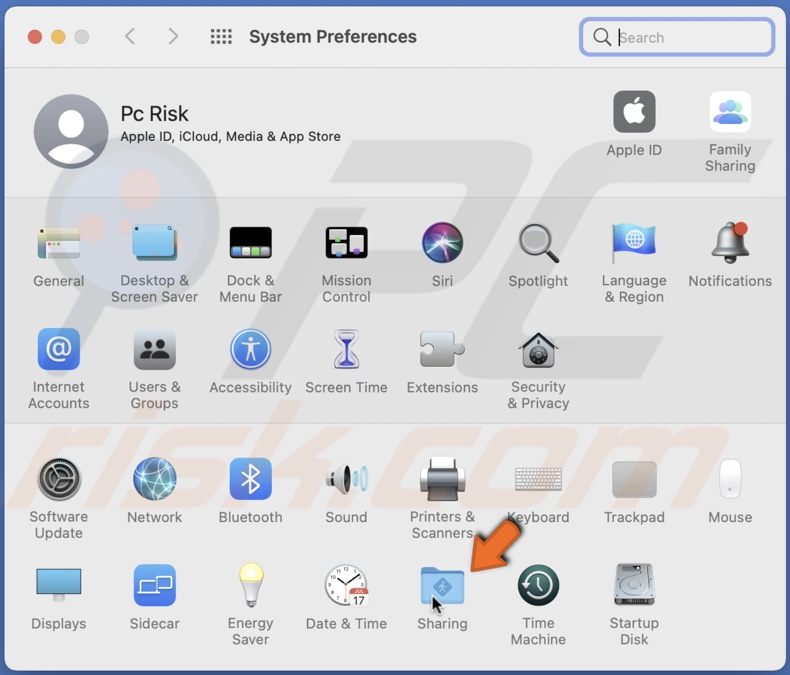
4. Check the box next to "File Sharing".
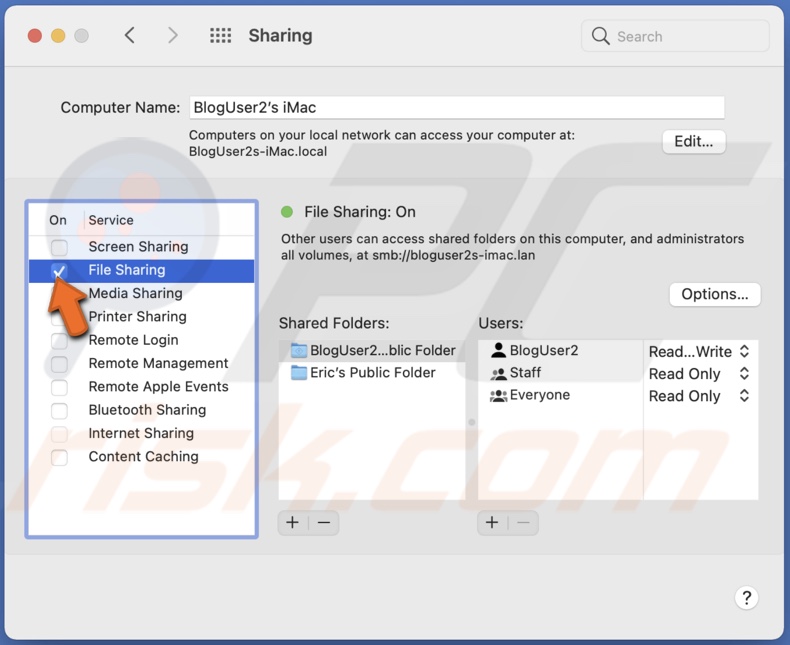
5. Then go to your receiving Mac and open Finder.
6. In the upper menu, click on the "Go".
7. Click on "Go to Folder".

8. Enter: smb://(your IP address)
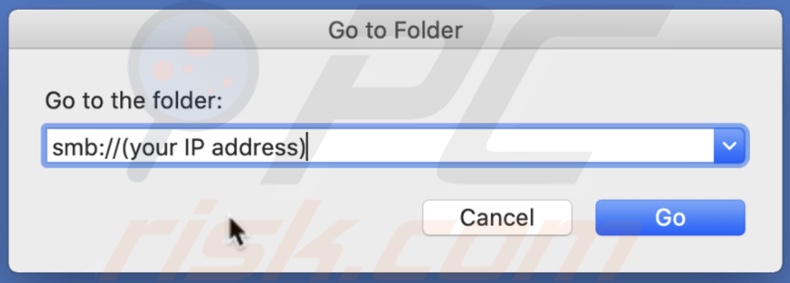
You can find more on file-sharing here.
Disable "Block All Incoming Connections"
As briefly mentioned above, your Mac's firewall might not be allowing you to use AirDrop. In this case, you should disable the setting that is causing this issue. You don't have to stop using the firewall.
1. In the upper menu, click on the Apple logo.
2. Go to "System Preferences".
3. In the "System Preferences" window, find and click on "Security & Privacy".
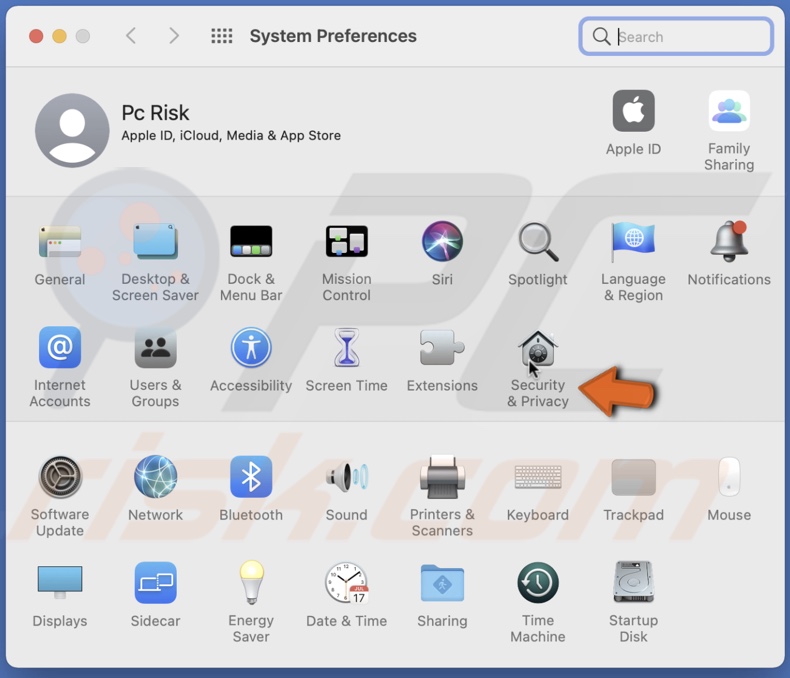
4. Go to the "Firewall" tab.
5. Click on the lock at the bottom left corner and type in your admin password.

6. Then click on "Firewall Options".

7. Uncheck the box next to "Block All Incoming Connections".
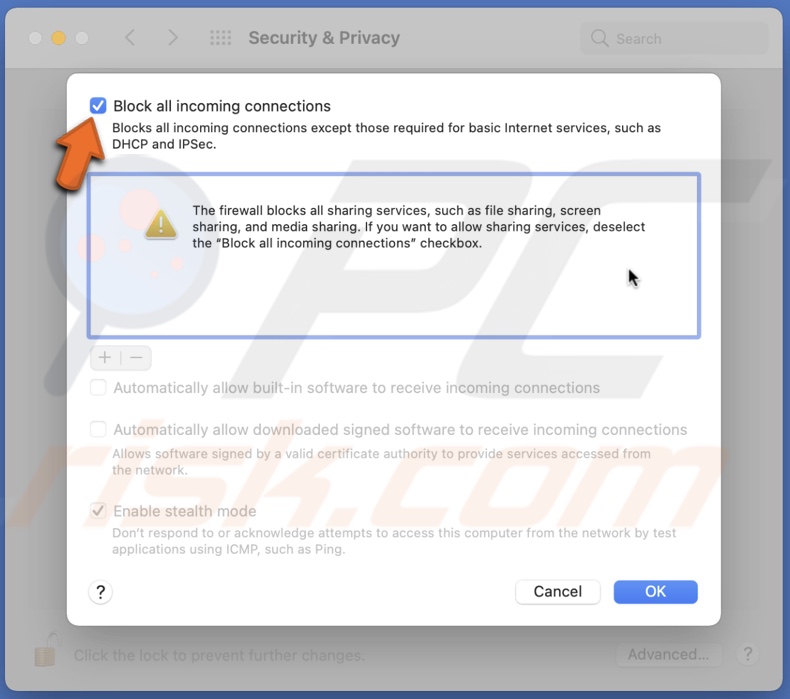
8. Click on "OK" to save changes and check if AirDrop is working.
Disconnect VPN
Sometimes VPN software can prevent AirDrop from sending or receiving files. Try disconnecting it and see it solves the problem.
1. In the upper menu, click on the Apple logo.
2. Go to "System Preferences".
3. In the "System Preferences" window, find and click on "Network".
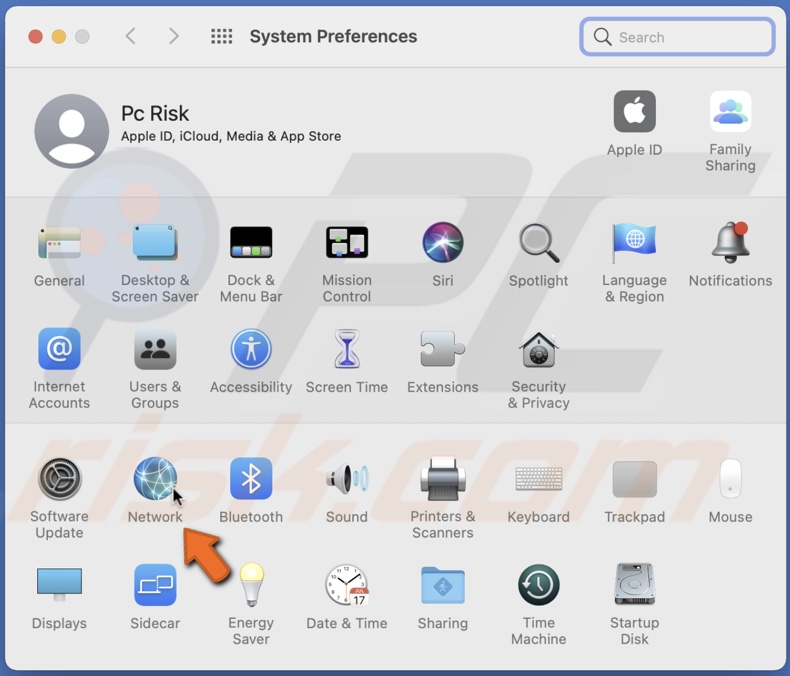
4. From the left sidebar in the Network window, select the VPN connection.
5. Click on "Disconnect".
Update macOS
If you want to minimize software issues, it is best to update your Mac when there are new updates. You can try to update your Mac's operating system and see if AirDrop fixes the issue.
1. In the upper menu, click on the Apple logo.
2. Go to "System Preferences".
3. In the "System Preferences" window, find and click on "Software Update".
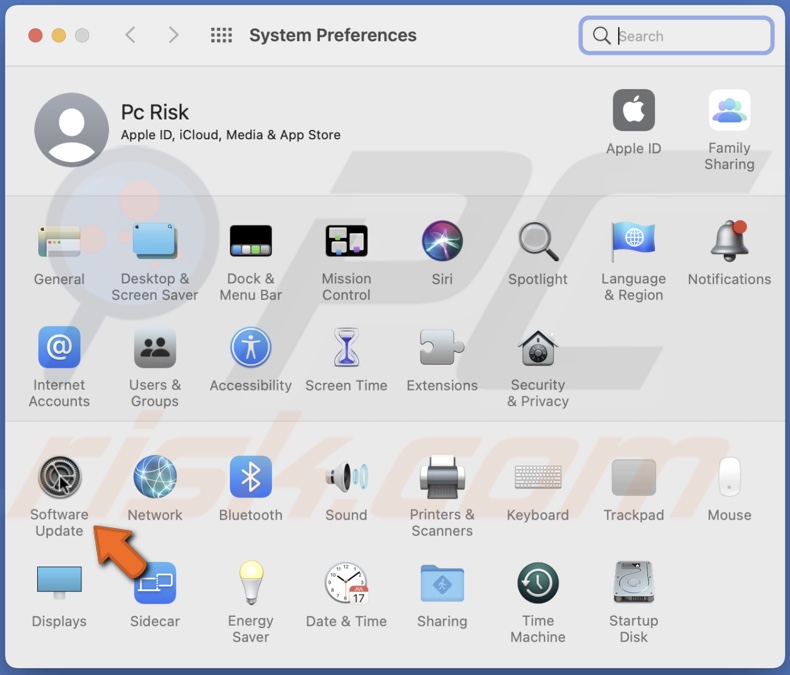
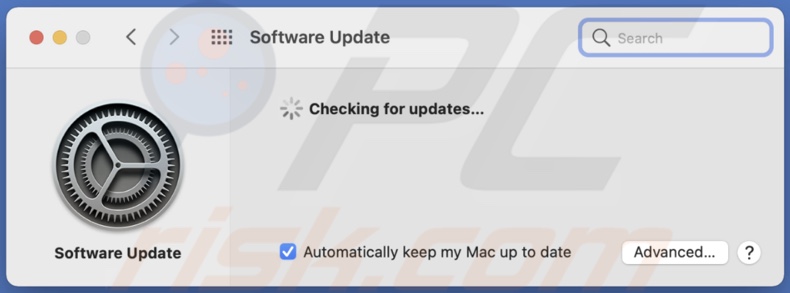
4. Wait for the system to finish checking for updates and if it finds any, update your Mac.
Let us know in the comments which method helped you to fix AirDrop not working correctly!
Share:

Karolina Peistariene
Author of how-to guides for Mac users
Responsible for collecting, analyzing, and presenting problem-solving solution articles related to macOS issues. Years of macOS experience combined with solid research and analyzing skills help Karolina provide readers with working and helpful solutions as well as introduce various features Mac has to offer.
▼ Show Discussion