How to Fix Blue Screen on Mac?

(updated)
Get Free Scanner and check your computer for errors
Fix It NowTo fix found issues, you have to purchase the full version of Combo Cleaner. Free trial available. Combo Cleaner is owned and operated by Rcs Lt, the parent company of PCRisk.com read more.
How to Fix Your Mac Stuck at the Blue or Gray Screen?
Either you are preparing to work on a project or watch a movie, it is not fun when you turn on your Mac and it is stuck on the Blue screen. Even though it is rare, it can happen suddenly, especially to older Macs. It appears when the OS encounters a critical error from which it can not recover. It is quite rare for Mac users to experience the Blue Screen of Death.

If you see a nearly black or gray screen with a message saying, "Your computer restarted because of a problem" or "You need to restart your computer," then it is probably a Kernal Panic. You could say that Mac's Kernal Panic is the equivalent of the Blue Screen of Death on Windows. A Kernal Panic usually appears when Mac encounters a critical error that it can not manage, and it automatically shuts down.
These errors can occur when your Mac has not enough RAM and hard drive space, the drives or plugins are outdated, disk permissions are broken, some apps are conflicting, peripherals are incompatible with your Mac, or there is an issue with the hardware. You can also encounter the Gray Screen. The problem is called "Gray Screen" because initially, the display would appear gray when the issue hit the device during the startup phase.
If you keep seeing the blue or gray screen after startup, follow the troubleshooting steps below.
Video on How to Fix Your Mac Stuck at the Blue or Gray Screen
Table of Contents:
- Introduction
- Method 1. Peripheral Issue
- Method 2. Boot in Safe Mode
- Method 3. Repair the Startup Drive From Another Drive
- Method 4. Repair the Startup Drive in Single-User Mode
- Method 5. Change Startup Drive Permissions
- Video on How to Fix Your Mac Stuck at the Blue or Gray Screen
Download Computer Malware Repair Tool
It is recommended to run a free scan with Combo Cleaner - a tool to detect viruses and malware on your device. You will need to purchase the full version to remove infections. Free trial available. Combo Cleaner is owned and operated by Rcs Lt, the parent company of PCRisk.com read more.
Peripheral Issue
As mentioned above, peripherals like USB or Thunderbolt devices that are not compatible with your Mac can cause the Mac to get stuck at startup. Before proceeding to other troubleshooting steps, the first thing you should do is check all peripherals connected to your Mac.
1. Turn off your Mac by pressing and holding the Power button for a few seconds until the Mac shuts off.
2. Disconnect all peripherals like USB and Thunderbolt cables.
3. Power on your Mac.
If the problem remains after disconnecting all peripherals from your Mac, proceed to the second step.
Boot in Safe Mode
Try booting your Mac in Safe Mode. It will verify the directory structure of the startup volume and repair it if necessary. It will also delete some of the startup caches that might prevent the Mac from starting successfully. And you will be able to access the Disk Utility window.
1. Startup your Mac and, at the same time, hold down the Shift key on your keyboard. It might take some time for the Safe Mode to boot.

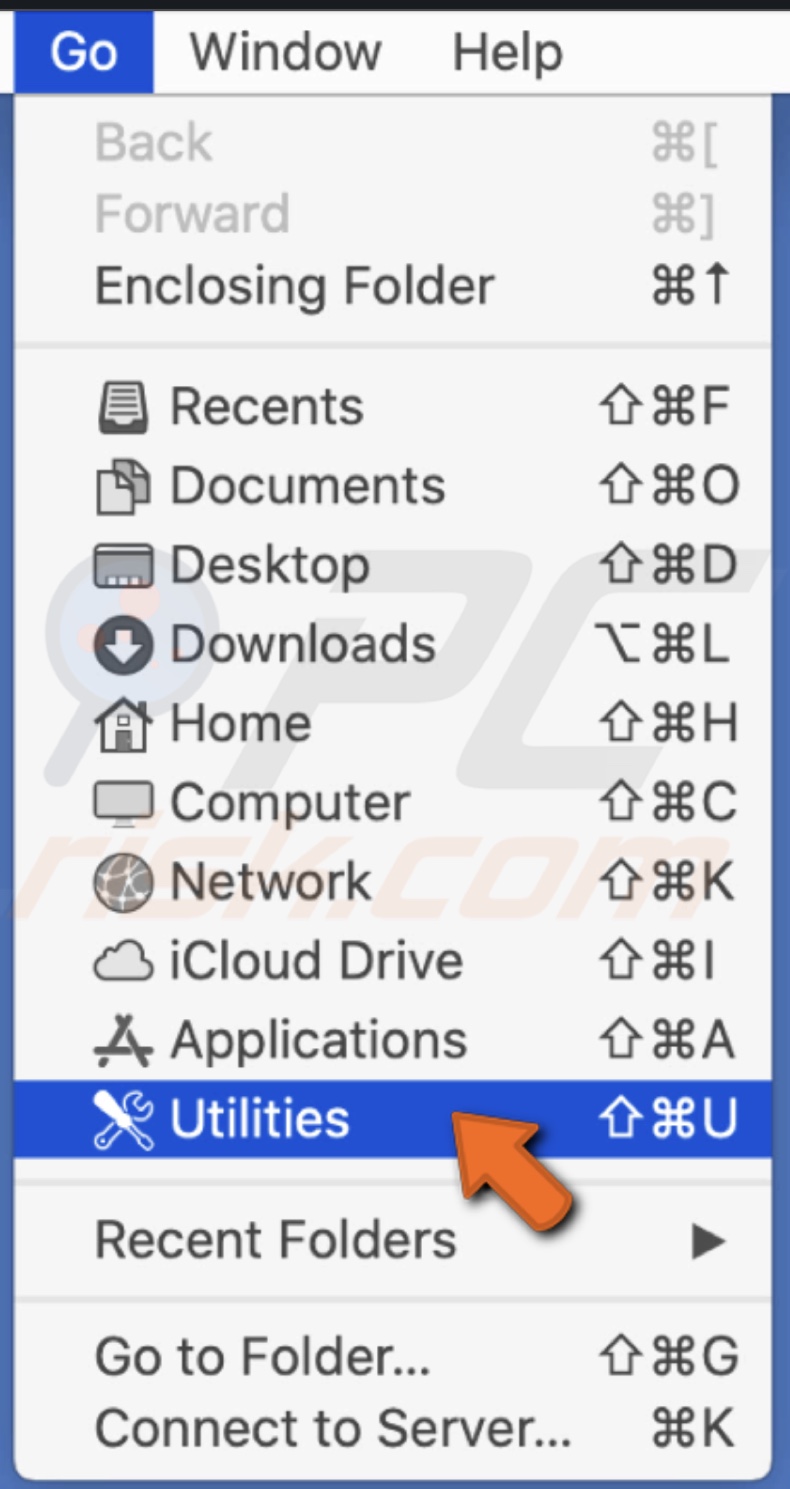
2. After you see the desktop, in the upper menu, click on "Go."
3. Go to "Utilities."
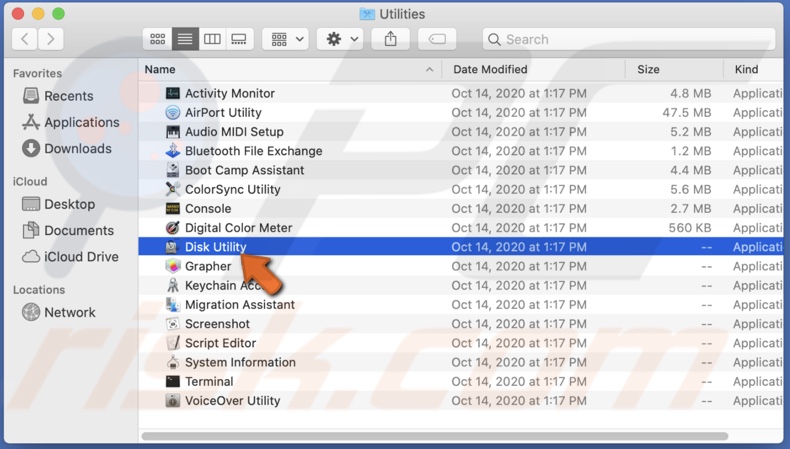
4. Find and open "Disk Utility."
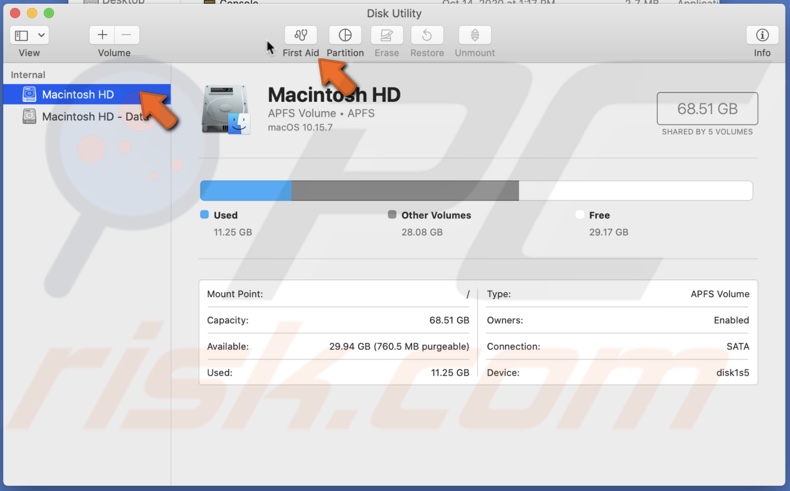
5. Select your drive and click on "First Aid."
6. Then click on "Run" and wait for the process to finish.
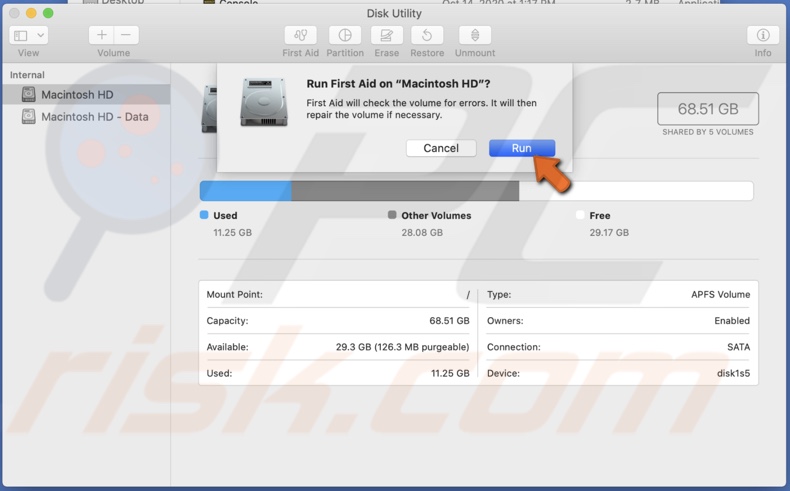
If you are asked, click on "Repair Disk." Then restart your Mac.
Safe Mode does not support all applications and OS X features as it is used only for troubleshooting and is not recommended to use on a day-to-day basis.
Repair the Startup Drive From Another Drive
You can try to repair the startup drive using Disk Utility. To do that, you will have to boot from another drive that has Disk Utility tools or the Recovery HD that is a partition on your startup drive or a DVD install disk because you can not start your Mac up.
Boot from a USB flash drive:
1. Insert a USB flash device.
2. Hold down the Option key on your keyboard and start up your Mac.
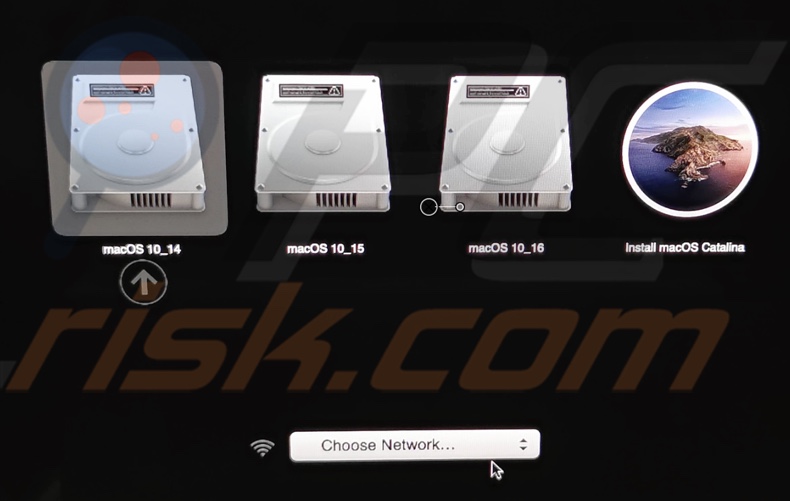
3. You will see the Mac OS startup manager appear, where you can choose the device to boot from.
Boot from a DVD install disk:
1. Insert the DVD into the Mac.
2. Restart your Mac and, at the same time, hold down the letter C key on your keyboard.
3. Follow the instructions on the screen.
If you are using OS X Lion or a later operating system, in that case, you can boot from the recovery disk.
Boot from a Recovery HD:
1. Restart your Mac and, at the same time, hold down the Command + R keys on your keyboard.
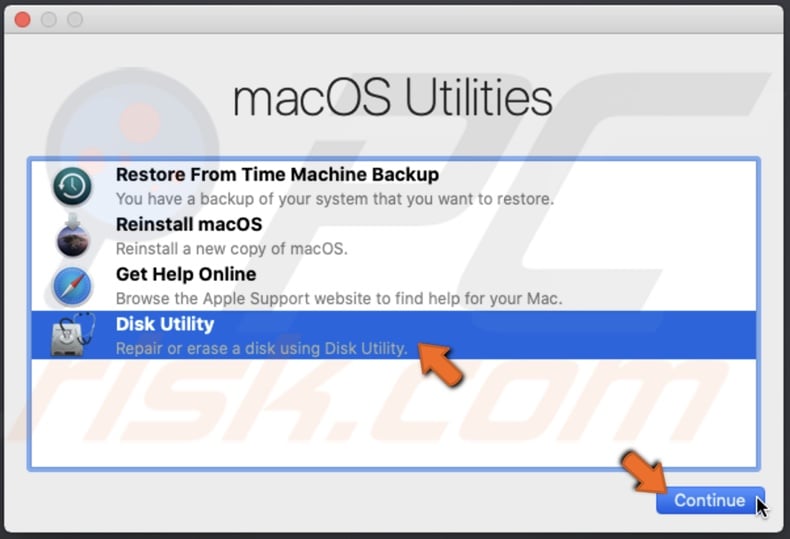
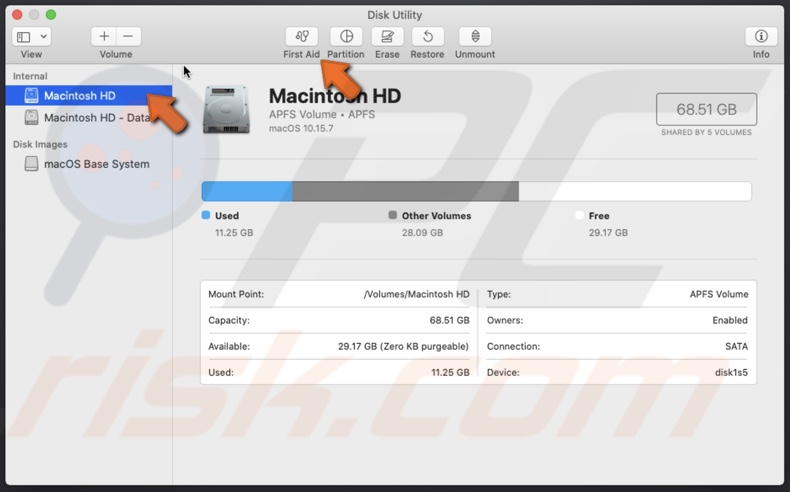
2. After your Mac boots, in the Disk Utility window, select your drive.
3. Click on "First Aid" and then on "Run." Wait for the process to finish.
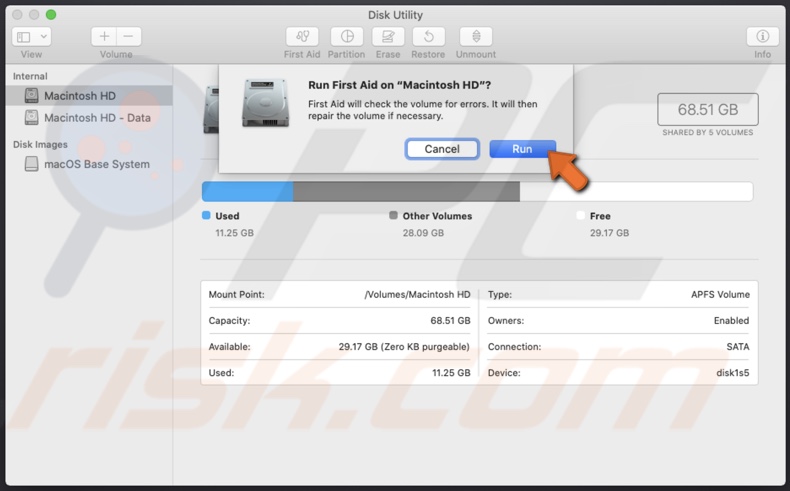
4. Verify to repair the drive if asked.
Repair the Startup Drive in Single-User Mode
If you only have your usual startup drive and no other startup option, you can repair the drive in single-user mode. It will allow you to work with your Mac using Terminal commands. It's possible because single-user mode does not require the startup drive to be completely functional.
1. Startup your Mac and, at the same time, hold down Command + letter S keys on your keyboard. Hold down the keys until you see a few lines of scrolling text.
2. In the command prompt, enter the command: /sbin/fsck -fy
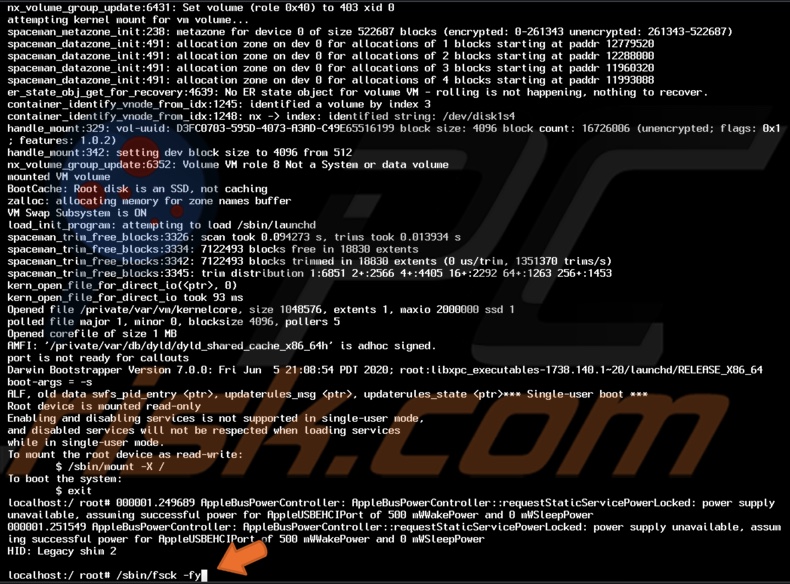
3. Wait for the fsck command to finish the process.
If you see the message "** The volume xxxx", it means no problems were found.
If you see the message "***** FILE SYSTEM W", it indicates that issues were found, and the fsck command tried to correct the errors on your hard drive. If you see this message continue to execute the fsck command until you see the message "volume xxx appears to be OK". If the message does not appear after five or more attempts, your hard drive has severe issues, and you might not be able to repair it.
Note that If you have encrypted your drive, you will need to select the relevant user account and decrypt it by entering your password. Single User mode is not available to you if you have a firmware password set on your Mac,
Usually, repairing the startup drive solves the problem. But keep in mind that it will likely appear again as your drive has issues, and you should probably consider replacing the drive in the near future.
Change Startup Drive Permissions
Try changing the startup drive permissions if non of the steps above helped.
Change permissions by booting from another drive:
1. Boot your Mac from another startup device.
2. Wait for your Mac to boot.
3. When you see the desktop, open Spotlight by pressing the Command + Space keys on your keyboard.
4. In the Spotlight, enter "Terminal" to open it. Or you can open it from the "Utilities" folder.

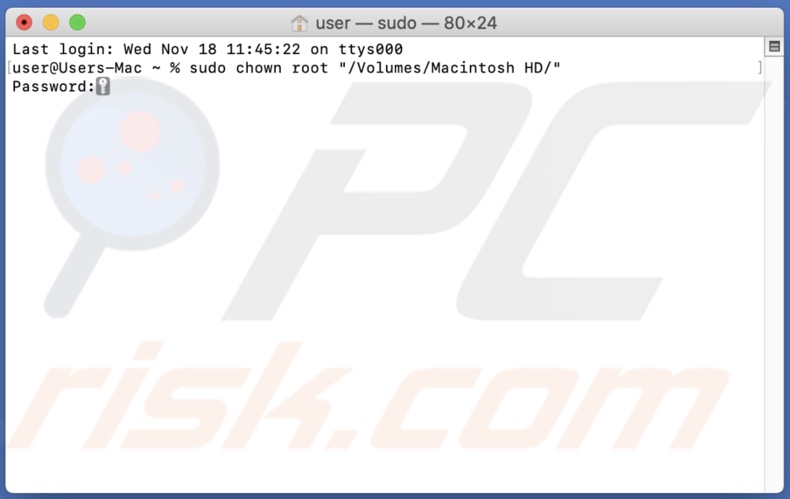
5. In the Terminal window, enter the command line: sudo chown root "/Volumes/startupdrive/"
Note that you have to replace the word 'startupdrive' with the name of your startup drive that is experiencing issues.
6. Enter your administrator password. The password characters will not be shown in the Terminal window.
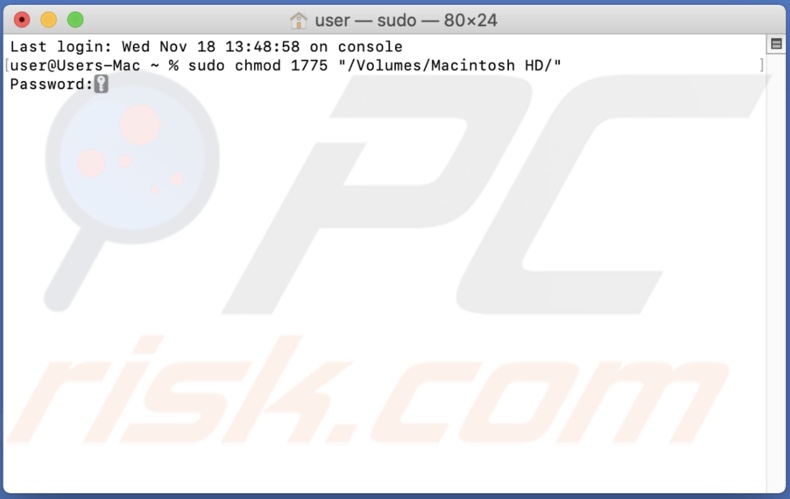
7. In the Terminal window, enter the command line: sudo chmod 1775 "/Volumes/startupdrive/"
Note that you have to replace the word 'startupdrive' with the name of your startup drive that is experiencing issues.
8. Restart your Mac.
Change permissions by using single-user mode:
1. Hold down the Command + S keys on your keyboard and start up your Mac. Hold down the keys until you see a few lines of scrolling text.
2. In the command prompt, enter the line: mount -uw /

3. Then enter the next command line: chown root /

4. Then enter the following command line: chmod 1775 /

5. Enter the last command line: exit

Your Mac will boot from the startup drive.
If none of the above troubleshooting steps helped, you should consider replacing your startup drive as it is probably too damaged to be repaired.
If you managed to repair your startup disk and boot your Mac successfully, let us know which method helped you in the comments!
Share:

Karolina Peistariene
Author of how-to guides for Mac users
Responsible for collecting, analyzing, and presenting problem-solving solution articles related to macOS issues. Years of macOS experience combined with solid research and analyzing skills help Karolina provide readers with working and helpful solutions as well as introduce various features Mac has to offer.
▼ Show Discussion