Mac or MacBook Can't Recognize My External Drive. How to Fix?

(updated)
Get Free Scanner and check your computer for errors
Fix It NowTo fix found issues, you have to purchase the full version of Combo Cleaner. Free trial available. Combo Cleaner is owned and operated by Rcs Lt, the parent company of PCRisk.com read more.
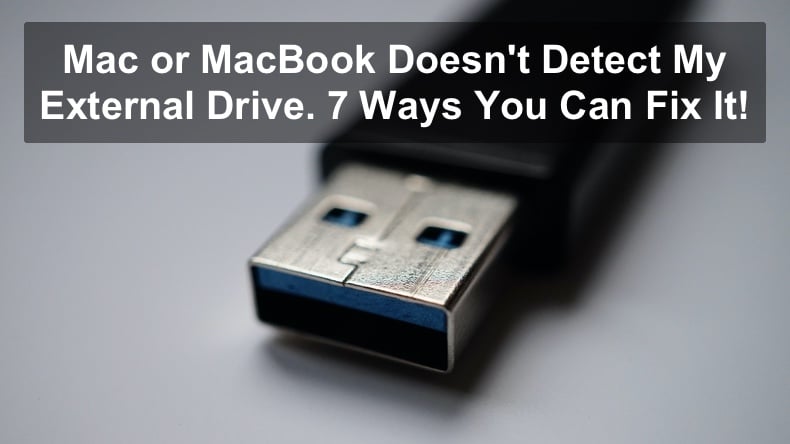
Mac or MacBook Doesn't Detect External Drive? 7 Ways You Can Fix It!
An external hard drive is a lifesaver when you need a lot of storage to store your files. What's great is that you can carry the drive with you wherever you go and efficiently move large files from one Mac to another. Due to large storage capacities, you can use your external hard drive as a storage backup for your Mac.
Unfortunately, sometimes Macs and MacBooks can't recognize the external drive. That can happen when you eject the external drive the wrong way by unplugging it from your Mac without ejecting it. Then when you plug it back in suddenly, your Mac can't recognize the drive.
There are more reasons why your Mac might not recognize your external drive. Follow the troubleshooting steps in this article to find out the problem and fix it.
Video on Mac or MacBook Doesn't Detect My External Drive. 7 Ways You Can Fix It!
Table of Contents:
- Introduction
- Method 1. Check Your Settings
- Method 2. Run Disk Utility
- Method 3. Reformat External Drive
- Method 4. Remount External Drive Using Terminal
- Method 5. Reset NVRAM
- Method 6. Reset SMC
- Method 7. Inspect The External Drive via Console
- Video on Mac or MacBook Doesn't Detect My External Drive. 7 Ways You Can Fix It!
Download Computer Malware Repair Tool
It is recommended to run a free scan with Combo Cleaner - a tool to detect viruses and malware on your device. You will need to purchase the full version to remove infections. Free trial available. Combo Cleaner is owned and operated by Rcs Lt, the parent company of PCRisk.com read more.
Check Your Settings
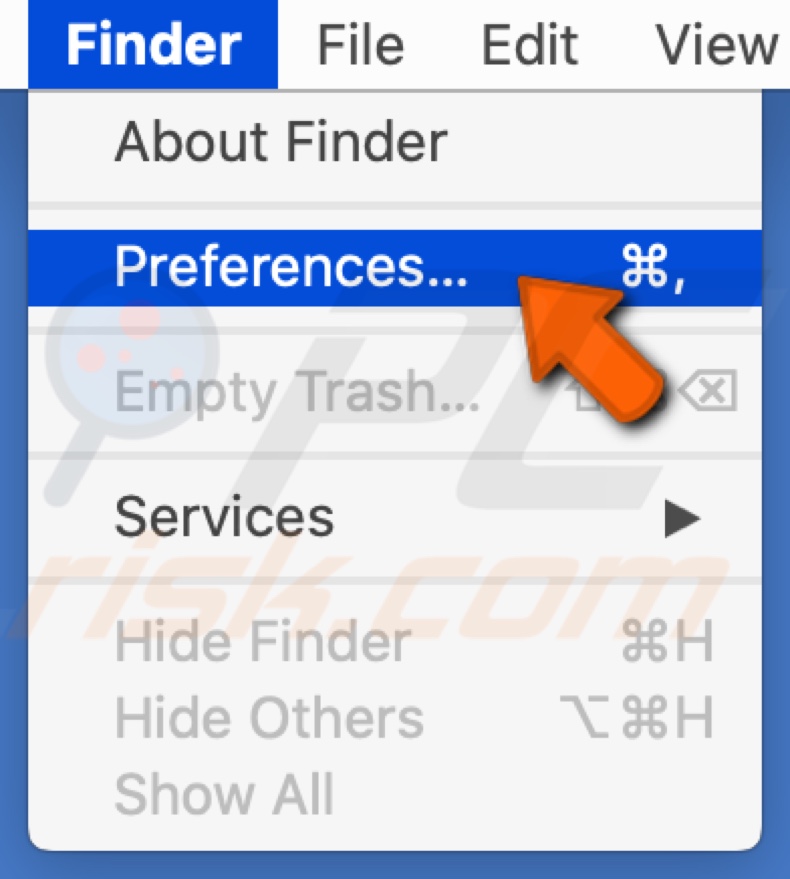
Before proceeding to more complex troubleshooting steps, check your settings if hard and external disks are set to be shown on the desktop.
1. Go to the upper menu and click on the "Finder" menu.
2. Go to "Preferences."
3. In the "General" tab under "Show these items on the desktop", check the boxes next to "Hard disk" and "External disk."
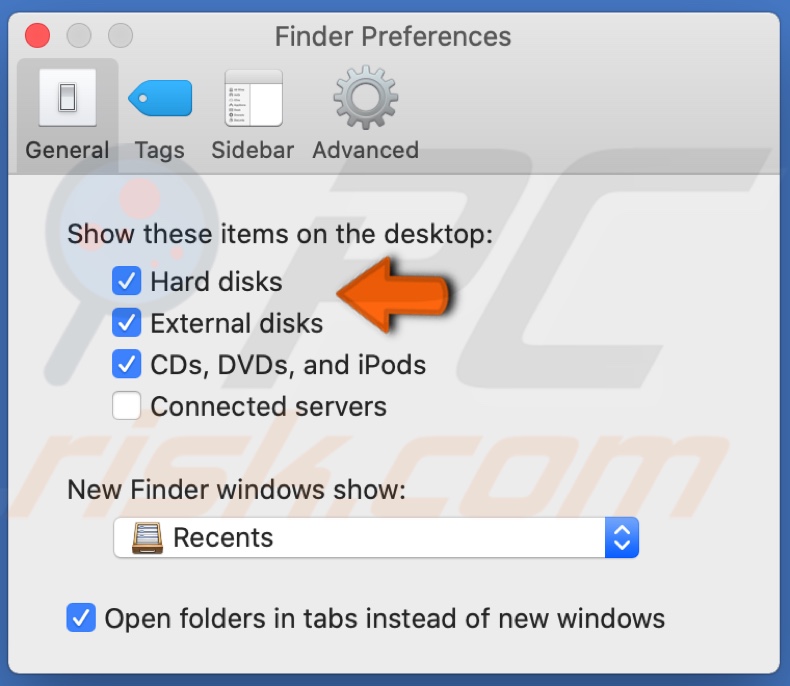
If the boxes are checked and you don't see the external drive on your desktop, proceed to the next step.
Run Disk Utility
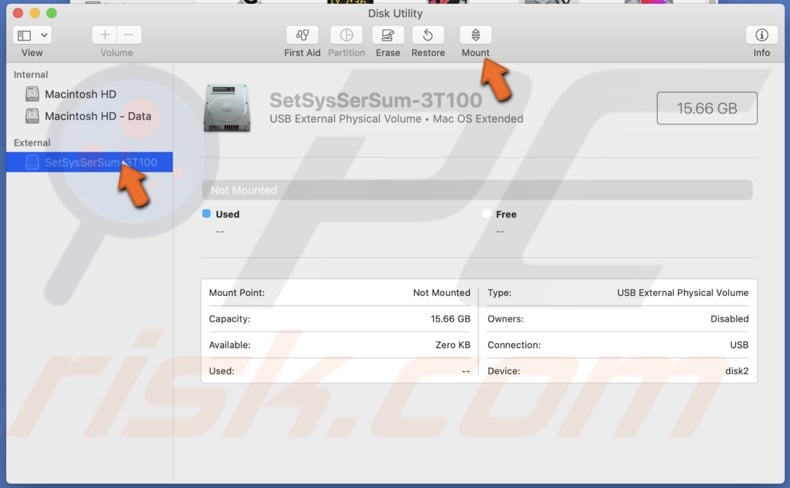
Go to Disk Utility and look up if your external drive is visible there. Run First Aid to find the issue with your drive.
1. In the upper menu, click on the "Go" menu and select "Utility."
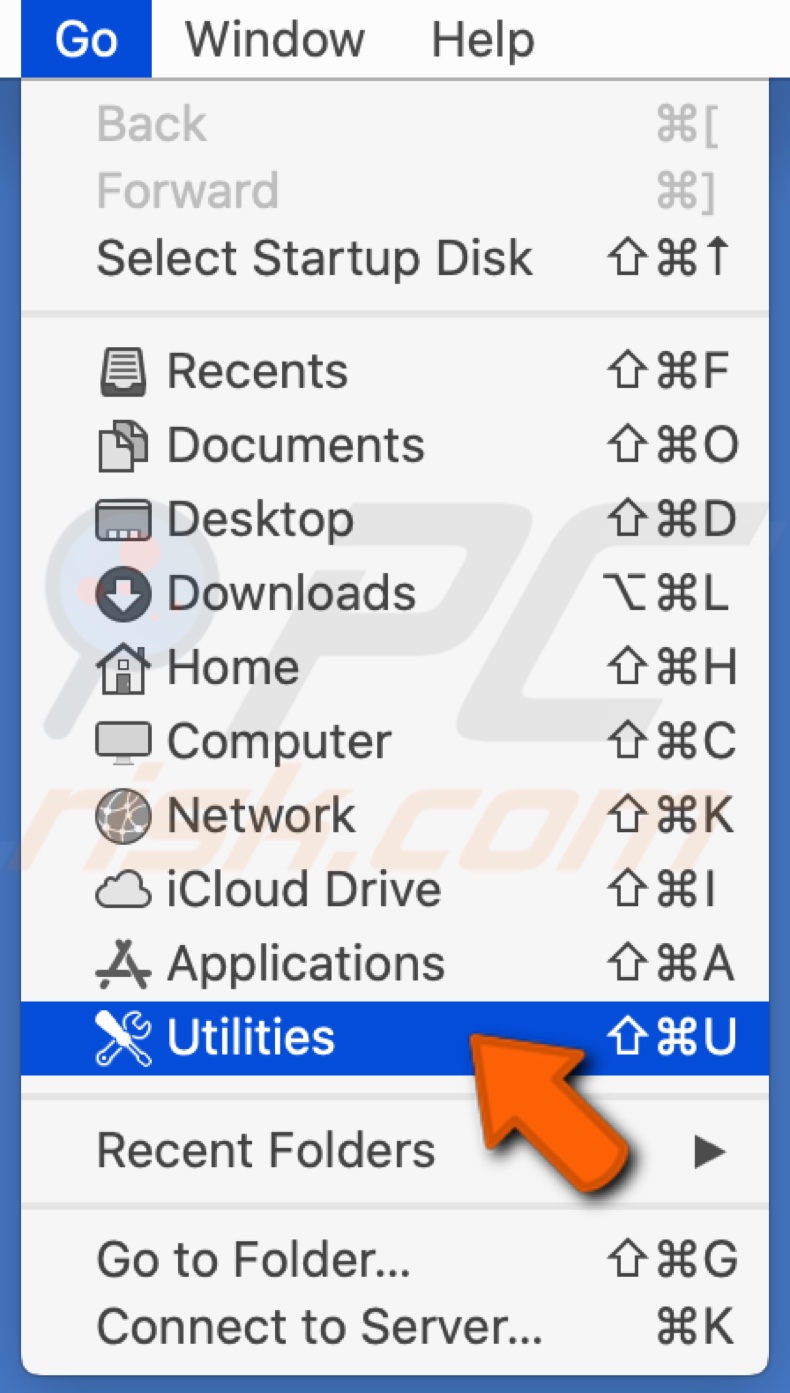
2. In the Utility window, find and click on "Disk utility."
3. If you see your external drive in the Disk Utility window, but it shows that it's not mounted, select the drive and click on the "Mount" button.
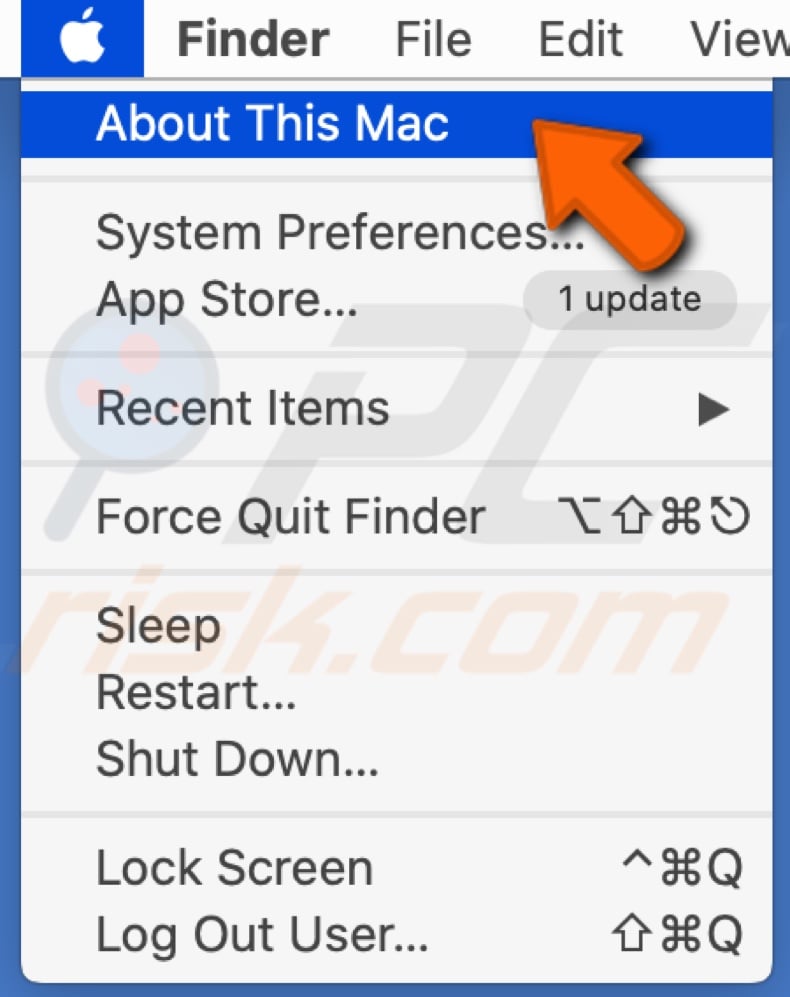
4. Then, go to the upper menu and click on the Apple logo.
5. Click on "About This Mac."
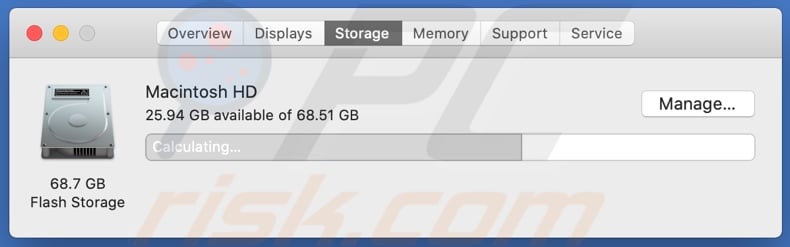
6. Go to the "Storage" tab. If you can't see your external drive there, go back to the "Disk Utility" window.
7. Select the drive and click on "First Aid."
8. Then click on "Run" and wait for the process to finish.
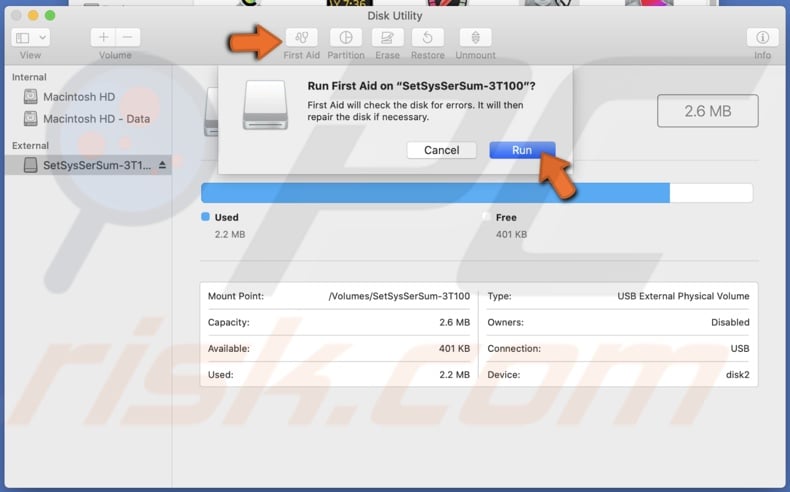
The First Aid option will check the disk for errors and then repair the disk if necessary. Click on "Repair Disk" if you see this option pop up.
Reformat External Drive
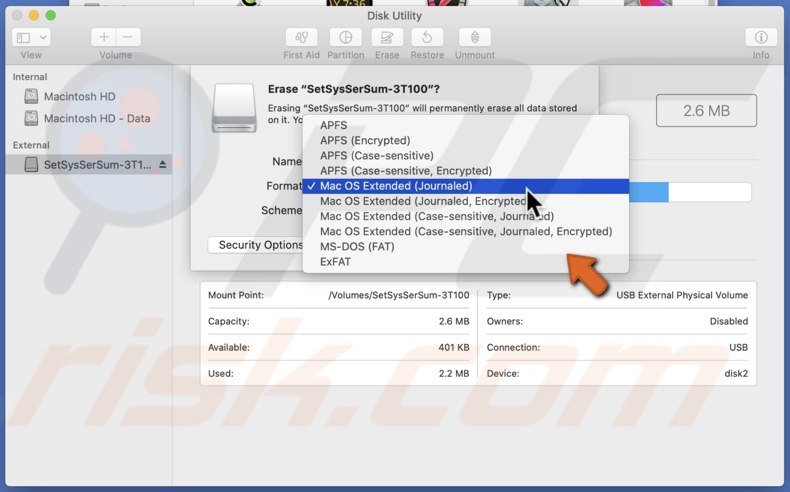
If you see your drive in the Disk Utility window but could not mount it to your Mac, you might have a disk format issue. In this case, you need to reformat the drive. PCs with Windows operating systems use the New Technology File System (NTFS). In contrast, Macs with macOS operating systems use the Hierarchical File System (HFS+). By default, USB flash drives and other external drives are formatted with the NTFS file system - this works great on PCs, while Macs can read data in the format but struggle to write it. Fortunately, you can format your external drive with the File Allocation Table (FAT32) or Extended File Allocation Table (ExFAT) file system.
Format FAT32 [on a Mac, known as MS-DOS (FAT)] is fully compatible with all versions of Windows and Mac operating systems. Therefore, even the oldest operating system versions, Windows XP SP1 and OS x 10.5 Leopard are compatible. The FAT32 file system is also supported by Xbox 360, PlayStation 3, and most cameras. Unfortunately, this particular file system does have file size restrictions. The maximum size of supported files is 4GB which means you can't write files larger than 4GB. Also, you can't create a startup drive for Macs within storage media that uses the FAT32 file system. Suppose you are not planning to use external storage to transfer large files or create executable partitions (such as a Mac startup drive). In that case, the FAT32 format can be a great option.
ExFAT is a file system format that has an advantage over the FAT32 file system. It has no restrictions on file or partition sizes. Therefore, you can write a 1TB size file and create partitions of 5TB within the device. Despite the improved data size, some older versions of operating systems are no longer compatible with this file system format. The oldest versions of operating systems compatible with ExFAT are Mac OS X Snow Leopard 10.6.5 or later, OS X Lion, Windows XP SP2, or later (with an additional update for exFAT support, Windows Vista SP1 or later and Windows 7.
Unfortunately, the ExFAT file system format is not supported by various cameras, video game consoles, and other devices that can read and/or write to external storage. If you will be using a USB flash drive or external storage device with any of these devices, the required format is FAT32. If the drive is to be used only with computers with modern versions of operating systems, the recommended format is ExFAT.
Format external drive:
1. In the upper menu, click on the "Go" menu and select "Utility."
2. In the Utility window, find and click on "Disk utility." In the Disk Utility window, select your drive.
3. Click on the "Erase" option.
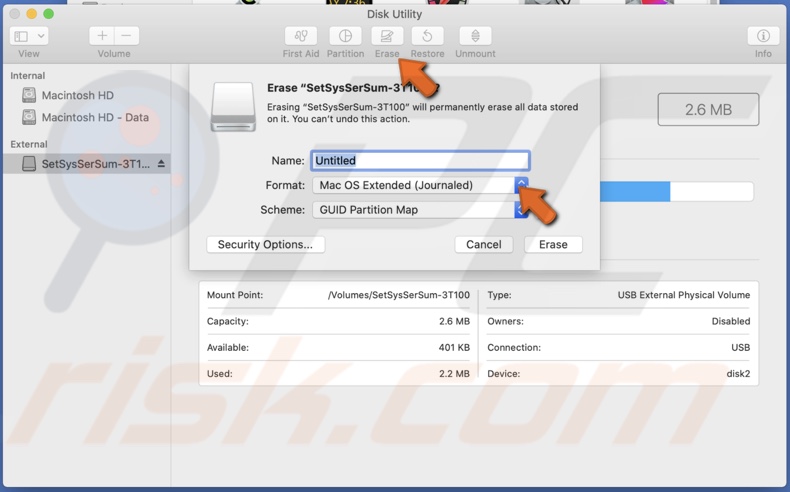
4. Choose the disk format as ExFAT, MS-DOS (FAT), or Mac OS Extended (Journaled).
5. Click on "Erase."
6. Then, go to the upper menu and click on the Apple logo.
7. Click on "About This Mac."
8. Go to the "Storage" tab to see if your external drive is visible.
Remount External Drive Using Terminal
First, check if the system recognizes your drive. If it does see that the external drive is plugged into your Mac, but it doesn't show up, try to remount the drive using Terminal.
1. Then, go to the upper menu and click on the Apple logo.
2. Click on "About This Mac."
3. Go to the "Storage" tab to see if your external drive is visible.
4. Open Spotlight by pressing Command + Space keys on your keyboard.
5. In the Spotlight, enter "Terminal" to open it.
6. In the Terminal window, enter: diskutil list
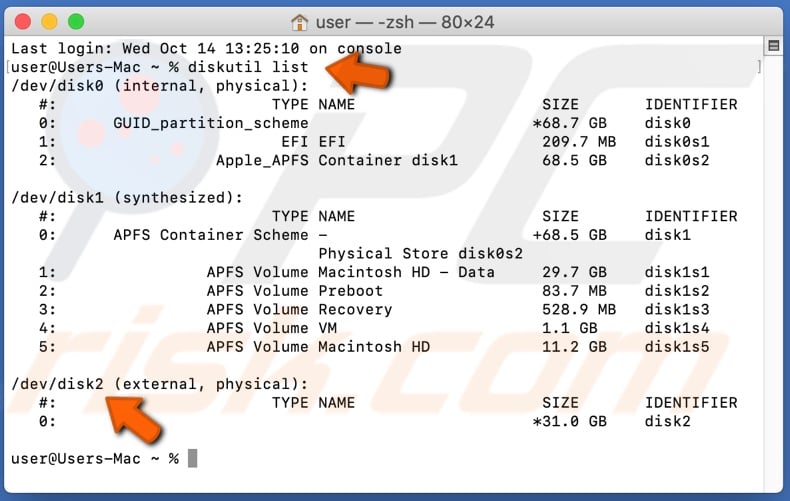
The "diskutil list" command will display the essential information about all available drives and volumes attached.
7. Then search for /dev/disk_ (external, physical). Make sure to remember the number following after the word "disk."
8. In the same Terminal window, enter another command line: diskutil info disk(digit)
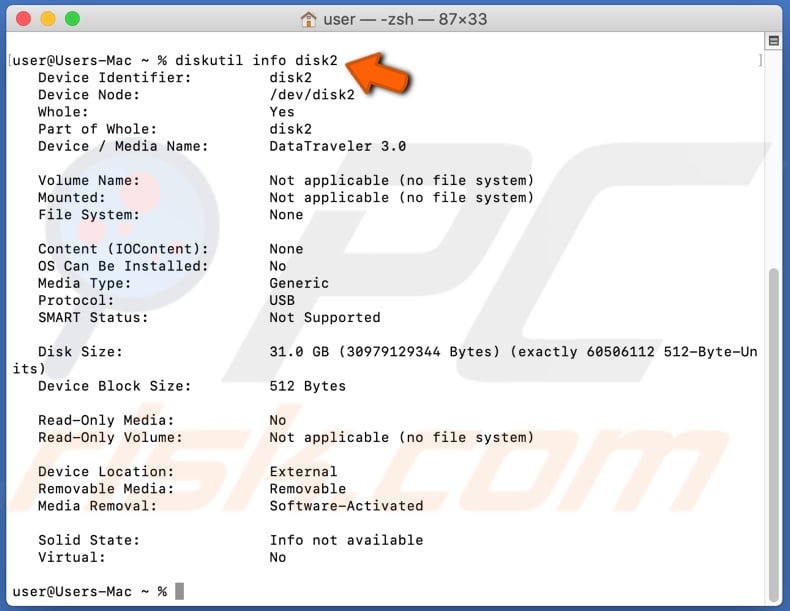
9. After that, eject your disk by entering the command: diskutil eject disk(digit)
10. After executing the eject command, check if it was removed by entering the command line: diskutil list
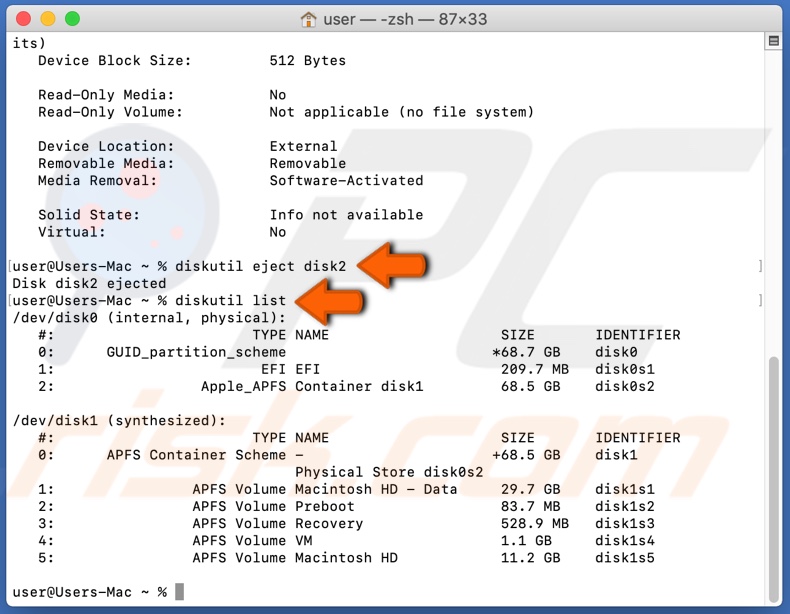
If you don't see your drive in the list, that means you removed it successfully. Then remove the drive physically from your Mac.
Reset NVRAM
Nonvolatile Random Access Memory (NVRAM) stores hard drive information. If NVRAM has encountered bugs, your external drive not showing up can be the cause of it. In this case, it's best to reset NVRAM.
1. Restart your Mac.
2. When you hear the startup sound, simultaneously hold down Command + Option + P + R keys on your keyboard for 20 seconds.
3. When you hear the startup sound for the second time, you can let go of the keys.
If you have a newer Mac, you don't need to restart your Mac to reset NVRAM. Just hold down the keys for 20-30 seconds, and the NVRAM will be reset.
Reset SMC
If your Mac or MacBook shuts down after connecting your external drive, that means the drive consumes too much power from the USB port. If your drive can't connect to an additional power source and the issue keeps on repeating, try resetting SMC (System Management Controller).
If the battery is integrated:
1. Shut down your Mac.
2. Unplug all peripherals.
3. Simultaneously hold down Shift + Control + Option keys on your keyboard together with the Power button for 10 seconds. If you have a MacBook Pro, the Touch ID button is also the power button.
4. Then reconnect your power cable and other devices.
5. Turn on your Mac.
If the battery is removable:
1. Shut down your Mac.
2. Unplug all peripherals and remove the battery.
3. Press and hold the Power button for 5 seconds.
4. Insert the battery and connect your Mac to the power source.
5. Turn on your Mac.
Inspect The External Drive via Console
The Console app can be handy in times of trouble. It displays log information that helps to troubleshoot problems on your Mac. It won't fix the problem but will provide information to diagnose the problem.
1. In the upper menu, click on the "Go" menu and select "Utility."
2. In the Utility window, find and click on "Console."
3. Select the "Error and Faults" tab.
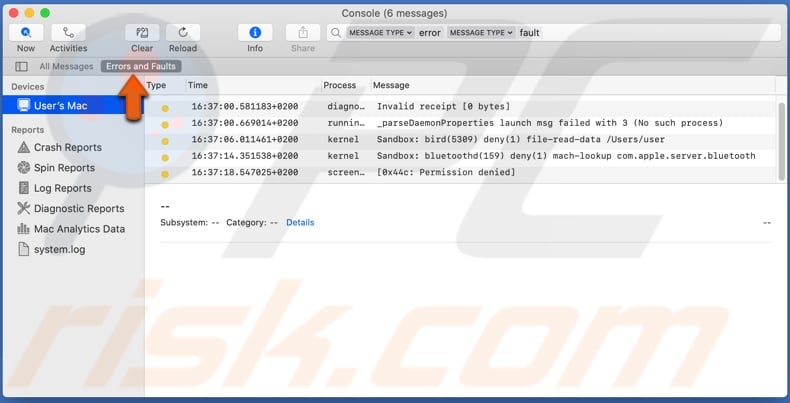
4. Plug in your external drive to your Mac.
5. Then look to see if it detects your drive or if there's an error. If no errors pop up and nothing happens, then your problem is not with the external drive.
Let us know in the comments which solution helped you fix the problem!
Share:

Karolina Peistariene
Author of how-to guides for Mac users
Responsible for collecting, analyzing, and presenting problem-solving solution articles related to macOS issues. Years of macOS experience combined with solid research and analyzing skills help Karolina provide readers with working and helpful solutions as well as introduce various features Mac has to offer.
▼ Show Discussion