How to Block Unwanted Messages on Mac and iPhone/iPad?

(updated)
Get Free Scanner and check your computer for errors
Fix It NowTo fix found issues, you have to purchase the full version of Combo Cleaner. Free trial available. Combo Cleaner is owned and operated by Rcs Lt, the parent company of PCRisk.com read more.
How to Block Advertising and Other Unwanted Messages on Your Mac and iOS Device?
Many developers began to create spam messages promoting various websites. These people include cybercriminals who send emails with messages stating that recipients have won a lottery, received a package via a delivery services company, or failed their last financial transaction.
Today, emails are not the only system used to spread spam and junk messages. For example, phone numbers are also used to send them. Fortunately, most popular email systems apply content filters, including Apple, which includes this feature in their mobile operating system, iOS, used on iPhones and iPads. Below is a guide showing how to set email filters and block unwanted contacts on your mobile Apple device.
Video showing How to Block Unwanted Messages on Mac?
Table of Contents:
- Introduction
- Enable mail filtering and blocking features via Mail application
- Enable mail filters within email systems
- Block unwanted text messages
- Block contacts via FaceTime application
- Video showing How to Block Unwanted Messages on Mac?
Download Computer Malware Repair Tool
It is recommended to run a free scan with Combo Cleaner - a tool to detect viruses and malware on your device. You will need to purchase the full version to remove infections. Free trial available. Combo Cleaner is owned and operated by Rcs Lt, the parent company of PCRisk.com read more.
Enable mail filtering and blocking features via Mail application
Apple has included several valuable functions, such as filtering junk mail and mail blocking rules with their Mail application. This is to improve Mac users' experience when using email. We recommend that you try the automatic junk mail filtering function.
1. Launch the Mail application, click on Mail in the menu bar at the top of the screen, and select Preferences. Alternatively, press the keyboard shortcut of Command and Comma (,) to enter applications Preferences.
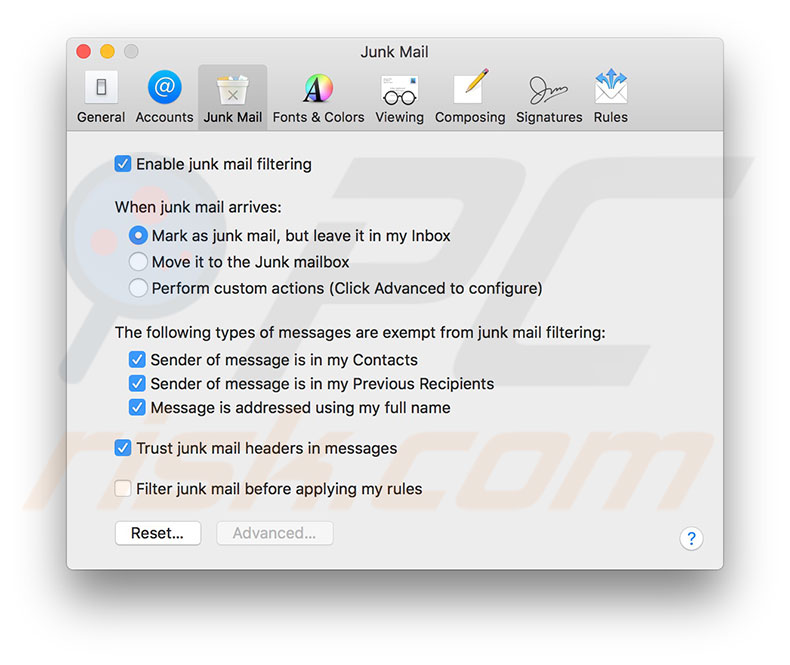
2. A new window will pop up. Select the Junk Mail tab at the top of the window to access preferences related to automatic junk mail filtering.
3. The 'Enable junk mail filtering' option is usually enabled by default. However, if you see a white box, click to select.
4. Below, you will find options separated into two categories: 'When junk mail arrives:' and 'The following types of messages are exempt from junk mail filtering:'. Under the first category, we recommend that you choose the 'Mark as junk mail, but leave it in my Inbox'. This option will eliminate the possibility that essential emails might be hidden in the Junk folder.
5. If you are receiving numerous junk emails, you should consider choosing one of the following options.
Another valuable and efficient feature is blocking rules. You set the rules, and if received emails match these conditions, the Mail application will automatically apply actions you set within the rules tab.
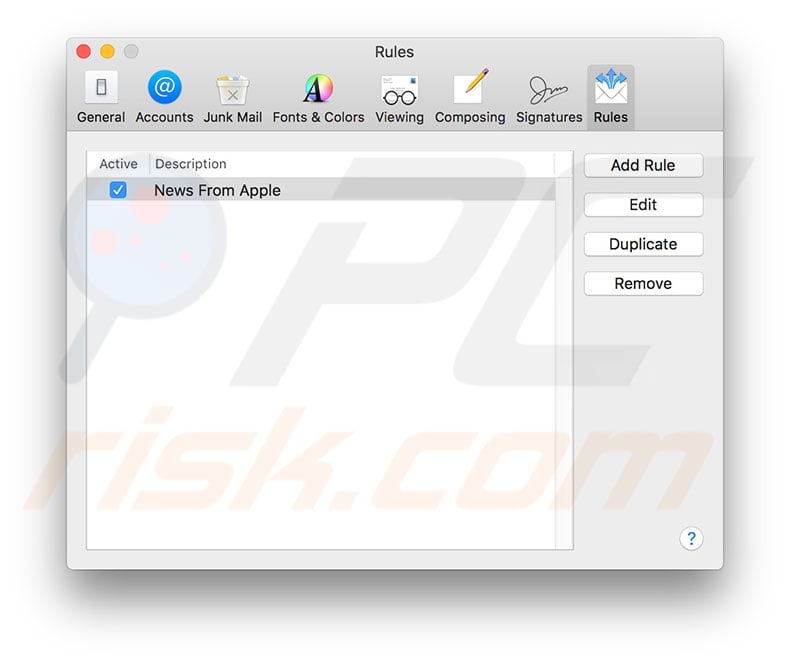
1. To begin, click the Rules tab at the top of the Mail preferences window and click Add Rule.
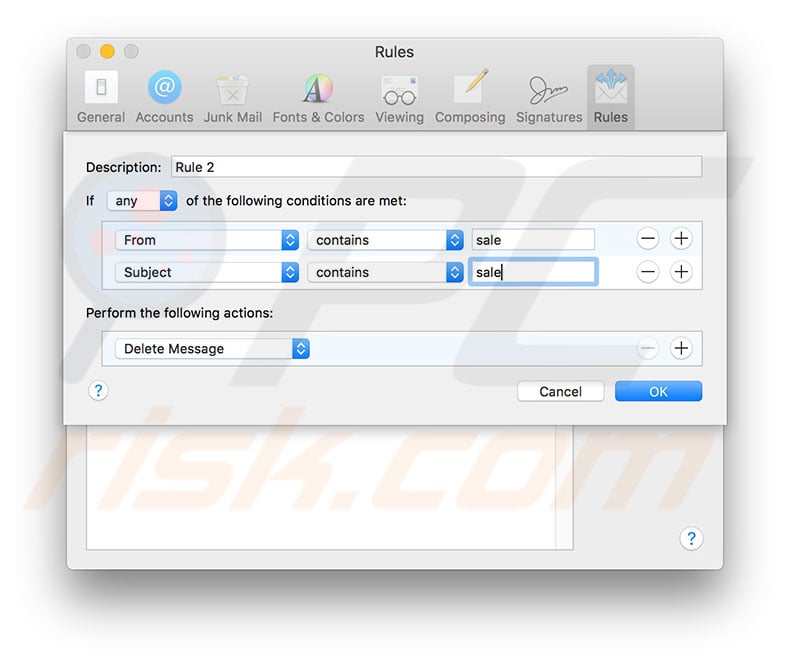
2. A new window will pop up in which you can set the name, add as many conditions as you wish, and select the action to be automatically performed by the Mail app.
In the screenshot below, we have set a rule: if the sender's address or the subject contains the word 'sale', the message will automatically be moved to the Trash folder. In this way, you can create a personal filter. This feature is handy when you wish to keep the inbox clean and receive only important emails.
Enable mail filters within email systems
Email systems such as Gmail, Yahoo, Aol, and others, attached some filtering engines to their systems to reduce the amount of spam and potentially risky messages delivered to users. Google introduced its 'Block' feature in September 2015. However, many users are unaware of this feature or simply ignore it.
We recommend that you enable this function since these emails remain in the Spam folder. To prevent any possible threats, you should set an automated filter to move these emails to Trash.
1. Sign in to your Google mail system on the computer.
2. Open the Inbox folder and select an unwanted/spam email by clicking on the small checkbox beside it.
3. Then click the More button to expand the drop-down menu with available options. Select the 'Filter Messages like these' option from the list.
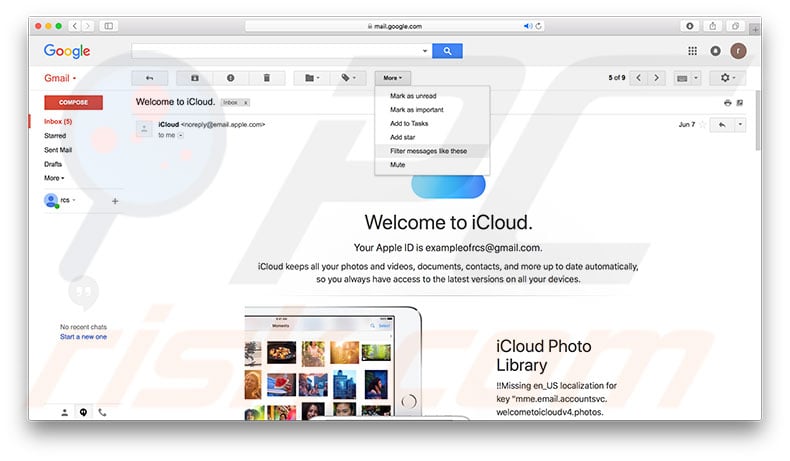
4. The new window will pop up. At the top, you will see a field called 'from' and the sender's email address. Below, you will see a list of available actions applied when an email is received from this particular sender. If you wish to automatically move these messages to Trash, select the 'Delete it' option and click the Create filter button.

5. If you have opened the email, click on the down arrow at the top right corner to expand the list with available options and select the Block option.
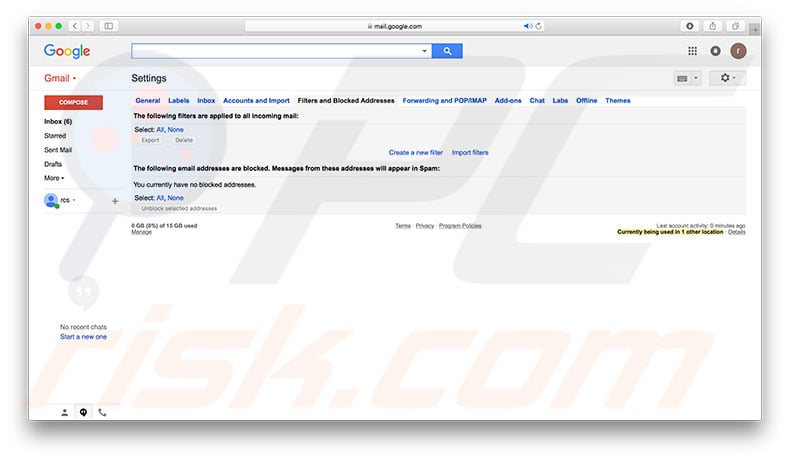
6. If you believe you might be missing some emails or are keen to check how many and from whom messages were blocked, you can review the list by clicking the gear icon at the top right corner while signed-in to your Gmail account and then select Settings.
7. Choose the Filters and blocked addresses tab. You can change settings within the same tab.
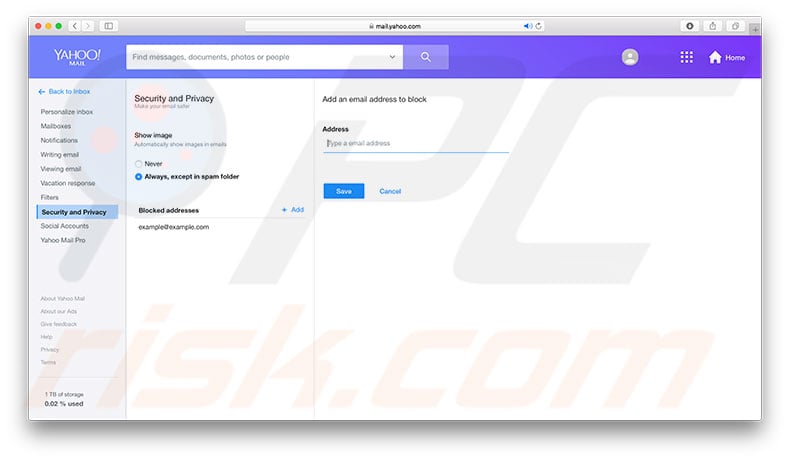
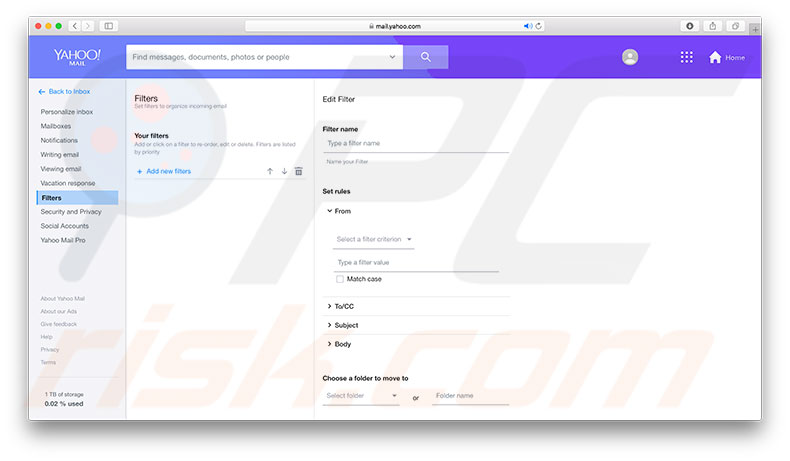
If you use the Yahoo mail system, you can block a specific email address or the whole domain. Blocking the domain will reject all messages regardless of the name. For example, blocking the mailsystem.com domain will reject all messages from email addresses regardless of any name given before the '@' symbol.
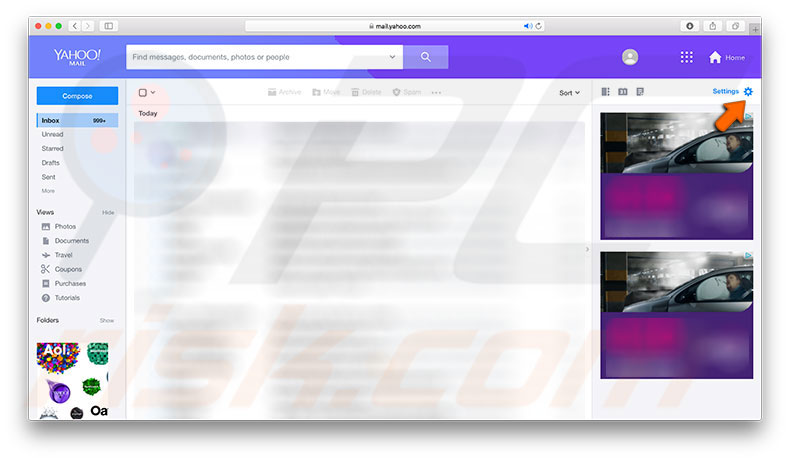
1. To set up this filter, sign in to your Yahoo email account and click the gear icon.
2. Then click More Settings.
3. From the list in the left-hand sidebar, select the Security and Privacy category.
4. You will see the block option-click add. Type the address you wish to block. There is also a filters option.
5. In the left-hand sidebar, choose Filters.
6. Click Add new filters and set conditions and actions that will be automatically applied to incoming messages.
Using the Aol email system, you can block up to 1000 email addresses and domain names.
1. Sign in with your account and click the Mail icon, and then choose Settings.
2. Select Spam Controls and click Edit Spam Controls.
3. In the Sender Filter window, click the 'Block mail from addresses I specify' option and complete the text field with the email address you wish to block. You can add multiple addresses by separating each with a comma.
4. Finally, click Save. All emails received from listed senders will now be blocked automatically.
Block unwanted text messages
There are various reasons why you might want to block certain text messages. For example, intrusive advertisements or messages from unwanted past contacts. Whatever the reason, blocking contacts is simple in the Messages application.
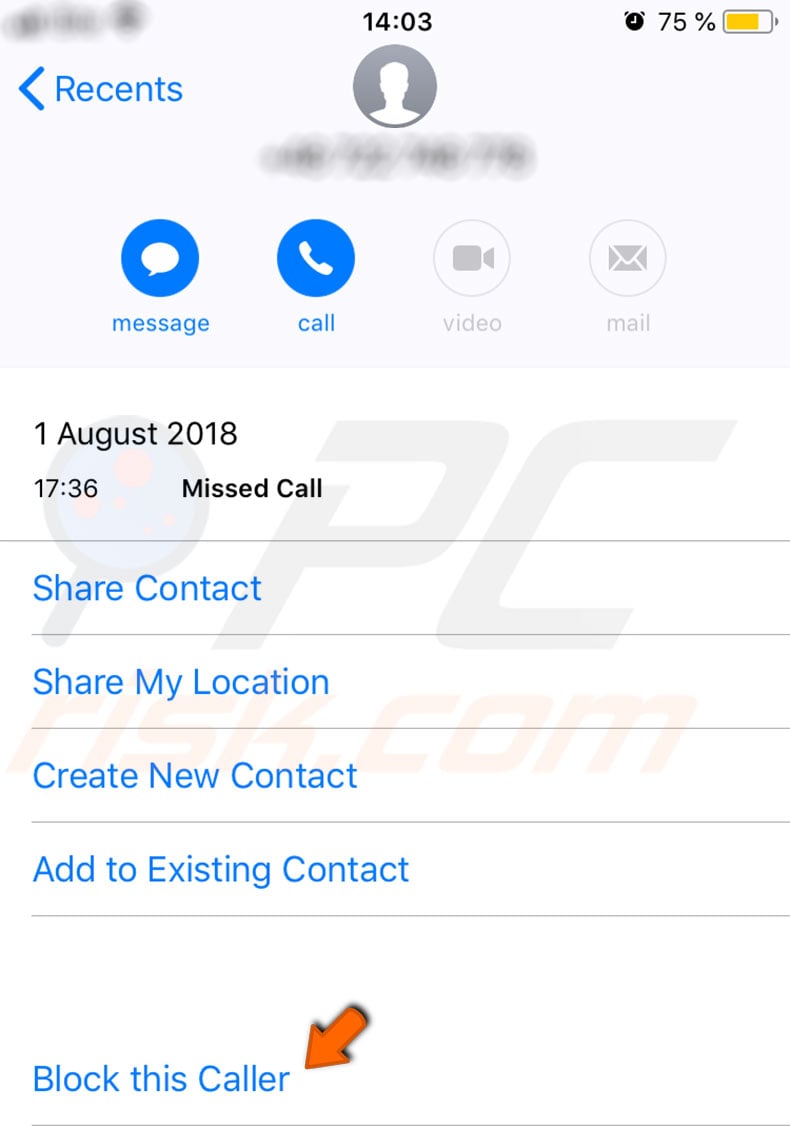
1. Open the application and tap the Information icon at the top right corner of the screen.
2. Then tap the sender number.
3. Tap Block this Caller in the list of available options.
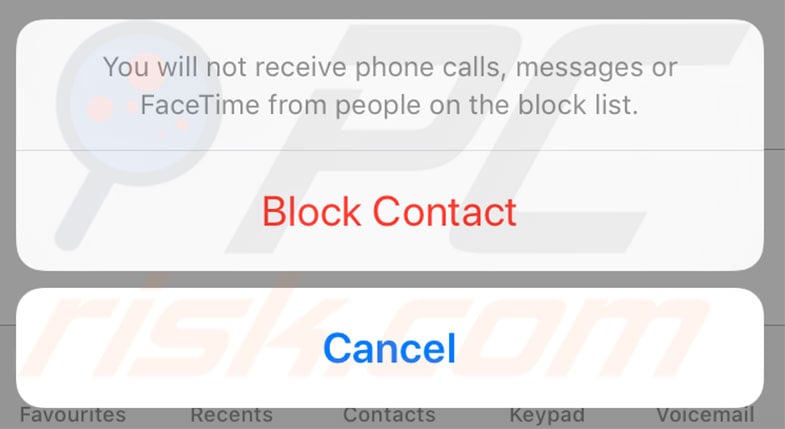
4. You will be prompted to confirm your actions. Tap Block Contact.
5. Once you have confirmed to block the contact, you will no longer receive any messages, phone calls, or FaceTime requests from this particular contact. If you change your mind, you can always review and edit the list of blocked contacts by going to Settings - select Messages and go to Blocked.
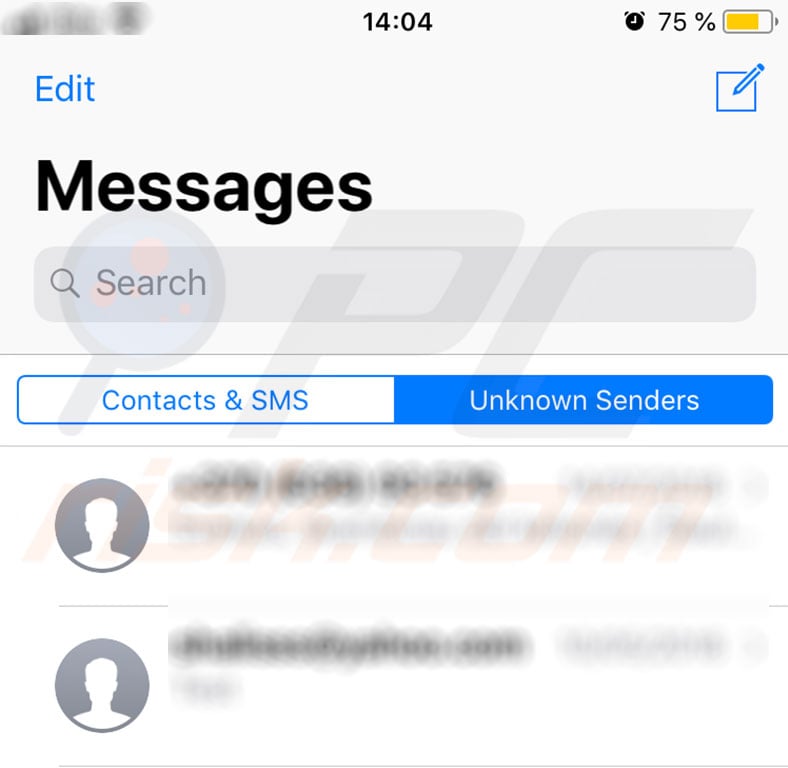
The iOS contains another useful feature worth mentioning on this topic: Filter Unknown Senders. When you turn on this function, the iPhone or iPad will not display any notifications about iMessages received from Unknown Senders. Furthermore, all received messages will be sorted into two separate tabs: Contacts & SMS and Unknown Senders.
1. To enable this function, go to your mobile device Settings.
2. Select Messages, scroll down until you find the 'Filter Unknown Senders' option, and then toggle it to 'on'.
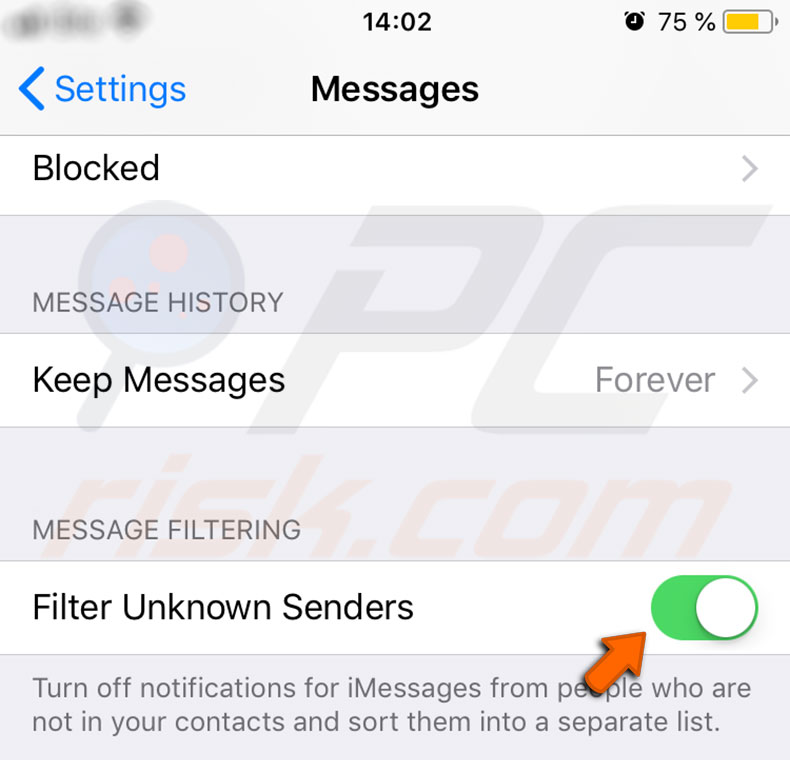
3. From this point, all messages will be sorted under two separate tabs.
Block contacts via FaceTime application
This method is similar to the one described above. However, it is helpful if you are only receiving unwanted calls via the FaceTime application.
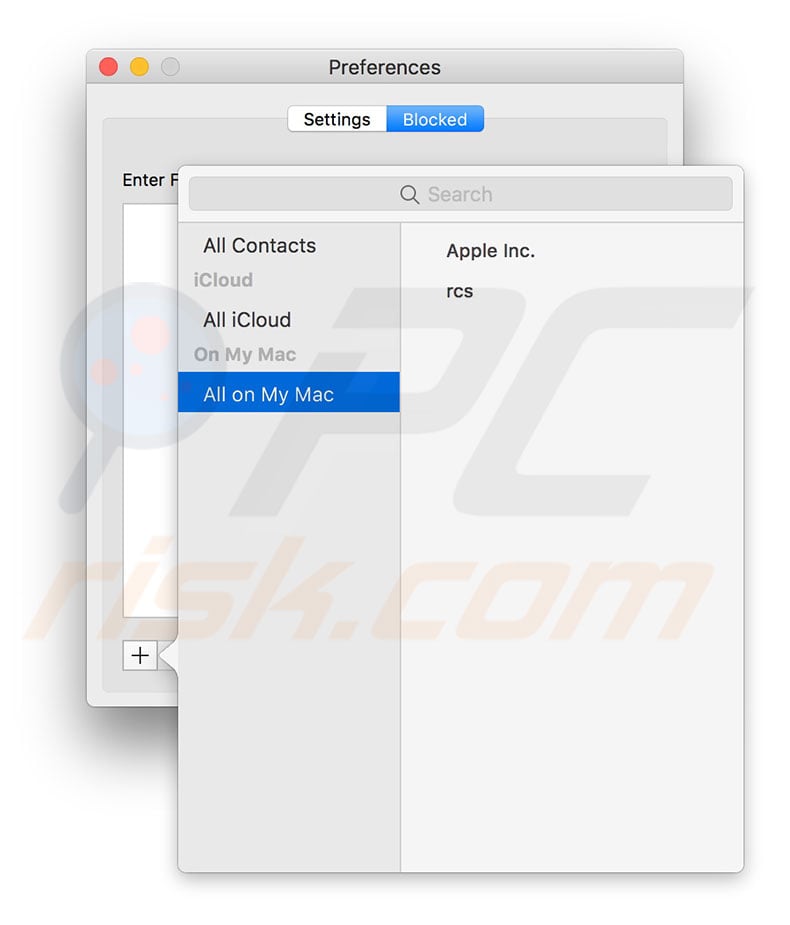
1. Launch the app and go to Settings by clicking FaceTime in the menu bar at the top of the screen to block specific contacts.
2. Then select Preferences. Alternatively, use the keyboard shortcut of Command and Comma (,).
3. Select the Blocked tab and click the Add (+) button at the bottom left corner of the window.
4. Then select the contact from the list. To block contacts on your iOS device, go to Settings, choose FaceTime, and tap on Blocked.
5. You will see a list with already blocked contacts and also the Add new button. Tap it and select from the list to add.
Share:

Karolina Peistariene
Author of how-to guides for Mac users
Responsible for collecting, analyzing, and presenting problem-solving solution articles related to macOS issues. Years of macOS experience combined with solid research and analyzing skills help Karolina provide readers with working and helpful solutions as well as introduce various features Mac has to offer.
▼ Show Discussion