AirDrop Issues and Solutions

(updated)
Get Free Scanner and check your computer for errors
Fix It NowTo fix found issues, you have to purchase the full version of Combo Cleaner. Free trial available. Combo Cleaner is owned and operated by Rcs Lt, the parent company of PCRisk.com read more.
How to Solve Most Common AirDrop Related Issues on Apple Production
Apple products are well known to be stable, innovative, and especially functional concerning features related to communication between devices. A good example is the AirDrop feature, which allows you to send big files fast and efficiently.

It is very useful when this technology works appropriately, but many people report issues relating to the AirDrop feature. In this guide, we prepared for you the most common reasons why AirDrop might stop working and how to fix the issue. Follow the methods and the AiDrop feature will be working in no time.
Table of Contents:
- Introduction
- What is the AirDrop feature
- Minimum system requirements to use AirDrop
- Basic troubleshooting steps to solve AirDrop issues
- Ensure all preferences are correct when using the Contacts only option
- Troubleshoot problems while trying to transfer content via AirDrop from applications
- Troubleshoot multiple file transfers failing issue
- AirDrop transfer with older Mac
- Adjust Mac's Firewall preferences
- Device's name contains special characters?
- Reset network settings
- Fix Bluetooth service on your Mac
Download Computer Malware Repair Tool
It is recommended to run a free scan with Combo Cleaner - a tool to detect viruses and malware on your device. You will need to purchase the full version to remove infections. Free trial available. Combo Cleaner is owned and operated by Rcs Lt, the parent company of PCRisk.com read more.
What is the AirDrop feature?
First, some background. What is this technology, and how does it work?
Airdrop is designed to use a peer-to-peer (P2P) protocol allowing data transfer via Bluetooth and Wi-Fi connections. The protocol is known for its high speed and low latency. Therefore, the transfer process is extremely fast. Transfer speed is not the only advantage of this feature. Additionally, your content will also be encrypted during transfer, thus ensuring significant privacy protection.
Your Mac computer and iPhone, iPad, iPod touch, and other Mac devices do not need to be connected to the same Wi-Fi network to benefit from this helpful technology. The only condition is that Wi-Fi and Bluetooth services must be enabled.
However, these actions are performed automatically when you enable the AirDrop feature. iCloud is not necessary unless you wish to share content with your contacts only - in this case, both the sender and recipient must be signed in to iCloud. As mentioned above, there are no restrictions on content size or type.
Minimum system requirements to use AirDrop
Before trying to diagnose AirDrop issues, ensure the device is compatible with this technology. Below you will find a list of minimum requirements to successfully use AirDrop.
They appear in the list below (or later models) to transfer content between two Mac computers. They must also be running on OS X Lion or a later version of the operating system.
- Late-2008 MacBook Pro, excluding late-2008 17-inch MacBook Pro
- Late-2010 MacBook Air
- Late-2008 MacBook, excluding late-2008 white MacBook
- Early-2015 MacBook with 12-inch Retina display
- Early-2009 iMac
- Mid-2010 Mac mini
- Early-2009 Mac Pro with AirPort Extreme card
- Mid-2010 Mac Pro
The minimum system requirements are listed below to transfer content via AirDrop between a Mac computer and an iOS device. The iOS devices must also be running on iOS 8 or a later version, and Mac computer on OS X Yosemite or later.
- Mid-2012 MacBook Air
- Mid-2012 MacBook Pro
- Early-2015 MacBook with 12-inch Retina display
- Late-2012 iMac
- Late-2012 Mac mini
- Late-2013 Mac Pro
To share content between iOS devices, the minimum system requirements are listed below. It must also be running on iOS 7 or a later version.
- iPhone 5, iPhone 5c, iPhone 5s, iPhone 6, iPhone 6 Plus, iPhone 6s and iPhone 6s Plus
- Fifth and sixth-generation iPod touch
- Fourth-generation iPad, iPad Air, iPad Air 2, and iPad Pro
- Original iPad mini, iPad mini 2, iPad mini 3, and iPad mini 4
Devices released earlier, such as iPhone 4s and others, do not support the AirDrop feature due to limited Wi-Fi service functionality.
Basic troubleshooting steps to solve AirDrop issues
Ensure the AirDrop device is discoverable
This step can be a problem when attempting to use the AirDrop feature for the first time. An airDrop must be manually enabled in the Control Center on iOS devices and within Finder on Mac computers. #
To access the Control Center on your mobile Apple devices, such as iPhone, iPad, or iPod touch:
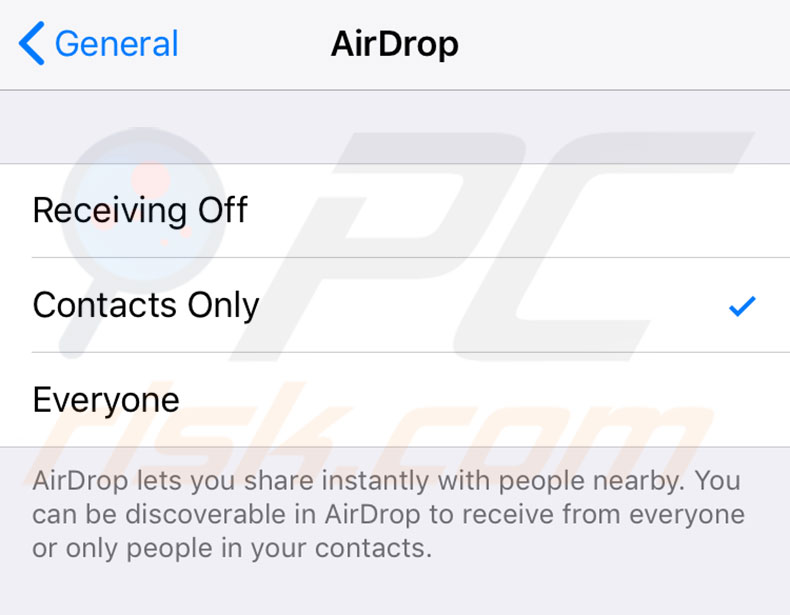
1. Swipe up from the bottom of the screen and tap on the AirDrop icon to turn on discoverability mode.
2. You will then be asked to configure the preferences and with whom you wish to share the content. Choose from three options:
Receiving Off. When this option is selected, your device will not be detectable through other Apple devices but still enables you to send content via AirDrop to recipients.
Contacts Only. This option makes your device discoverable only for recipients whose contact details remain within your address book. To use this option, both devices must be signed in to iCloud, and the email address or phone number must be associated with your Apple ID within the recipient's Contacts application. This is the safest option and prevents content transfer with unknown devices.
Everyone. While enabled, your device will be discoverable for all nearby devices that have the AirDrop feature enabled. This option is usually recommended since you must accept to receive incoming content.
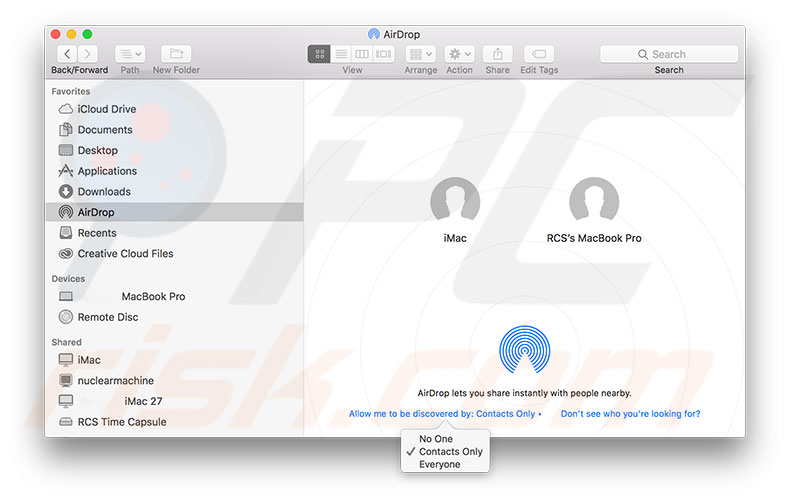
To adjust the discoverability option on Mac computers:
1. Open Finder and click on Go in the menu bar at the top of your screen.
2. Then select AirDrop.
Alternatively, use the keyboard shortcut of Command, Shift, and R. You can also look in the sidebar of Finder's window for the AirDrop category.
3. Then click on the option 'Allow me to be discovered by' and choose one of the same three options described for the mobile Apple device. To avoid problems while devices are not discoverable, it is recommended to select Everyone.
Ensure the connection services are enabled
The AirDrop protocol uses the Bluetooth service to detect devices in range. Then it needs a Wi-Fi connection to transfer content via devices. Therefore, if one of these connection services is disabled, the AirDrop feature will not work (since it will be unable to detect devices or transfer content).
To check and/or enable both or either of the services that are disabled on Mac computers:
1. Open the AirDrop window by opening Finder and selecting AirDrop in the sidebar.
Alternatively, click on Go in the menu bar at the top of your screen and choose AirDrop.
2. If one or both connections are disabled, look for a button to Turn On Wi-Fi and Bluetooth, so you do not need to manually enable them.

Note that this option is not accessible via the AirDrop share sheet (you only see a warning that the service is disabled).
On mobile Apple devices, such as iPhone, iPad, or iPod touch, you can simply tap on the AirDrop option while attempting to share content, and it will automatically enable both Wi-Fi and Bluetooth services.
Check if your devices are within range
Since the AirDrop feature uses Bluetooth to detect devices, there is a restriction of range. Only devices within 30 feet (9 meters) are discovered and connected. If you are experiencing issues related to this feature and are unsure if you have exceeded the range, try to move devices closer if possible. If your devices are close to the maximum range, they might not work due to other electric devices, walls, or obstructions. Try to move the devices as close as possible.
Ensure both devices are not asleep
The AirDrop feature works only if the receiving iOS device's screen is turned on. On Mac computers, the situation is different - the display might be sleeping, but the computer must be ready to use. If the computer's hard disk is also sleeping, the AirDrop function will not work. Moreover, the device will become undetectable when attempting to find it through other devices.
AirDrop sharing request notifications will appear on the lock screen on iOS devices, and you will be able to swipe without unlocking the mobile device, such as iPhone, iPad, or iPod touch. The AirDrop notification prompts the login screen on Mac computers, even when the display is sleeping (unless all hardware is sleeping).
Therefore, if your device went to sleep automatically or manually (for example, you chose to put your Mac to sleep by selecting Sleep from the Apple menu or clicking the Sleep/Wake button on a mobile device), the AirDrop sharing function will not work.
The default settings for Mac computers usually allow the display to sleep first, and after a short time, the rest of the computer system goes to sleep. You can enable the default function labeled 'Prevent computer from sleeping automatically when the display is off' to prevent this situation.
1. Go to Mac's System Preferences and choose the Energy Saver pane.
2. You will see two tabs. Under the Battery tab, you can configure the preferences used while the computer is working on the battery (the power cord will be disconnected). While power adapter tab lets you configure preferences while the computer is connected to the power socket.

Check if the restricted mode is disabled on your devices
Apple devices contain several modes (such as Do Not Disturb and Airplane) that disable certain functions. For example, Airplane mode disables all wireless radios on your mobile device. As mentioned above, a Wi-Fi connection is necessary to use the AirDrop feature effectively.
Do Not Disturb mode does not block Wi-Fi connections or Bluetooth. However, it prevents your device from receiving any pop-up notifications - this prevents you from accepting or declining incoming sharing requests, and the device becomes undetectable. The AirDrop function thus becomes unreachable, and so you should ensure that none of these modes are enabled on your devices.
To disable Airplane Mode on a mobile Apple device, such as iPhone, iPad, or iPod touch, swipe up from the bottom of the screen and tap on the Airplane icon.
Alternatively, go to the device Settings and toggle off the switch beside Airplane mode. If you are using an Apple Watch and have enabled Airplane mode under the watch companion application, this will also turn on the iPhone Airplane mode.

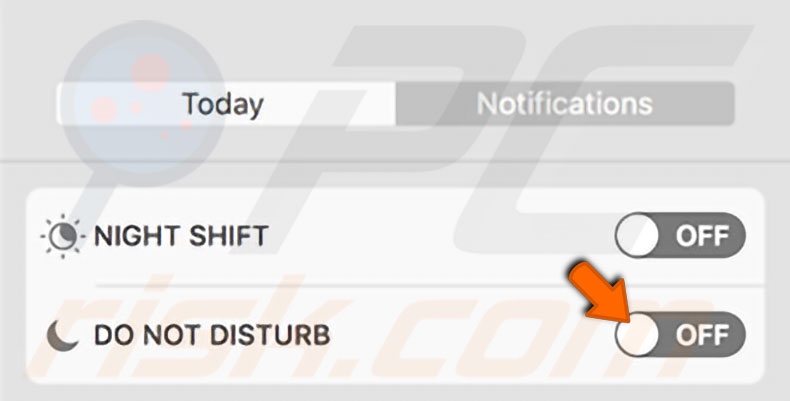
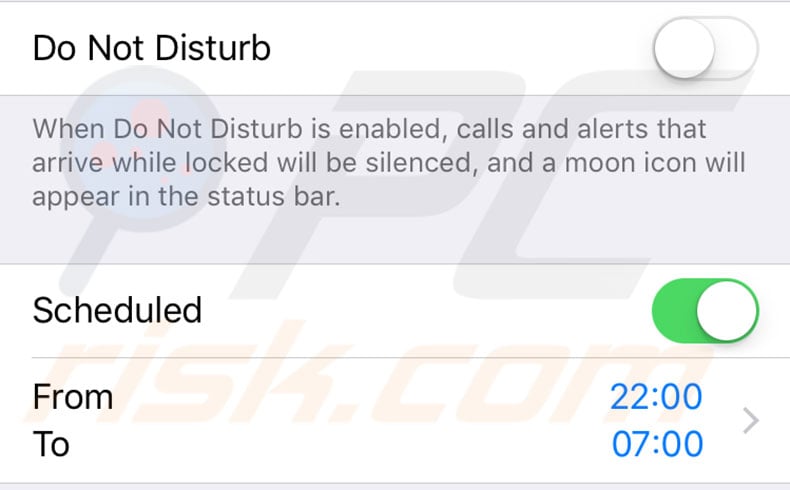
As mentioned above, the Do Not Disturb mode also prevents using the AirDrop feature since it disables all incoming notifications and hides the devices from the detectable devices list.
To disable this mode on Mac computers, simply click on the notifications center icon in the menu bar at the top right corner of your screen, then scroll up to reveal the Do Not Disturb mode switch and set it to Off.
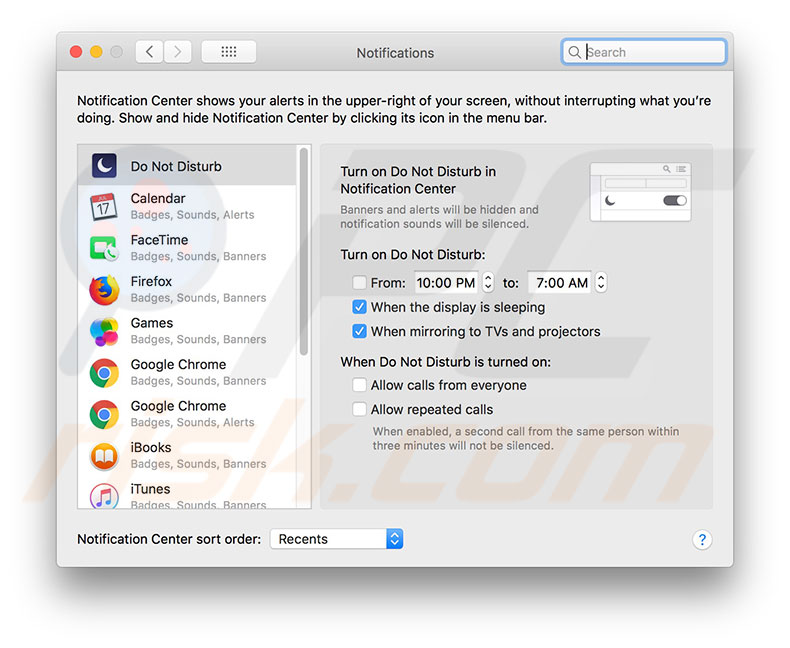
You may consider using the schedule function to prevent AirDrop notifications on your computer. To configure the schedule for enabling Do Not Disturb mode, go to Mac System Preferences, choose the Notifications pane, and select Do Not Disturb from the list on the left side of the window.
To disable this mode on a mobile device, such as iPhone, iPad, or iPod touch, swipe up from the bottom of the screen to access the control center and tap on the Do Not Disturb mode icon.
To configure the schedule on an iOS device, go to Settings, select Do Not Disturb, enable Schedule, and set when it should turn on and off.
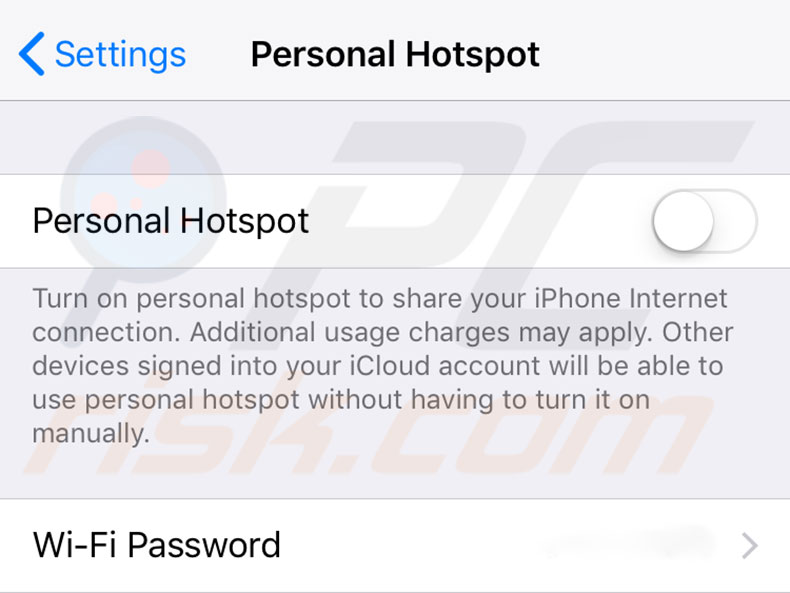
Ensure you are not sharing the internet from your device
Personal hotspots can conflict with the AirDrop feature since both require a Wi-Fi connection. iPhone, iPad, and iPod touch will display a warning message in the AirDrop menu to report the issue and state 'AirDrop is not available when using Personal Hotspot'.
If you see this warning message, choose the most important feature. If you have selected AirDrop, go to device Settings and tap on Personal Hotspot. Choose then to switch it off. Additionally, on a Mac computer, click the Wi-Fi icon and choose to disconnect from the Personal Hotspot.
Ensure all preferences are correct when using the Contacts only option
An option to receive content from contacts only improves protection since only authenticated devices can send you data. However, this option can add some restrictions and misconfigurations within your Apple ID account and cause trouble while attempting to use the AirDrop feature.
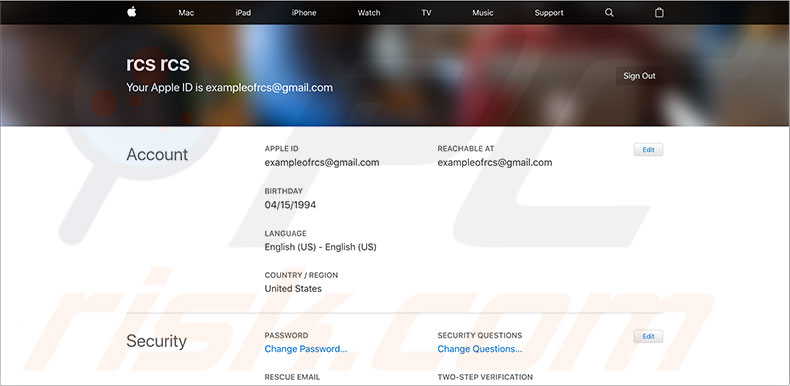
The email address or phone number must be attached and verified to the Apple ID account to successfully share content via the AirDrop feature. If you have added the contact information, but it is still not confirmed, you will not receive the benefits of this option. Under the ' Reachable At ' line, you can check if your Apple ID contains verified contact information on their support website.
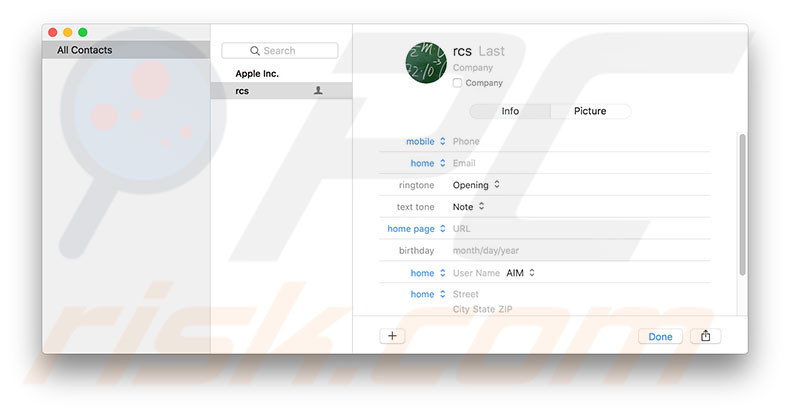
Another important requirement is contact details within the Contacts application in both the sender and receiver devices. Moreover, each device must contain its own card within the application.
1. To ensure all required contact information is attached, launch the Contacts app on Mac computers.
2. Click on Card in the menu bar at the top of the screen, and then select Make This My Contact Card (if you have not set it before) or Go to My Card to check and/or edit existing card information.
To create and/or adjust a card on mobile devices, such as iPhone, iPad, or iPod touch:
1. Go to Settings.
2. Choose Contacts or Mail, Contacts, Calendars in the earlier version of iOS.
3. Then scroll down until you locate the My Info option. Select the card you wish to use for your Contacts.

When you have verified that all contacts are correctly configured, there is another option you should check. To use Contacts Only mode for AirDrop transfers, both devices (the senders and receivers) must be signed in to iCloud. To check if the device is connected to iCloud on Mac computers, go to System Preferences and select the iCloud pane.
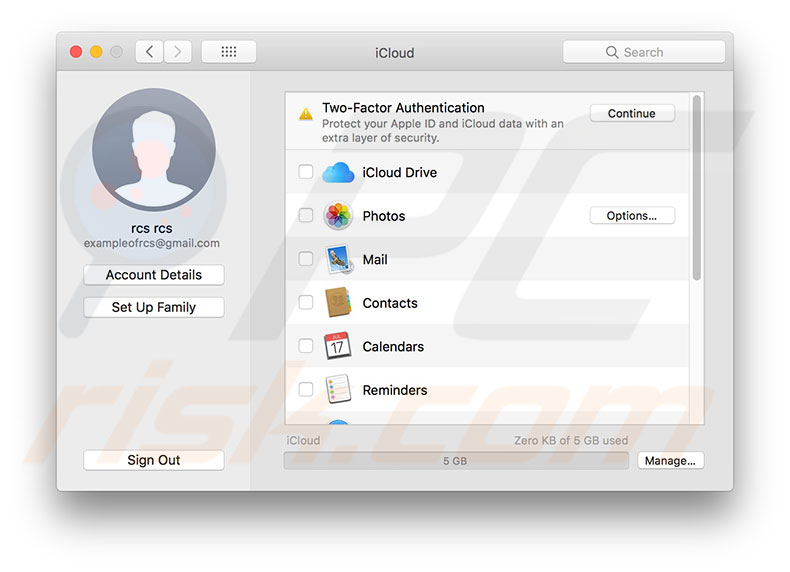
To check if the Apple mobile device, such as iPhone, iPad, or iPod, is connected to iCloud, go to Settings and tap on your account or iCloud for an earlier version of iOS.
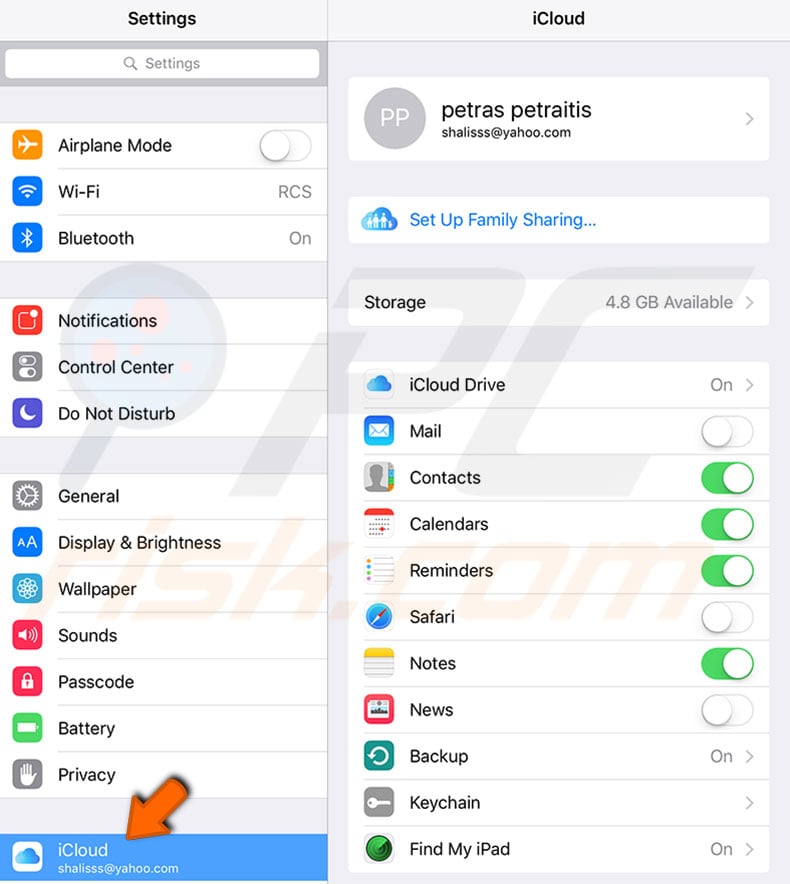
Suppose the device receiving files is signed in with the same iCloud account as the sender's device. In that case, the operating system automatically accepts and saves files in the downloads folder - this travels via AirDrop without any additional actions.
If, however, an attempt to transfer content via AirDrop to a device with separate iCloud accounts is being made, an approval request will pop up, and files will not be accepted until the user manually approves (even though sender and receiver are listed in respective Contacts).
Troubleshoot problems while trying to transfer content via AirDrop from applications
Most third-party applications provide access to AirDrop within the share menu. However, some do not allow the transfer of content in this way.
If you cannot find an AirDrop option in a particular application, visit the App Store to check its description or the support page where developers might confirm applications' abilities to use the AirDrop feature. This option is sometimes disabled to ensure copyright protection. For example, you will not share music or video files via AirDrop from native Apple applications related to media content.
Troubleshoot multiple file transfers failing issue
You might have encountered an AirDrop error message stating that the device "Cannot receive all these items at the same time." This appears only when you attempt to send multiple files of different types from a Mac computer to a mobile Apple device, such as iPhone, iPod touch, or iPad.
The main reason for this problem is that the AirDrop feature for iOS devices was developed to automatically open recently received files in the appropriate applications. The iOS devices have difficulty launching some applications simultaneously and display the message to prevent various freezes, crashes, or other glitches.
Despite this, multiple files of different types can be transferred between two Mac computers via AirDrop, as well as multiple files of the same kind - sharing them between separate operating systems. So, you can transfer many images, music files, and videos, the only condition being that you cannot transfer all at once - you must send just one type of file at a time.

AirDrop transfer with older Mac
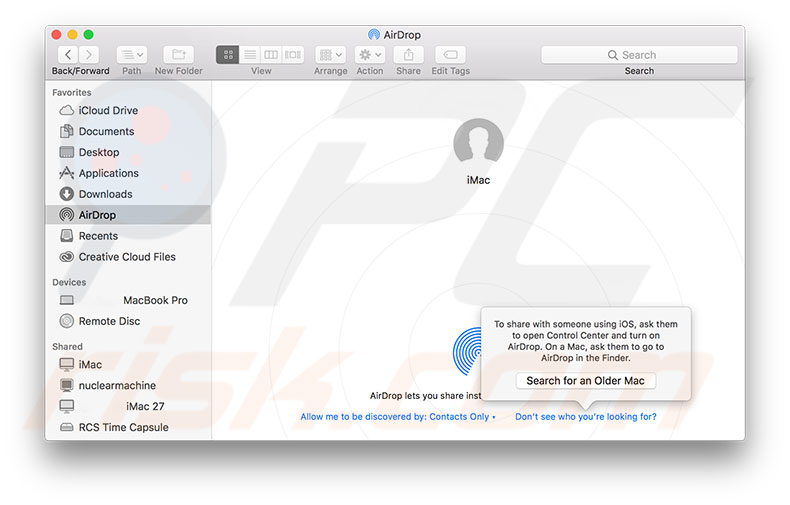
Despite the minimum hardware requirements specified above to use this feature, you can share content via AirDrop on older systems. Apple added an option whereby you can switch the legacy mode to detect earlier versions of Mac computers.
1. To share content with earlier models, open the AirDrop window and locate the option at the bottom of the window labeled 'Don't see who you're looking for?'.
2. In the pop-up window, click the 'Search for an Older Mac' button. This will switch legacy mode and scan the range for any Apple computer using an older implementation of the AirDrop protocol.
Bear in mind that whenever you wish to share content between modern Apple devices, you will have to manually exit the legacy mode. To exit this mode, simply open the AirDrop window and click the Cancel button at the bottom.
Adjust Mac's Firewall preferences
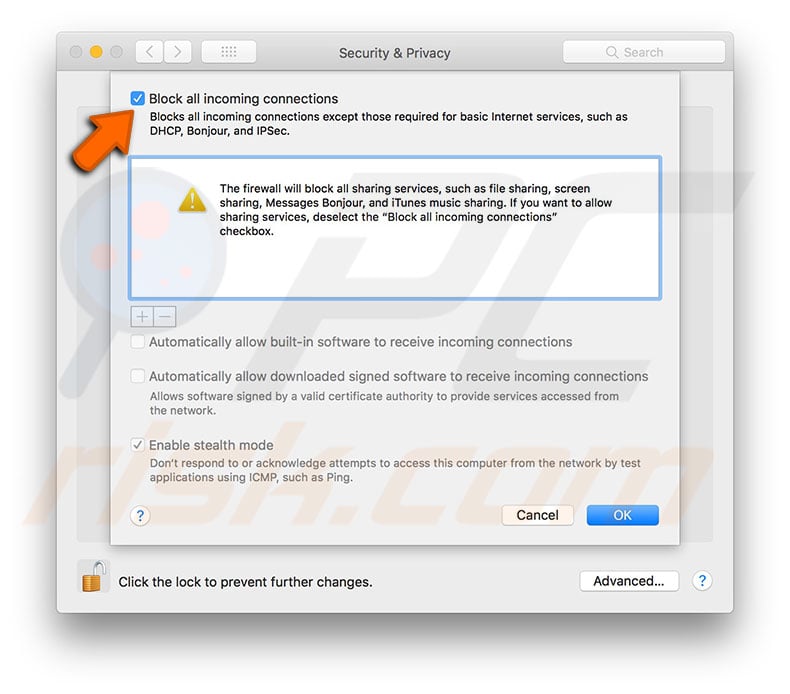
Mac computers contain a built-in security feature called a firewall, which includes blocking all incoming connections. If this option is turned on, and although the AirDrop feature is built-in software, it will be blocked with all sharing services, including File Sharing, Screen Sharing, and other incoming connections.
1. You can disable this option by going to Mac System Preferences.
2. Then open the Security & Privacy pane.
3. Select the Firewall tab at the top of the window and then click on the lock icon in the bottom left corner to enable the editing options.
4. You will be asked to enter the administrator's account password.
5. Click on the Firewall Options button.
6. In the new pop-up window, remove the mark from the checkbox beside 'Block all incoming connections' and click OK. From this point, your computer will stop blocking incoming connections.
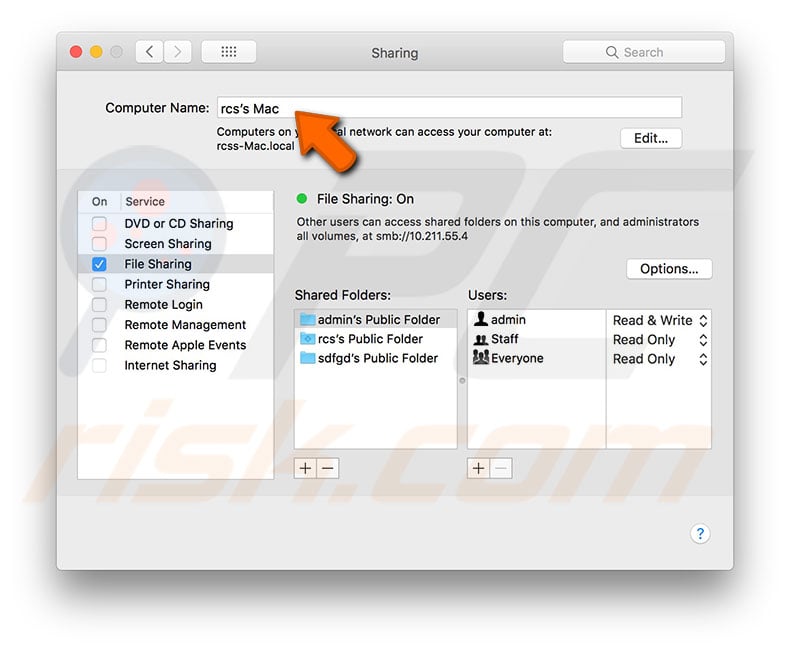
Does the device name contain special characters?
Many people report that special characters within the device and network name cause various confusing issues. You are advised to avoid using the non-standard characters and spaces in the names of devices. If you are experiencing random issues and a device name (or names) contains special characters, try to change it
1. To change the Mac computer name, go to System Preferences and select Sharing.
2. Edit the text in the label beside Computer Name.
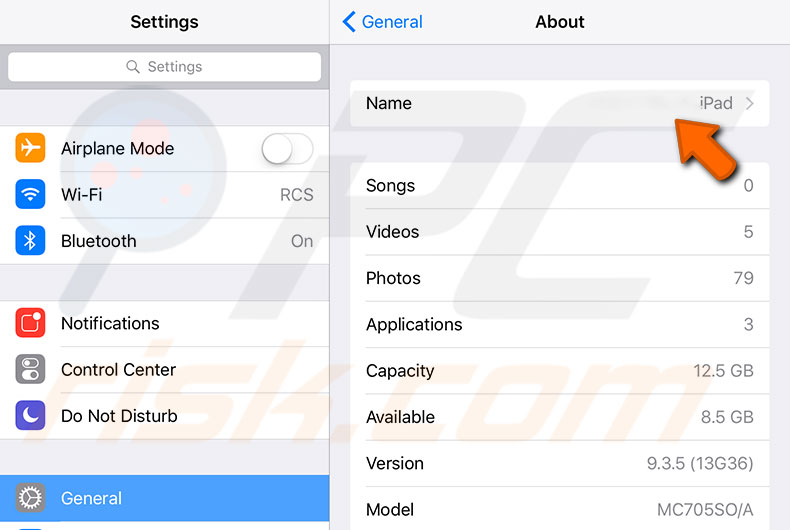
To change the mobile device such as iPhone, iPad, or iPod touch name:
1. Go to Settings.
2. Select General and tap on About.
3. Finally, tap on the name of your mobile device and remove or change all special characters, and then tap Done.
4. To finish, restart your devices to enable them to apply the new name.
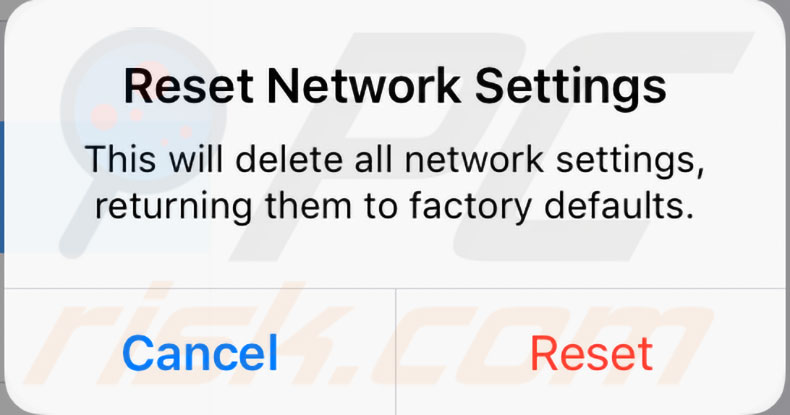
Reset network settings
If the steps above do not solve the problem, try some other common methods. Resetting network settings often solves various problems, especially with features like AirDrop that uses both Wi-Fi and Bluetooth connections. Network settings contain preferences related to both of these connections - within these settings.
1. To reset network settings on a mobile device, such as iPhone, iPad, or iPod touch, go to its settings.
2. Select General and tap on Reset.
3. Select the Reset Network Settings option - this action will delete all network settings on your iOS device and return them to their defaults (restoring the factory state).
4. This will require you to re-enter all Wi-Fi passwords to connect.
Fix Bluetooth service on your Mac
If you need a solution for AirDrop-related issues urgently, there is another step you should not skip. The Bluetooth service itself can also be a problem if it does not function properly. To repair the Bluetooth service on a Mac computer is simple - with accurate guidance, you can complete it in a few minutes.
1. To start, turn off the service by clicking on the Bluetooth icon in the menu bar on the top right side of your screen.
2. Then launch the Finder application.
3. Click Go in the menu bar at the top of the screen and select Go To Folder.
4. When the new window appears, type the following path into the destination field and click Go:
/Library/Preferences/com.apple.Bluetooth.plist
5. Once Finder directs you to this particular file, simply delete it or move it to another location on the Mac hard disk.
6. Finally, restart your computer and turn the Bluetooth service back on.

Share:

Karolina Peistariene
Author of how-to guides for Mac users
Responsible for collecting, analyzing, and presenting problem-solving solution articles related to macOS issues. Years of macOS experience combined with solid research and analyzing skills help Karolina provide readers with working and helpful solutions as well as introduce various features Mac has to offer.
▼ Show Discussion