How to Share Your Mac's Screen?

(updated)
Get Free Scanner and check your computer for errors
Fix It NowTo fix found issues, you have to purchase the full version of Combo Cleaner. Free trial available. Combo Cleaner is owned and operated by Rcs Lt, the parent company of PCRisk.com read more.
How to Share Screens Between Macs Without Third-Party Applications?
Solving technical issues with friends and colleagues can be difficult if you are geographically separated. To address this, Apple has included a helpful screen sharing feature with many applications and can also stream and watch live tutorials.
The screen sharing function provides remote access to your Mac for other users (recipients). When this feature is enabled and connected, users connected to your computer will launch applications, browse files and folders, run various tools, and perform other tasks available on the machine.
Remember that restarting the device is not available during screen sharing since this will terminate the connection immediately. In this article, we describe various methods to share your Mac screen with other users.
Video showing How to Share Mac's Screen?
Table of Contents:
- Introduction
- Enable Screen Sharing tool on Mac
- Start screen sharing
- Share iOS device's screen by using Mac
- Video showing How to Share Mac's Screen?
Download Computer Malware Repair Tool
It is recommended to run a free scan with Combo Cleaner - a tool to detect viruses and malware on your device. You will need to purchase the full version to remove infections. Free trial available. Combo Cleaner is owned and operated by Rcs Lt, the parent company of PCRisk.com read more.
Enable Screen Sharing tool on Mac
Apple computers have a straightforward method for screen sharing without using any additional applications.
1. To enable this helpful feature, first open Mac System Preferences and select Sharing.
2. In the new window, look on the left side for a list of available options. To turn the screen sharing option on, enable the checkbox next to it.
Note that Screen sharing and Remote Management cannot work together, so you must choose one and deselect the other.
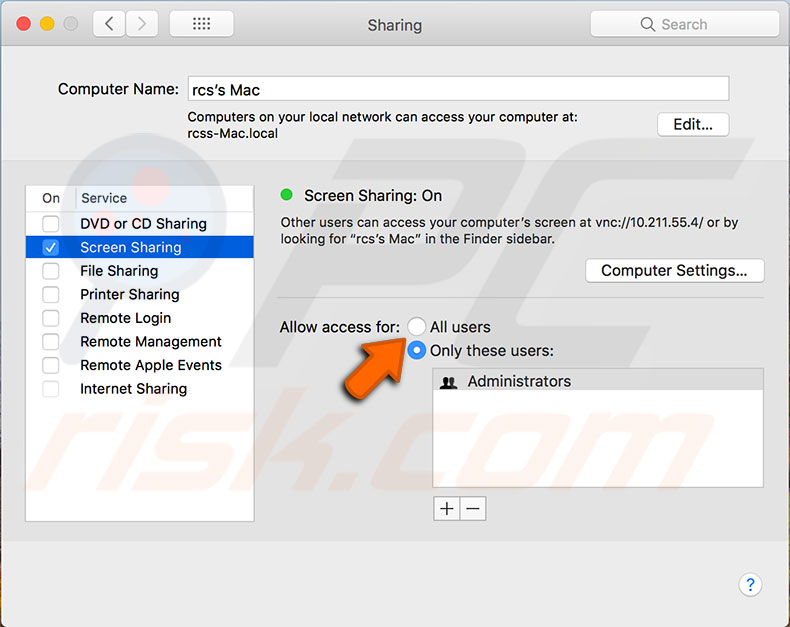
3. Once you enable the Screen sharing option, you will see some available security options on the right side of the window. You are advised to configure them before providing access to your computer.
If you are not the only person using your computer and have more than one account configured, you can choose between restricted permissions to share the screen or allow anyone to share it.
The 'All users' option will grant permissions for all existing accounts, except for guest users.
The 'Only these users:' option will allow screen sharing on the accounts listed only.
You can also click the Add (+) button to assign screen sharing permissions to a new user or group.
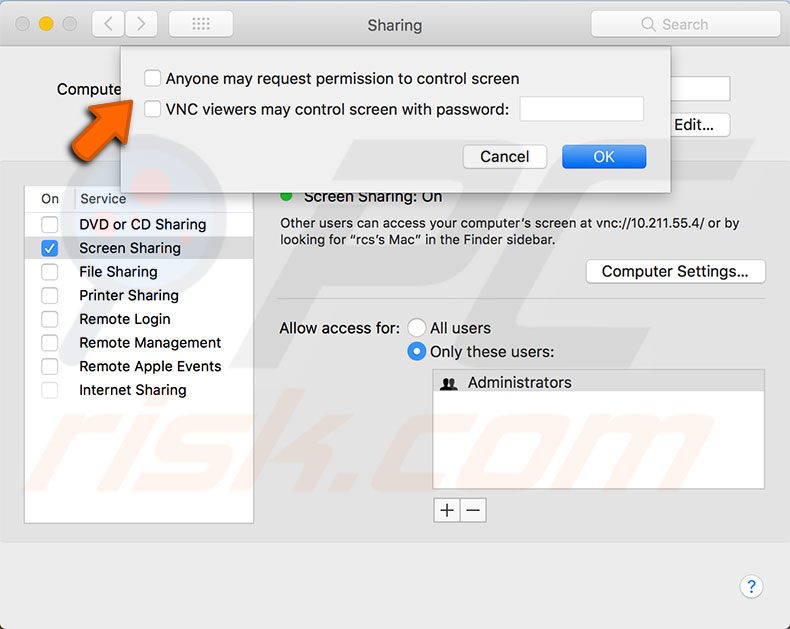
The following setting to configure is under the Computer Settings button. In the popped up window, you can choose to enable or disable the following two options:
Anyone may request permission to control the screen. If this option is enabled, any other computer will be able to request permission to see your screen, browse files and folders, launch applications, and various tools. You will be able to approve or deny each incoming request.
VNC viewers may control the screen with a password. This feature allows other users to access your Mac screen and content via a VNC viewer application, such as VNC viewer. When this option is enabled, anyone who knows the password that you created when setting up this feature can connect and control your Mac.
This function is useful when you need to access your computer's content through a mobile device. But there is a risk of unauthorized people's access to your Mac.
Start screen sharing
There are several methods available to connect computers and share screens without using third-party applications. Note, however, that the screen you wish to control must be configured with the screen sharing option as detailed in the method above. Furthermore, if the streaming Mac uses a separate Apple ID for iCloud and Messages application, you must know both of those emails for access.
Establish connection via Screen Sharing application
macOS contains a built-in application named Screen Sharing, but this is usually not displayed via Launchpad or the Applications folder via Finder. The easiest way to open this specific application:
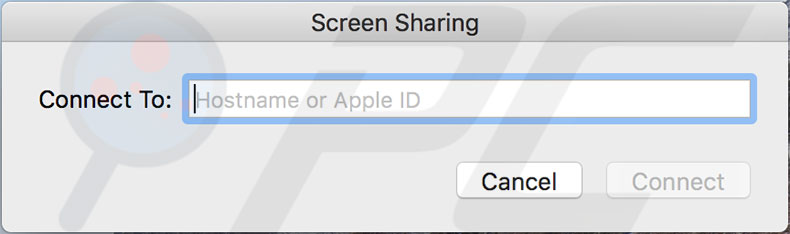
1. Open Spotlight using the keyboard shortcut of Command and Spacebar and then type 'Screen Sharing' in the search field. Alternatively, open Finder, type the same query in the search field, and select 'This Mac' as browsing storage.
2. When the application opens, you will see a field to enter the Apple ID or connect it to the same network. The recipient must approve your request and select the 'Control my screen' option. Otherwise, the process will be reverted, and your screen will not be shared with the recipient.
Share screens between Mac computers via iMessage
As mentioned above, Apple included several methods to share screens between Mac computers. One uses the Messages app, which allows users to send text messages and offers video or simply call and screen sharing functions.
1. Open the recipient chat and click on Details in the top right corner to begin screen sharing between Macs.
2. Here, you will find three features buttons - click on Screen Sharing.
3. Select between the Invite to share my screen and Ask to share screen options. Your friend will then be prompted with a pop-up window asking to accept or decline your screen sharing request.
Additionally, you can launch QuickTime Player and start a new screen recording project by clicking on File in the menu bar at the top of the screen and selecting New Screen Recording. In this way, the tutorial can be reviewed anytime.
To stop the screen sharing session, click on Screen Sharing in the menu bar at the top of the screen and select Quit Screen Sharing.

Apple released an improved version of QuickTime Player and Mac OS Yosemite, stating that the new QuickTime Player contains some helpful modifications for developers. The main feature was streaming an iOS device screen with a Mac computer. However, the iOS device must be connected to the Mac.
1. Start with establishing screen sharing between Macs and connect a mobile device to one computer via a USB cable.
2. Next, open QuickTime Player on the computer with the iOS device connected, and then click on File in the menu bar at the top of the screen.
3. Select New Movie recording.
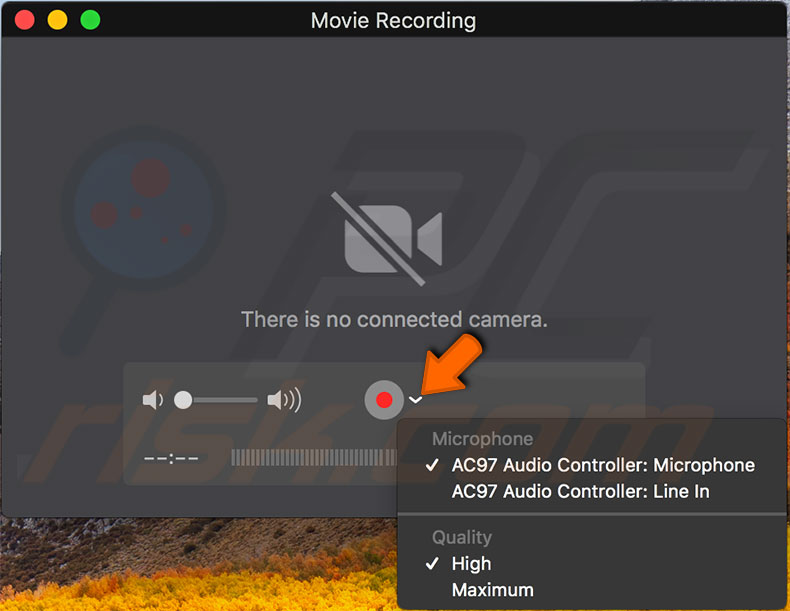
4. Once the movie window pops up, click the drop-down icon next to the Start recording button, select the iOS device you wish to see, and click record.
5. When you have finished your work on the iOS device, click stop recording and save the video (this will not terminate screen sharing).
Share:

Karolina Peistariene
Author of how-to guides for Mac users
Responsible for collecting, analyzing, and presenting problem-solving solution articles related to macOS issues. Years of macOS experience combined with solid research and analyzing skills help Karolina provide readers with working and helpful solutions as well as introduce various features Mac has to offer.
▼ Show Discussion