How to Write an ISO File to an USB Drive on Mac?

(updated)
Get Free Scanner and check your computer for errors
Fix It NowTo fix found issues, you have to purchase the full version of Combo Cleaner. Free trial available. Combo Cleaner is owned and operated by Rcs Lt, the parent company of PCRisk.com read more.
How to Create a Bootable Installer USB Flash Drive on Mac Computer?
New computers often come without a CD-Rom device (responsible for reading CDs and DVDs) since they have been replaced with 'flash drives that offer memory read/write speeds several times higher. Despite the advantages of flash drives, there are often problems when creating a bootable device and adding or 'burning' an ISO file to them.

You can create a bootable flash drive without using third-party software. This, however, might be a problem for inexperienced Mac users since it requires the use of a command-line and Terminal (the most reliable way to create the installer drive).
Although you may be unfamiliar with using a command line, carefully following the steps listed below will help. Bear in mind that when using "sudo dd", caution is required since small mistakes when pointing to disks can result in permanent data loss. So, if using data storage devices such as CDs or DVDs is not an option, follow the step-by-step guide below to create a bootable installer drive without using third-party software.
Table of Contents:
Download Computer Malware Repair Tool
It is recommended to run a free scan with Combo Cleaner - a tool to detect viruses and malware on your device. You will need to purchase the full version to remove infections. Free trial available. Combo Cleaner is owned and operated by Rcs Lt, the parent company of PCRisk.com read more.
Copy or 'burn' an ISO file into the flash drive
Note that when using this method, files from the destination drive will be permanently replaced with the contents of the ISO file. Therefore, we recommend that you create a Time Machine backup of your data.
1. To start, connect your preferred external drive to the Mac.
2. Next, launch the Terminal application, which can be performed using Spotlight or going to the Utilities folder under Applications through Finder.
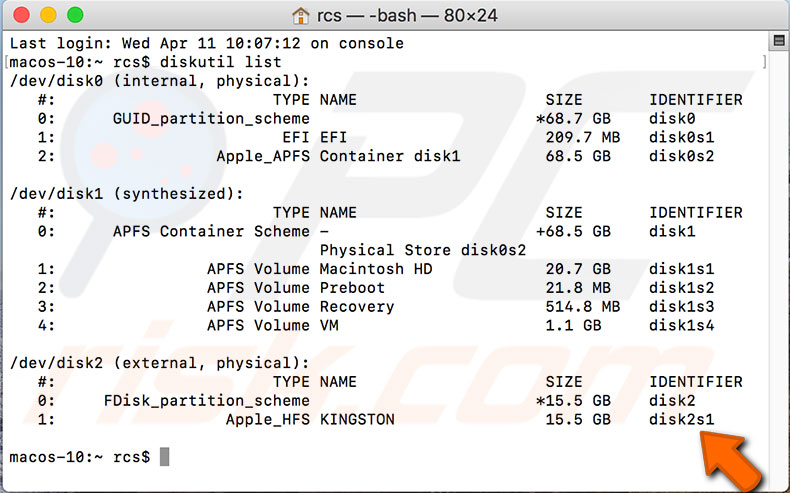
3. When the Terminal window appears, type the following command to see a list of volumes connected to the Mac: diskutil list

4. When Terminal displays information about available volumes, look for the line with the name of your external drive and make a note of the identifier displayed on the same line. For example, above it is 'disk2s1'. Once you have found the identifier of the flash drive, unmount the target volume by using the following command, replacing 'identifier' with the one found from the displayed list:
sudo umount /dev/identifier
These steps prepare the flash drive for the formatting process, which is required to write the ISO file to the external drive. Remember that all content will be removed permanently, and you cannot press Command and Z or perform any function to undo this action.
Another important point is the identifier - as mentioned before, type this carefully, since even a small mistake can result in loss of all content stored on a volume. Carefully type the following command to write ISO files onto the flash drive. Remember to replace 'identifier' with the appropriate text:
sudo dd if=/path/image.iso of=/dev/ridentifier bs=1m
An example of correct syntax with a Windows ISO file called 'Windows10_x86_EN-US.iso' would be:
sudo dd if=~/Desktop/Windows10_x86_EN-US.iso of=/dev/rdisk2s1 bs=1
Note that an 'r' signifier is placed before the disk identifier, which boosts commands speed. The 'bs=1m' placed at the end of the command is a statement of blocksize, which also increases the speed of the process. Neither of these adjustments is necessary to copy the ISO file to the flash drive, but they are faster.
Once you are sure the syntax is correct, hit Return and enter the administrator password to execute the command.
Note: There is no progress bar or indication of process status. Be patient and wait for it to complete. The time required to finish the writing process depends on various factors such as the power of the Mac, hard drive and external drive capacity, size of ISO file, etc. Finally, when the process has finished, eject the flash drive by typing the command below (the installer drive will then be ready to use):
diskutil eject /dev/identifier
Note that this method works with all types of ISO images, including the ISO file of the Mac volume.
Share:

Karolina Peistariene
Author of how-to guides for Mac users
Responsible for collecting, analyzing, and presenting problem-solving solution articles related to macOS issues. Years of macOS experience combined with solid research and analyzing skills help Karolina provide readers with working and helpful solutions as well as introduce various features Mac has to offer.
▼ Show Discussion