Repair Your MacBook's Decreased Performance. How to Reset Your Macbook?

(updated)
Get Free Scanner and check your computer for errors
Fix It NowTo fix found issues, you have to purchase the full version of Combo Cleaner. Free trial available. Combo Cleaner is owned and operated by Rcs Lt, the parent company of PCRisk.com read more.
How to Repair Decreased MacBook Performance by Performing a Factory Reset?
Has your MacBook performance reduced, and it cannot perform your requested tasks? Or maybe you have purchased a new computer and are planning to sell or give away your old MacBook? These are some of the most common circumstances in which you might need to reset your device (restore factory settings).
Furthermore, resetting your laptop might solve many issues and is an excellent prevention technique for errors and problems that accumulate over time. Note that resetting a MacBook wipes out all data and restores your device to the default settings.
Resetting a laptop might seem like a convenient solution to various issues, but if you are not an experienced Mac user, the process may seem confusing or even frustrating. To help, we outlined the steps to help you successfully reset your MacBook.
Video showing How to Reset Your MacBook?
Table of Contents:
- Introduction
- How to avoid issues performing a factory reset
- Clone your hard drive before resetting
- Reset NVRAM before you reset your MacBook
- Reset System Management Controller (SMC)
- Disconnect or disable necessary apps
- Reinstall macOS via Recovery mode
- Video showing How to Reset Your MacBook?
Download Computer Malware Repair Tool
It is recommended to run a free scan with Combo Cleaner - a tool to detect viruses and malware on your device. You will need to purchase the full version to remove infections. Free trial available. Combo Cleaner is owned and operated by Rcs Lt, the parent company of PCRisk.com read more.
How to avoid issues performing a factory reset
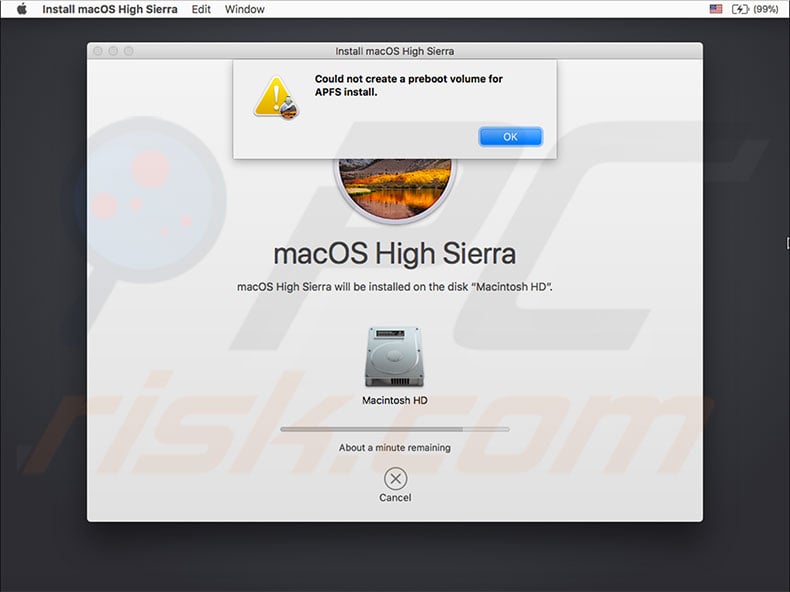
The latest version of the MacBook operating system, High Sierra, works on Apple's latest file system - APFS. Mac owners often encounter a problem when attempting to reinstall their operating system with the error message, 'Could not create a Preboot Volume for APFS install'.
Apple support declares that users should select the macOS extended file format when formatting their drives rather than the new file system (APFS). If, however, you have already encountered this type of issue, there is a solution.
1. First, shut down your Mac.
2. Then hold down Option, Command, and R while turning on your computer.
This combination will start an Internet Recovery, and you can try to reinstall High Sierra. You may be forced to repeat this step several times until it works.
Clone your hard drive before resetting
Resetting the MacBook will erase all data and information from your hard drive. To be safe, ensure you have a backup file stored on external media or hard drive. If you do not have a backup, you must create one before proceeding.
We recommend that you create your hard drive clone within a backup file in case of problems. The clone is a bootable duplicate of your hard drive and thus creates an identical copy of your startup disk. The most commonly recommended storage for the clone is an external drive. This will allow you to boot the MacBook through your external drive any time it is required.
What about Time Machine?
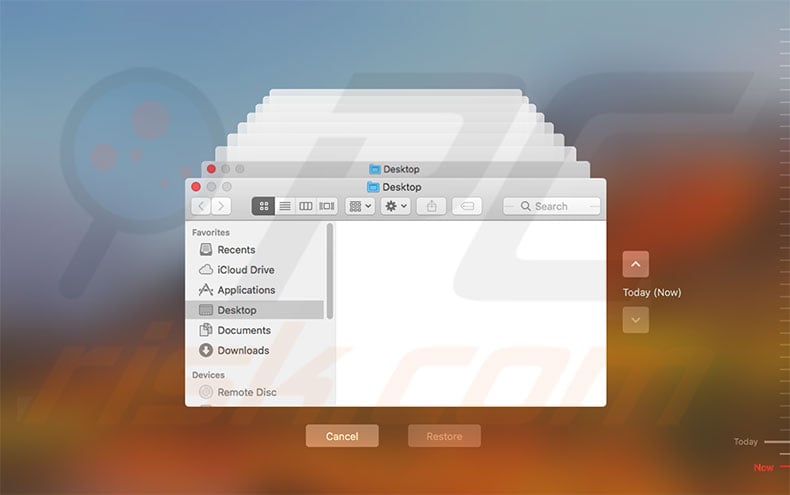
If you use Time Machine, which comes with your operating system, you already own a good backup. This file, however, is not a clone of your hard drive, and you will be unable to boot from it. Nevertheless, it will store information associated with documents, apps, and other data. If you prefer not to clone your drive, ensure you have a backup of the latest operating system version - manually create a new backup before proceeding.
1. To perform a manual backup, open System Preferences and select Time Machine.
2. Then choose the checkbox next to Show Time Machine in the menu bar.
3. Once enabled, you will see the Time Machine icon on your menu bar in the right corner (near date and time).
4. Click this icon and choose Back Up Now. This will create an up-to-date backup file and ensure that everything is stored in Time Machine backups.
Advantages and usage of Clones
A clone can perform an immediate recovery in the event of a drive crash. Therefore, you can reboot your computer through the clone drive, ignoring any startup volume issues.
1. To boot from a clone drive, simply hold down the Option key while restarting the MacBook and select the clone drive in Startup Manager.
2. Then press Return. Using this option, you will finish your work or any projects before solving the startup drive issue/s.
To create a startup drive clone, you will need to use a third-party app such as Carbon Copy Cloner, Super Duper, ChronoSync, or similar. Most of these applications are pretty simple - you will be asked to select your source (startup drive) and destination (external drive), often with no further dialogs. On-screen instructions should also help. Once you have created a clone, test it by boot via the clone using Startup Manager when booting the MacBook.
Reset NVRAM before you reset your MacBook
If you decide to reset your Mac due to decreased performance or prepare to sell or give it to another person, reset the NVRAM first. NVRAM (non-volatile random-access memory) is a small section of Mac memory that stores specific settings in a location accessible to the macOS. NVRAM stores speaker volume, screen resolution, startup disk selection, and any recent kernel panic reports.
How to reset NVRAM on MacBook pro
1. To reset the NVRAM, shut down the Mac.
2. Turn it on, and after you hear a loading chime, simultaneously hold the Option, Command, P, and R buttons. Keep holding this combination for at least 20 seconds. Your computer should appear to be restarting.
3. If you hear the startup chime again, release the buttons.
Note: Once NVRAM has been reset, you may need to reconfigure settings for screen resolution, time zone information, startup disk selection, speaker volume, and so on.
Reset System Management Controller (SMC)
Resetting the SMC will not return your computer to a new state but is a helpful way to solve many hardware problems.
How to reset your MacBook's SMC
There are two methods to reset your laptop SMC. These are determined by the battery of your Mac and whether it is removable or integrated.
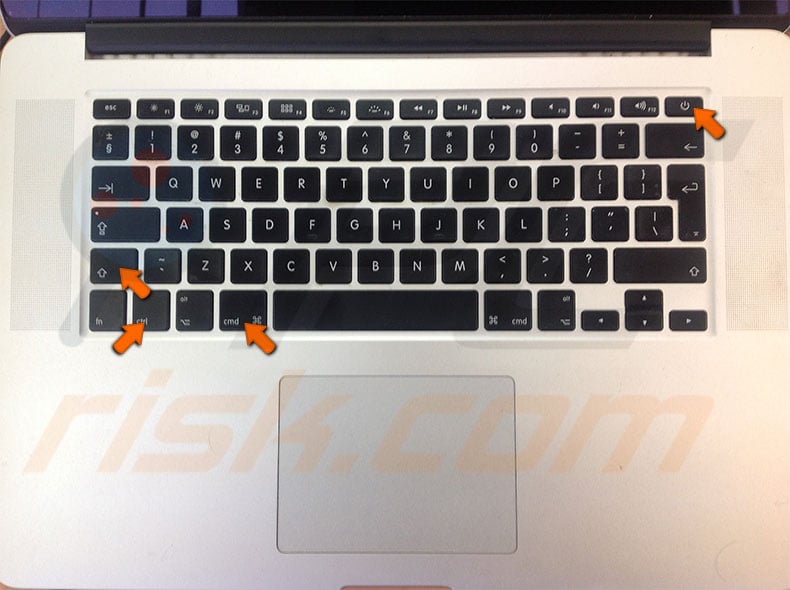
Method for MacBooks with non-removable battery:
1. First, shut down the device and connect the power adapter to the Mac.
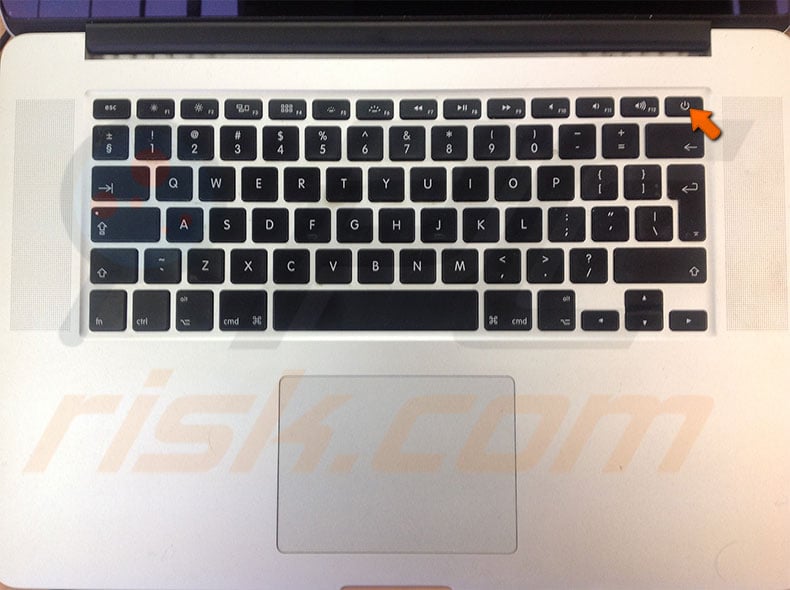
2. Hold down the Shift, Control, and Option keys while clicking the power button.
3. Finally, release all keys simultaneously - the light on the MagSafe adapter might change color to signify that SMC has been reset.
Method for laptops with removable battery:
1. Shut down the MacBook and remove the battery.
2. Disconnect the power adapter, hold the Power key for 10 seconds.
3. Release the button and reattach your power adapter and battery.
Disconnect or disable all necessary applications
Deauthorize your Mac in iTunes
iTunes has a built-in authorization tool to grant permission to access all iTunes content from the device/s you authorized. This step is necessary if you are preparing to sell or give away your Mac. If you are keeping the laptop after resetting, you can skip this step. Bear in mind that only five devices are permitted to connect with one Apple ID account.
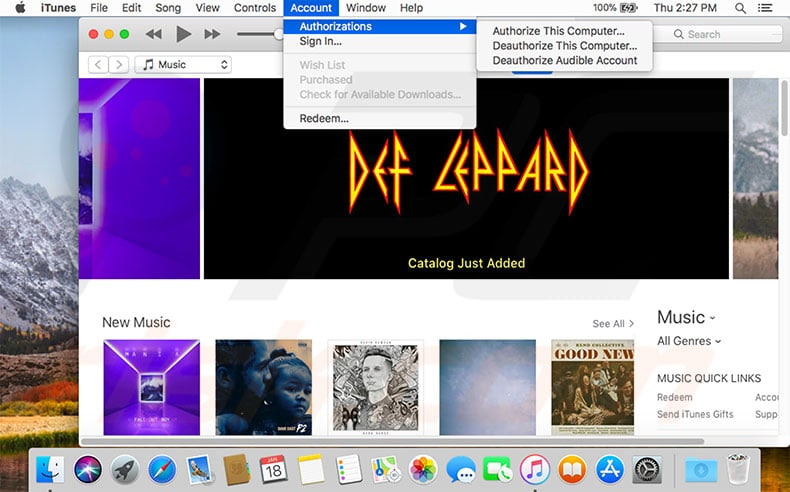
1. To deauthorize the MacBook, Open iTunes (login with your Apple ID if required).
2. From the menu bar at the top left of your screen, choose Account, select Authorizations, and finally click 'Deauthorize This Computer...'.
3. If required, enter your Apple ID and password and click Deauthorize.
Disable FileVault
FileVault encrypts the entire disk to protect against unauthorized access to data stored on your startup disk. People rarely use this feature, but you may need to check it out, especially if you log in with your account password (FileVault requires password secured log in).
How to disable FileVault?
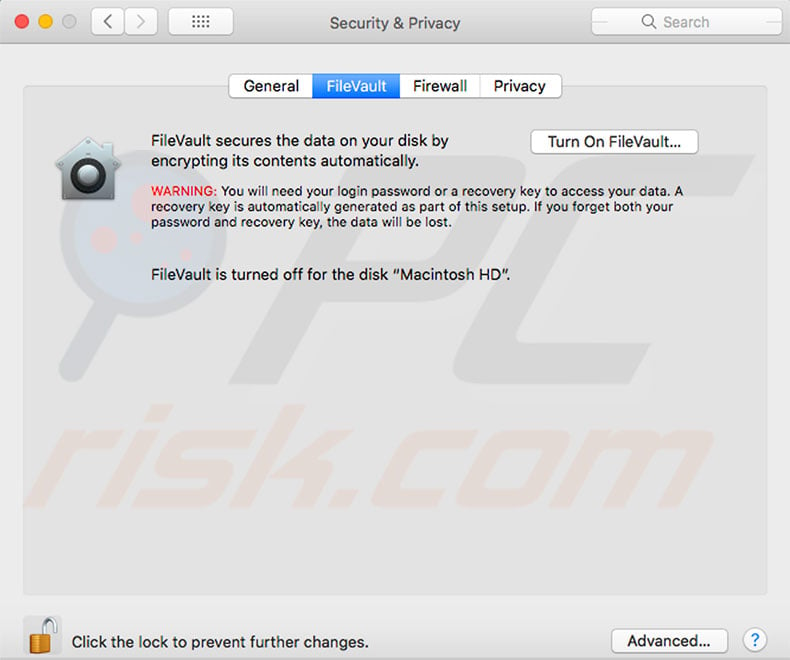
1. Enter System Preferences and choose Security & Privacy.
2. Select the FileVault tab and click the lock button to unlock it.
3. Enter an administrator name and password and turn off FileVault.
4. Then, restart your Mac.
When the computer loads, decryption of your startup drive begins in the background. The decryption of all disks on the Mac will take some time - you can check progress by entering the FileVault tab in Security & Privacy preferences.
Sign out from your iCloud
Disabling iCloud is a crucial step if you are selling or giving away your laptop. This is also necessary if you are planning to wipe all data from the hard drive. You can skip this step, but we do not recommend that you do.
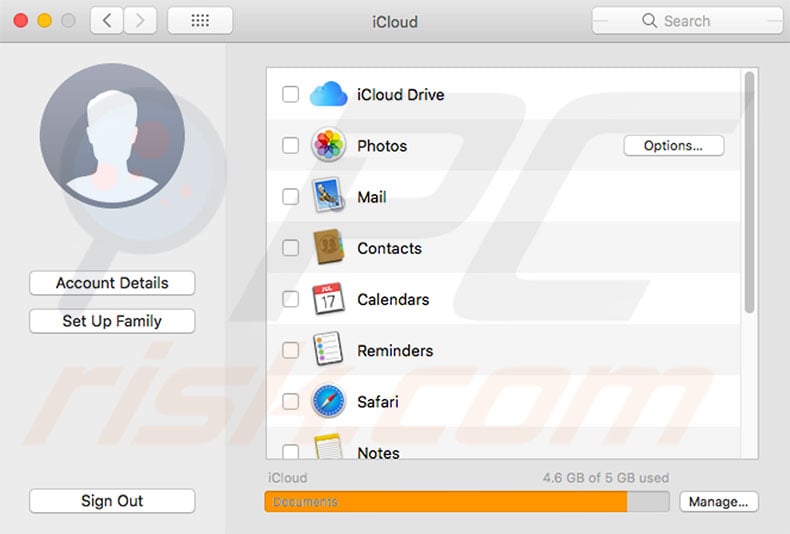
1. Open the Apple menu at the top left of your screen and select System Preferences.
2. Then, choose iCloud and Sign Out.
3. Ensure that you have removed all personal data by selecting Delete From Mac in each pop-up.
All data, such as iCloud contacts, calendar signs, etc., will be wiped from your Mac.
macOS Recovery is a segment of the built-in recovery system. The Utilities menu allows you to fully erase the internal hard drive. If you require a clean and fresh installation of the operating system, you can reinstall macOS to clear all private associations, such as personal data, user accounts, Apple ID, etc.
How to reset your Mac using macOS?
1. Turn on or restart the MacBook, hold down the Option, Command, and R keys until you see the Apple logo, and then release them.
2. When the Utilities window pops up, the startup is complete. Use Disk Utility to wipe your startup and any other internal hard disks.
3. Select your drive name from the sidebar and click Erase.
4. In the format menu, choose Mac OS Extended (unless you are using High Sierra), and above, select APFS.
5. Type a new name for your disk (we recommend leaving the default - Macintosh HD) and click Erase.
Note: this will wipe all data on the disk, including personal files and data.
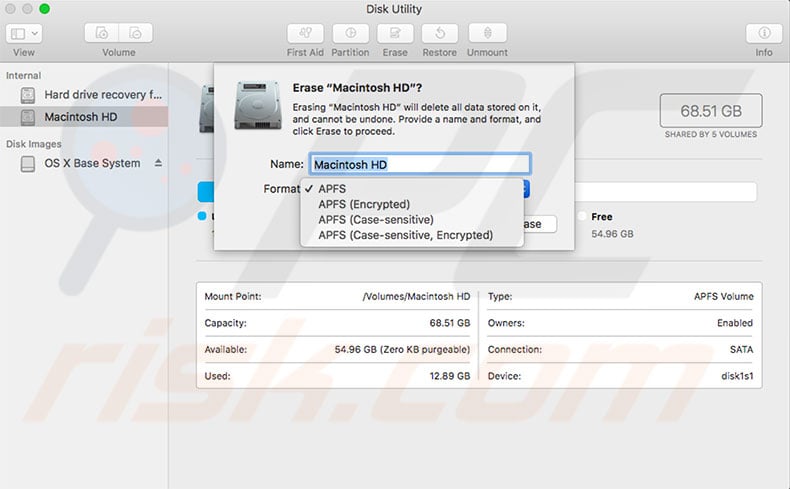
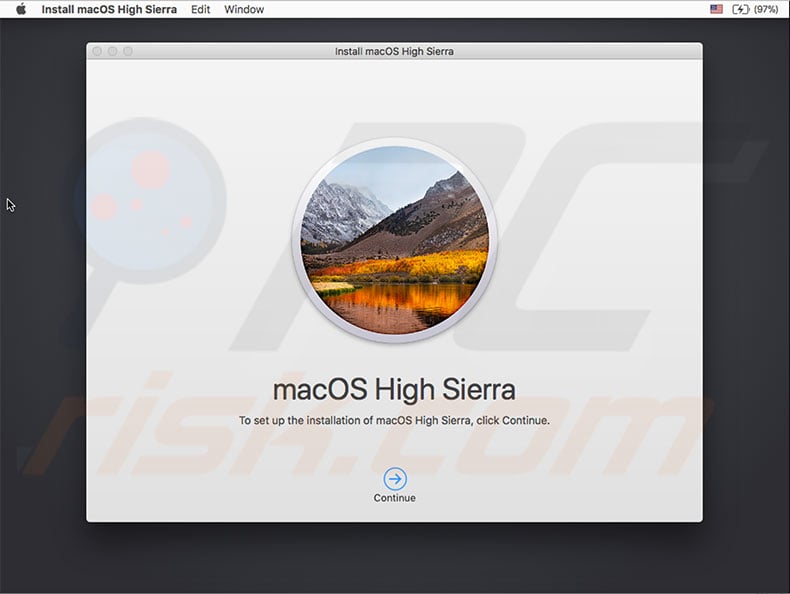
6. Once erasing is complete, return to the recovery menu, select Reinstall macOS, and follow the on-screen instructions.
7. When the Mac completes the installation, it will restart to a set-up assistant. If you are selling/giving away your Mac and wish to leave it in a factory default state, do not follow the assistant - simply press Command and Q, and then click Shut Down. If you are retaining your Mac, follow the assistant and set up your clean system.
Share:

Karolina Peistariene
Author of how-to guides for Mac users
Responsible for collecting, analyzing, and presenting problem-solving solution articles related to macOS issues. Years of macOS experience combined with solid research and analyzing skills help Karolina provide readers with working and helpful solutions as well as introduce various features Mac has to offer.
▼ Show Discussion